eBible Documentation
See Abstract http://mbed.org/users/davervw/notebook/ebible-abstract
See Program http://mbed.org/users/davervw/programs/eBible/lnaue6
eBible
The eBible is an eBook prototype using the mbed microcontroller programmed to navigate the entire King James Version of the Bible, the famous English translation completed 400 years ago in 1611.
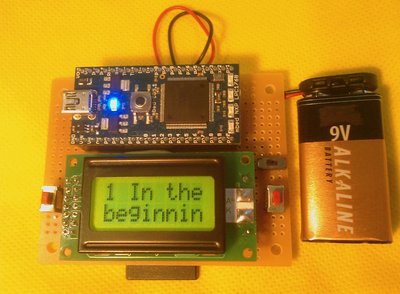
Figure 1 - Prototype
Introduction
With the popularity of eBook devices and software such as Kindle, Nook, iPhone, Android, etc., it is only fitting that an alternative personal book reader is developed from surplus electronic parts. This project cost around ten to fifteen US dollars (not counting the mbed, SD card, and battery) using a small LCD screen, SD card slot, switches, sockets, voltage regulator, circuit board, battery clip, and wires. The only discrete electronic component is the voltage regulator which is necessary to convert the 9V down to 5V for the LCD screen. The SD card stores the greater than 4Mb text file and generated indexes. Most everything else is wires and sockets.
The result is a viewer than can browse a large text file one small screen at a time, and allows easy navigation to any specific location.
Why the Bible? Displaying stories which are thousands of years old, longer than 4 megabyte text file (4,397,206 bytes) on a 16 character screen? This is only two rows of eight characters mind you; this is not one of the more popular 16x2 screens, but only half the size and half the content. Crazy! Absurd! Why, I must try it at once, I thought. And I saw what I created, and it was good. In all seriousness, I have wanted to implement a Bible reader ever since I had my Commodore 64 with the intent of actually reading it too, but the necessary storage wasn’t there, and I never got around to implementing it. After receiving an mbed at the ARM Development Conference in San Jose in late 2010, and hearing about the NXP mbed Design Challenge asking for folks to submit prototypes and libraries, I wanted to be included. I also wanted to implement a usable project and demonstrate to family and friends. The original idea was restored and I followed through on it.
Navigation
What makes the Bible ideal for this application is that its text has been historically divided by scholars into numbered portions around the size of a sentence or two. These book, chapter, and verse divisions allow for browsing to a specific location with ease.
Navigation of the eBible is accomplished with two buttons: left and right. With a quick tap, the text is advanced a screen at a time, to the next contiguous text. Hold down a button for a while (almost a second), and it starts advancing (right) or rewinding (left) by a verse. Hold down the button another second longer and it will traverse to the next or previous chapter. Still held down another second causes it to traverse in chapter increments, followed by book increments (66 books total) after another second, and then another second will be four books at a time increments. In a manner of seconds you can leaf through the Bible from Genesis to Revelations. When navigating in chapter or greater increments, the location is displayed. When navigating in verse or screen increments, the text is displayed. The left and right buttons when held down will advance in a progressively faster increment until reaching the beginning or end of the text, showing the position in the text by book name, chapter, and verse. Letting go for two seconds, the screen will return to the text. If the left or right buttons are tapped before the two seconds is up, the last increment will be advanced without speeding up to the next increment. Navigating to a specific position turns into a series of rewinds, fast forwards, taps, releases, and repeat.
Bookmarks can be saved (or deleted) by holding down both buttons for a few seconds while in text mode. If a bookmark for the current position is not present, it is added; if the bookmark is already present, it is deleted. An LED on the mbed will flash to note that a bookmark change has occurred. Bookmark mode is activating by tapping both buttons while in text mode, allowing navigation forward and backward through favorite verses, leaving the eBible in verse mode. Wait a couple seconds for it to return to text mode before navigating a screen at a time or removing the bookmark.
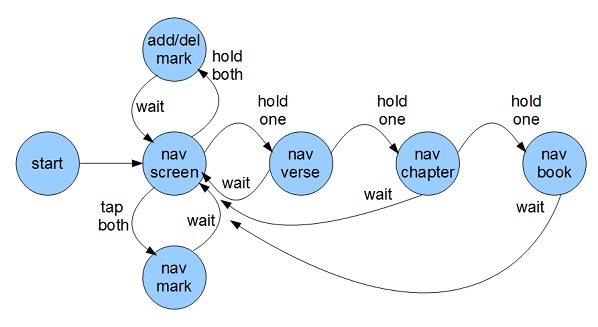
Figure 2 - Navigation State Diagram
Installation requires separately downloading the bible text file (download and decompress the file from http://printkjv.ifbweb.com/AV_txt.zip) to an SD card and name it bible.txt. Powering the unit for the first time, it will start indexing the books, chapters, and verses for a few minutes so it knows what is present, and will provide quick navigation latter. Progress of indexing is shown in a percentage as it scans each of the 66 books in the text file.
How it Works
The hardware is fairly straightforward; connections are made between the various components. The SD (Secure Digital) card socket is connected to one of the mbed’s three sets of designated SPI (Serial Peripheral Interface) pins, plus an extra connection for chip select, and 3.3V power and ground lines. The LCD is Hitachi HD44780 controller compatible backlit display with 8-bit and 4-bit parallel bus, connected with six signal wires plus 5V power and ground. The buttons are momentary contact switches connected to two more of the microcontroller’s pins. The mbed microcontroller was chosen due to its ease of prototyping circuits, and its pre-existing library routines for interfacing with the SD card and LCD screen. Power is supplied to the circuit either by connecting a mini-USB cable from a PC (or other USB power source) directly to the mbed’s included min-USB port, or from another external power source (7-25V) that the added voltage regulator (78M05C) converts to 5V.
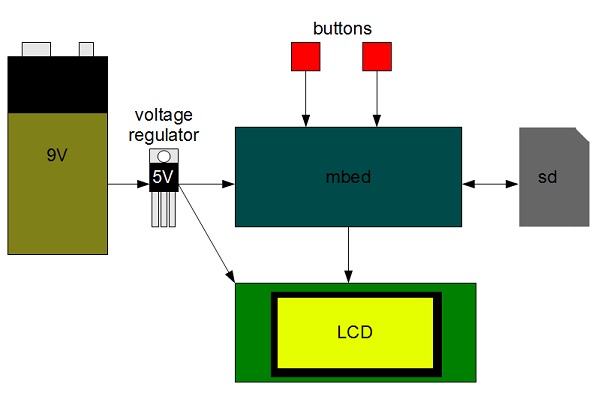
Figure 3 - Hardware Block Diagram
The SD card was chosen to add expandable storage to the mbed. While the mbed has 2Mb flash memory that can be accessed as a file system, it is too small for the full uncompressed Bible text which is over 4Mb. An SD card is effectively a flash memory integrated circuit that can be inserted and removed with ease. Today SD cards are readily available in sizes ranging from 1Gb to 32Gb. These sizes are more than enough for the storage requirements of this project and allow for future expansion.
The LCD was chosen based on its small size, comparable to the mbed, to fit on a circuit board. I chose an 8 column by 2 row display. The next available size (16x2) would double the text displayed while adding another inch in width to the circuit. Most text LCDs are Hitachi HD44780 compatible meaning that the command interface is standardized, and different size displays can be used with minimal software changes. Note that the hardware interface varies slightly including voltage ranges, and may require resistors or trimming resistors so be careful reading those datasheets if swapping parts. Also note that this project utilizes a parallel interface LCD, not one that is serial (SPI or I2C), so be careful purchasing the right part.
One 9-V alkaline battery was chosen as the most readily available power source capable of greater than 7V in a single package. The voltage regulator takes a hit of 1.5 to 2V from the input voltage in converting to 5V, requiring the battery to be 7V or more. The LCD and its backlight is a large drain on this battery, so the battery power option is more for looks, and short duration use; best to use USB power source instead, or use rechargeable batteries instead of constantly buying new batteries.
Source Code
The solution is only as good as its source code. It is composed of some library routines (mbed, SDHCFileSystem, FATFileSystem, TextLCD), custom classes (BibleIO, BibleUI), and a main.cpp.
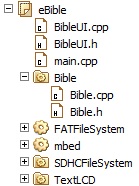
Figure 4 - Source Tree
The main.cpp module glues everything together, initializes the hardware components, initializes the BibleIO object and transfers control to the BibleUI code. BibleIO is written as a published library that can be used by other programs. It is UI independent, responsible for indexing and retrieving the Bible text. This code is designed to be platform agnostic, portable to other systems with just a little work. When a BibleIO object is initialized, the class looks for an index file, and if not present, builds all the indexes for all books, chapters, and verses in the text file. The text file is parsed with specific knowledge of its format, searching for a specific first book name “GENESIS,” how to parse a book name from its long form (THE FIRST BOOK OF MOSES, CALLED GENESIS) into its shorter form (GENESIS), chapters begin with CHAPTER or PSALM, how verses are formatted with numbers preceding them in a single line, and so on. The indexes require an additional 128K on the SD card, saved in a folder called index next to the text file.
class BibleIO
{
public:
    BibleIO(char* text_filename, void (*indexing_callback)(int, void*),
            void* indexing_context);
    ~BibleIO();
    short get_num_books();
    short get_num_chapters(short book);
    short get_num_verses(short book, short chapter);
    char* title();
    char* title_book(short book);
    char* title_chapter(short book, short chapter);
    char* text_chapter(short book, short chapter);
    char* text_verse(short book, short chapter, short verse);
    bool bookmark_add(short book, short chapter, short verse);
    bool bookmark_del(short book, short chapter, short verse);
    bool bookmark_prev(short &book, short &chapter, short &verse);
    bool bookmark_next(short &book, short &chapter, short &verse);
}
Figure 5 – Public API for BibleIO
BibleUI is the mbed and LCD specific GUI presentation layer for navigating the text. It uses BibleIO to retrieve text from one or more verses, appends them together, and word wraps them on the display. It is responsible for checking the buttons and implements how the buttons navigate the text. Debounce logic is included to filter out noise from the buttons. When a physical button is pressed, it is typical for the electric circuit to be broken and completed very quickly a number of times which can cause spurious results. Requiring any press or release to be valid for 25ms effectively reduces this noise.
The mbed online community can publish reusable components and libraries, useful for developing all sorts of software. See http://mbed.org/cookbook/Homepage for a listing of some popular ones including Text LCD and SD Card File System. There is also a good write up of how to attach an LCD to your mbed.
Note that the library SDFileSystem readily found at mbed.org on the Cookbook page may only support only up to 1Gb or 2Gb SD Cards. If you want to use a larger card (up to 32Gb), try the SDHC File System program (http://mbed.org/users/xxll/programs/SDHCFileSystem/) which should support most card sizes. Both of these libraries reference the FatFileSystem library for reading and writing files to the cards. Note that only 8.3 character filenames are supported. I have tested a few various sizes between 32Mb (a small card by today’s standards) and 16Gb. One of my 16Gb cards worked, the other didn’t. As necessary, try different cards until you get one to work with mbed. I chose SDHCFileSystem to use larger cards. A revised copy of SDHCFileSystem is included with eBible to address some compiler warnings.
TextLCD has been revised from the library originally published by mbed staff. I made minor revisions to add support for 8x2 and 40x2 displays. The changes simply define these LCD types, how many rows and columns they have, and how to address to a specific row and column (same code as default case). The changes for the 8x2 display were necessary to support the chosen hardware for this project. The mbed library is included in every program developed with the mbed online compiler. It includes classes for basic objects such as DigitalIn, DigitalOut, SPI, and LocalFileSystem.
Building the Prototype
The prototype was built from a medium sized circuit board (3.25”x2.5”) with 0.1” spaced holes and copper pads on one side, with two 20x1 socket headers for the mbed, one 2x7 socket header for the LCD power/control lines, and a 1x8 socket header for stability of the LCD and its backlight LED power lines, one SD socket, two momentary switches, and a 78M05C voltage regulator. The sockets were spaced appropriately for the mbed microcontroller, and LCD screen. Header pins were soldered into the LCD screen’s own circuit board to mate with the sockets. Sockets, switches, voltage regulator, and SD card were soldered into place. Wiring was completed on the back of the circuit board to complete the circuit between the components. Color coded wires were used based on function: red for power, black for ground, white for SD, yellow for LCD, green for switches.
The SD card slot was the trickiest to install. I could only find surface mount SD card slots, and picked one that looked like it could be hand soldered. The pins were manually bent to insert into the circuit board holes, and then soldered in place on the bottom of the circuit board to wires routes on the top of the circuit board. I had to be careful to keep the solder and wire ends from poking too far out the bottom of the circuit board, so the SD card will have room to slide in and out of the slot without interference from these connections. In those cases where the solder or wire protruded too far down, I used the soldering iron to melt the solder and push the wire through the board to reduce the clearance. I also bent and soldered some other tabs/pins around the SD card to help secure it in place to the circuit board.
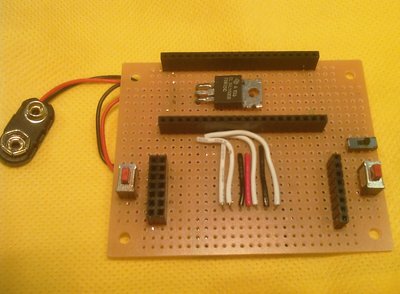
Figure 6 - Top view of bare circuit
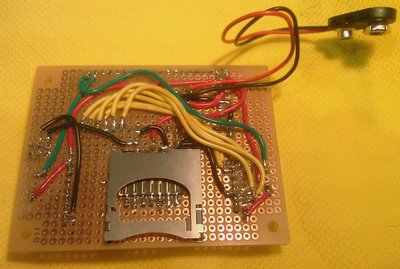
Figure 7 - Bottom view of bare circuit
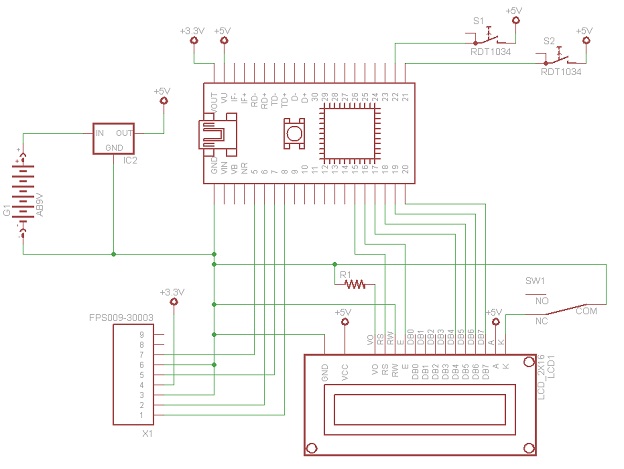
Figure 8 - Schematic
I had this 8 column by 2 row (16 characters total) screen I found in an electronics surplus shop for a few bucks that seemed absolutely absurdly small. I bought this tiny one on a whim to add to my collection of a 16x2, 40x2, and 20x4 screens. My theory was to buy different screens just in case I couldn’t get any but one to work. I have a development board for another CPU vendor and was fascinated by the ability to display text right on the device. I was interested in replicating this capability in my own circuits. Finding the already written LCDText library demonstrated online in the mbed cookbook, I sped off to try it with the various screens. Each one worked! The smallest screen was chosen for physical fit in the circuit.
Summary
There you have it. Lots of storage has been added to the mbed, and a tiny little screen to display information. I would recommend replacing the screen with a 16x2 which is more usable and easier to obtain. If you use plan to use this frequently, look for buttons that are easy on the fingers. This solution can be used as is, or reused for monitoring applications where logging and display is useful. Create an enclosure for portability and security of the parts. Add a USB A host jack and you can interface with thumb drives, USB keyboard, mouse, bluetooth, and other real world hardware. Or sit down and read a Bible story. “David and Goliath” starts at 1 Samuel (eight books past Genesis), Chapter 17, Verse 1 (displayed 1 Samuel 17:1).
1 comment on eBible Documentation:
Please log in to post comments.


Good job!!
Still, I prefer my hard-copy. Can you put a search tool on there too? JK, that would be pushing the 2-button control pretty hard.
Quinton Wideman