Shield Design Guide
Many development boards for sensors and microcontrollers have adopted the Arduino Uno R3 header configuration. There are plenty of derivatives to this but some commonality does exist. When designing a Shield whether it be for a MCU (target) or a sensor/radio/peripheral (device) using the following guidelines will ensure the most cross-target and cross-device compatibility.
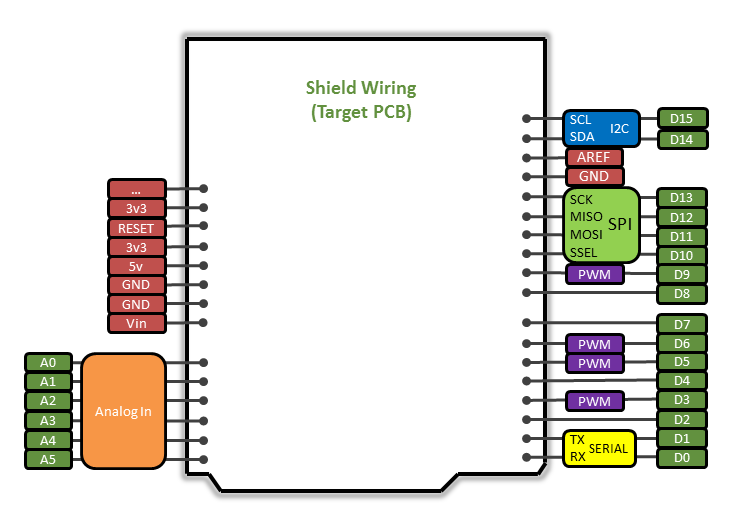
Wiring Diagram

Peripheral Mapping
All labeled from the targets perspective
| Peripheral | Peripheral Function | Pin Name |
|---|---|---|
| I2C | SCL | D15 |
| SDA | D14 | |
| SPI | SCK | D13 |
| MISO | D12 | |
| MOSI | D11 | |
| SSEL | D10 | |
| Serial | RX | D0 |
| TX | D1 | |
| PWM | Output | D3, D5, D6, D9 |
| Analog | Input | A0, A1, A2, A3, A4, A5 |
| Digital | IO | D2, D4, D7, D8 |
Target Implementation
- Avoid wiring a single MCU pin to multiple breakout headers
- SDK should resolve names to MCU specific pins (PinNames.h)
- A0 ... A5
- D0 ... D15
- I2C_SCL ... I2C_SDA
- Order of prescience for IO is 0 ... 13 (analog and digital). If not enough pins are available, connect starting at 0
- Female headers installed on topside of PCB
- All digital pins should be gpio interrupt capable (InterruptIn implementation)
Component Implementation
- Serial TX and RX need to be swapped
- SPI MISO and MOSI need to be swapped
- Provide a well documented C++ library for all on board components
- Provide a well documented demo application that uses the provided libraries in a simple but meaningful way
- Test you design on as many platforms as possible and document known incompatibilities. These should be the minority and easier to maintain
- Pass through male to female headers should be installed on PCB. Example
- Silk screen on the PCB should clearly indicate if a pins is consumed by the shield or is shareable with other components