You are viewing an older revision! See the latest version
esp8266 mbed setup and control
ESP8266 setup to talk to an mbed
The esp 8266 is a very handy little WiFi module that you can get hold of for a few $ via ebay.

There's a really good wiki page at https://developer.mbed.org/users/4180_1/notebook/using-the-esp8266-with-the-mbed-lpc1768/ with information on how to connect it to an lpc1768 and two test codes.
Whilst playing with this we found it fairly useful to be able to interact with the units via a terminal. In general this is a very good way to check out what it does and get a feel for how the unit behaves.
Our modified terminal passthrough code is here
Using this program you can manually enter the AT commands and observe the responses required to get your esp linked onto a WiFi network and even, somewhat laboriously, send messages to a server.
Power
The ESP8266 is a bit of current hog - it can require up to 150mA from the 3.3V supply so generally will not run from an mbeds own regulators (at least its not very reliable when we've tried it here).
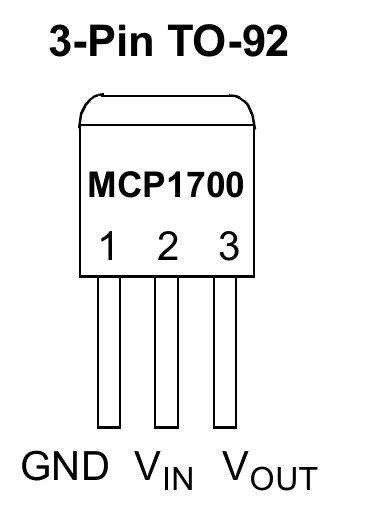
Instead a small 3.3V reg running from the 5V USB supply suffices to get it running happily. Something like this seems to work:

NB we now have th MCP1700-330 whose pinout is slightly different. check the MCP website for details at
http://ww1.microchip.com/downloads/en/DeviceDoc/20001826C.pdf

You can also put an led and resistor in series across the 3.3v to see if there is any voltage dropout when the unit is transmitting.
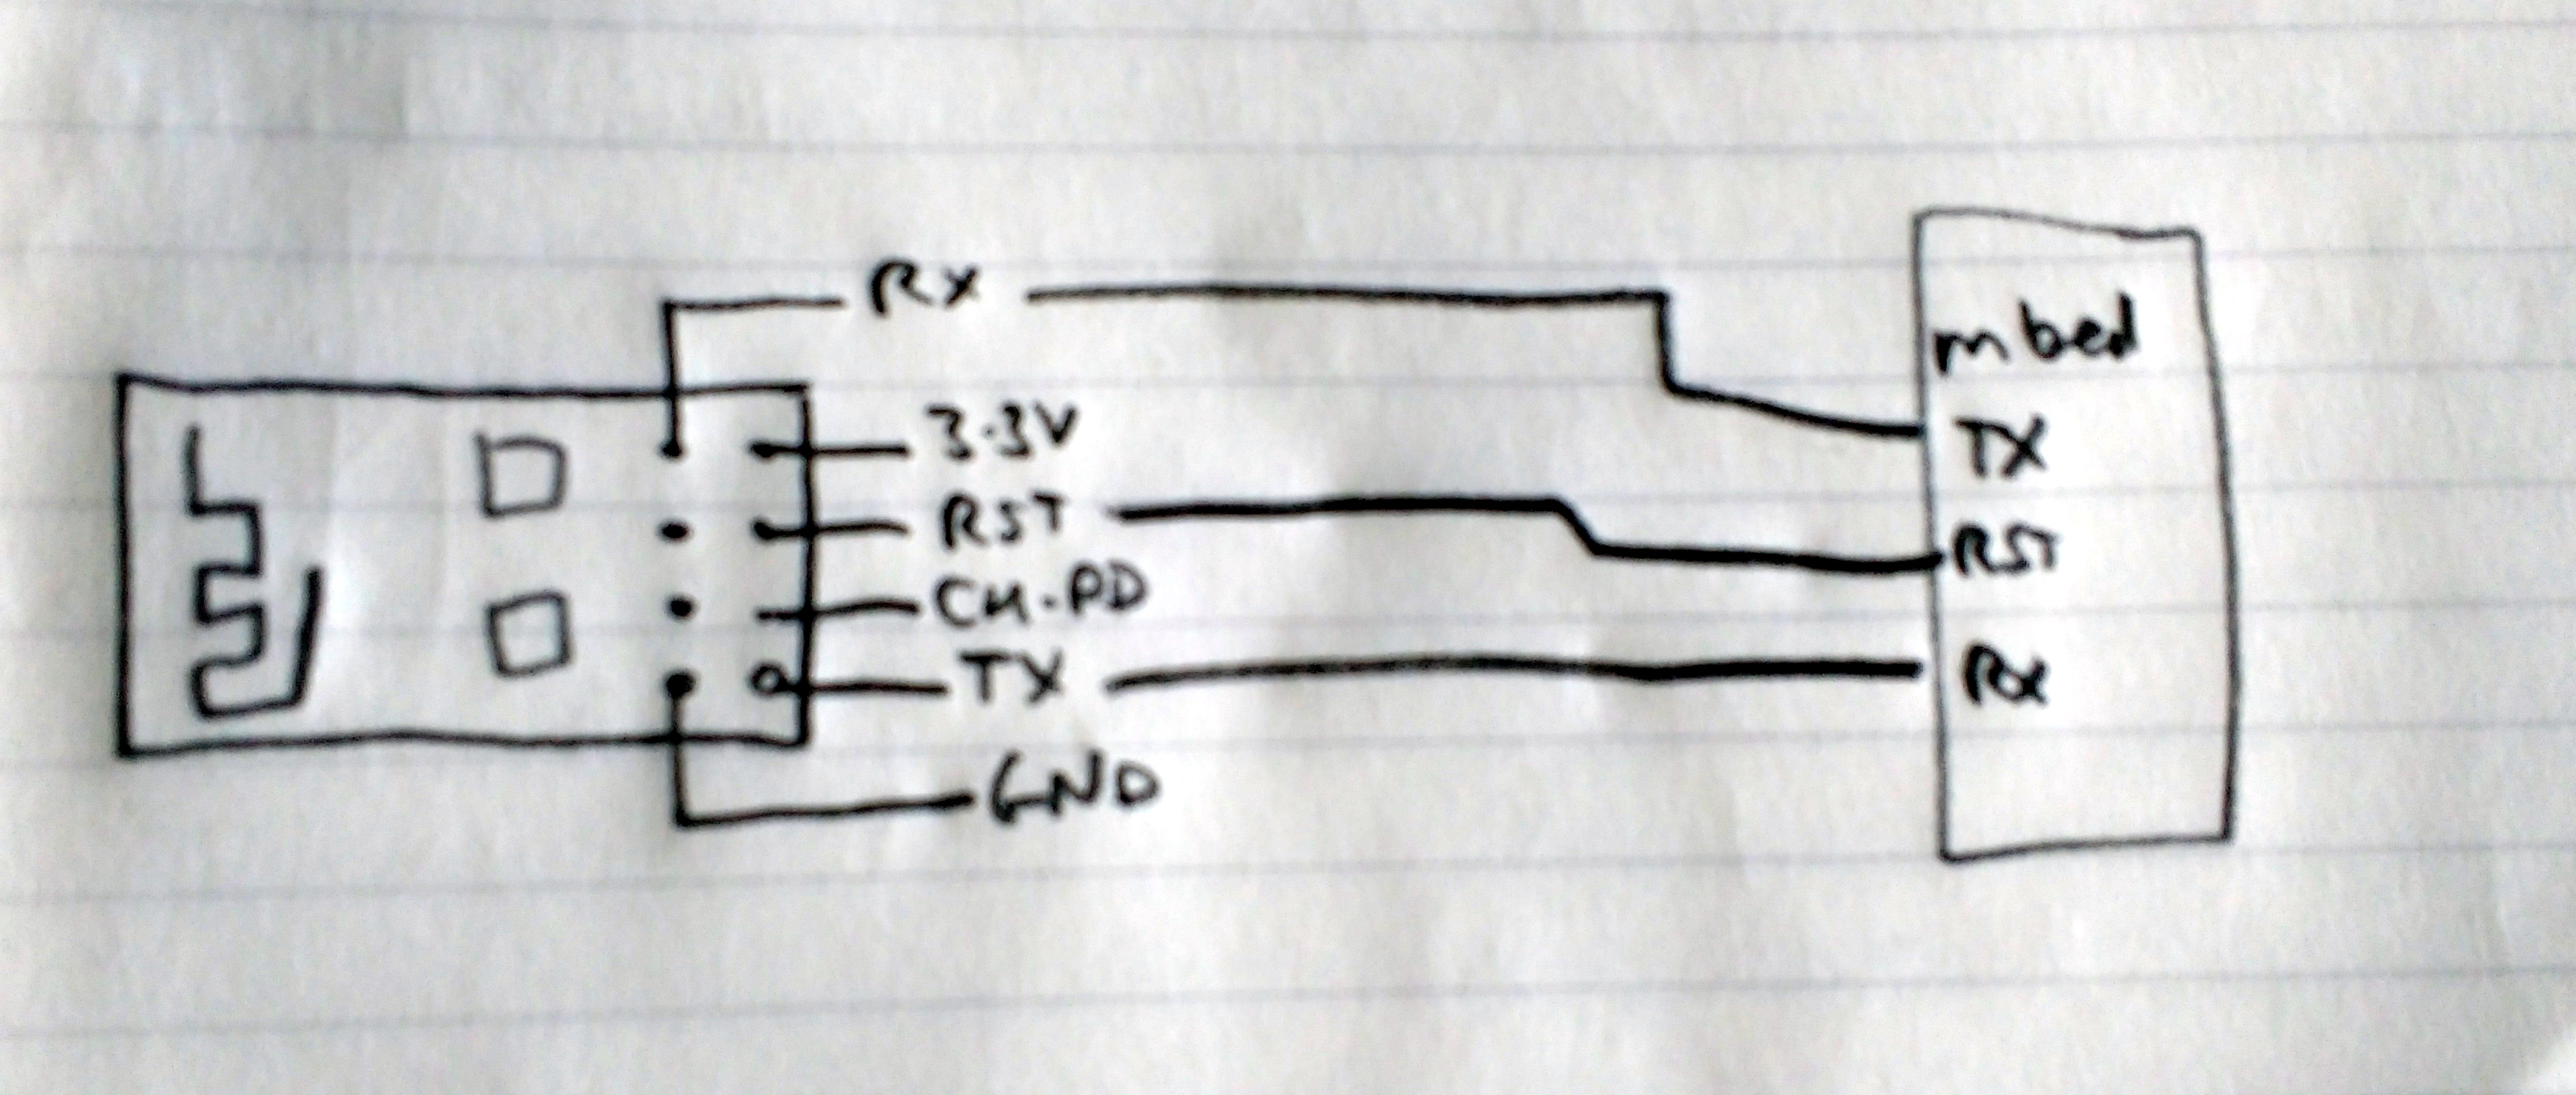
The mbed connections look like this (its a top view of the esp8266 here)
 NB you will need to connect the CH-PD pin high to power up the ESP8266. Sometimes this results in such a drain of power as the ESP turns on that the supply can't cope. Hence if you have any problems check the power first.
Once you've got your ESP8266 connected and powered the simple terminal program above can be really useful.
To get your esp running, upload the code and plug everything in.
Start a terminal and conect it to the mbed (for our linux boxes that's generally something like
sudo screen /dev/ttyACM0 115200
where the sudo is required otherwise you can't access the usb ports...
now the fun starts.
you'll probably get some kind of junk coming up on the screen straight away depending on what the esp unit was setup for last time.
to test it out try typing this : AT the board should reply as soon as you push enter with OK
this AT is the attention command that is required as a prefix to any command sent.
send it a few times to check.
Now to get the unit setup properly.
Reset
send the following: AT+RST this resets the esp8266 and reads back lots of information about it. The response should be something like this:
AT+RST
OK
ets Jan 8 2013,rst cause:2, boot mode:(3,7)
load 0x40100000, len 1396, room 16
tail 4
chksum 0x89
load 0x3ffe8000, len 776, room 4
tail 4
chksum 0xe8
load 0x3ffe8308, len 540, room 4
tail 8
chksum 0xc0
csum 0xc0
2nd boot version : 1.4(b1)
SPI Speed : 40MHz
SPI Mode : DIO
SPI Flash Size & Map: 8Mbit(512KB+512KB)
jump to run user1 @ 1000
�n't use rtc mem data
r��rl���
Ai-Thinker Technology Co.,Ltd.
ready
Set the mode
ok now set the mode (we want client at the moment) - this means that the wifi module will connect to our router as opposed to becoming a router in its own right...
AT+CWMODE=1
which will reply with
OK
Connect the unit
Now to get the unit online;
send this to login to the wifi unit named CWMWIFI with password CWM2016TT
AT+CWJAP="CWMWIFI",CWM2016TT"
there will be a slight delay and then a response which is hopefully
WIFI CONNECTED
WIFI GOT IP
OK
if it goes wrong you'll get
ERROR
If all has gone well you are now online.
Find the IP address
It's handy to know what IP address you've ben given so to find out send
AT+CIFSR
Reply will be:
+CIFSR:STAIP,"192.168.1.4"
+CIFSR:STAMAC,"5c:cf:7f:1c:0e:ff"
So at this point the esp8266 is registerd on the network and you can now really start testing.
There are two options now: Either you want to be a server or a client.
Server Setup
To setup as a server that will respond to requests sent to port 8080 (you can probably choose any in our case but your router / firewall can limit the options sometimes) :
set the unit to multiple connections
AT+CIPMUX=1
which should respond with
OK
then
AT+CIPSERVER=1,8080
which should also respond with
OK
What this has done is tell the esp8266 to become a server and accept connections on port 8080. Now if another unit connects to this one (see later) you;ll get a response and be able to respond.
Client Setup
This is what to do for a unit tat's going to talk to a server:
set the unit to multiple connections
AT+CIPMUX=1
which should respond with
OK
so far so good (and the same as the other version)
now to open a connection to our server using connection 4 (there are 5 to choose from thats the point of the multiple connections option above)
to a server whose IP address is 192.168.1.4 and is open to connections on port 8080
AT+CIPSTART=4,"TCP","192.168.1.4",8080
after which you are hoping for something like
OK
CONNECTED
although some seems to reply with LINKED
if something goes wrong then you get
ERROR
4,CLOSED
assuming that you got a link you can now send a message: To send the text "Quick Brown Fox" you do this:
AT+CIPSEND=4,14
where the number 4 denotes the connection to send to and the number 14 tells the system how many bytes you want to send.
the response to this should be
>
and at this point you can just type the message
Quick Brown Fox
as soon as you type the 14th character("x") the message will be sent
Other useful info
- if you send a command to the esp8266 too soon then it will fail and the unit returns
busy p... - If you server times out you can extend its timeout time by sending AT+CIPSTO=xxxx where xxxx is a number between 0 and 7200 and is equal to the timeout delay. by default this is only 180s when you first use the esp8266 whihc is a little short. if you want your connection kept alive then extend this. if the number xxxx=0 the timeout is infinity but this is potentially problematic in some situations.
Example communication
AT+CIPSTART=4,"TCP","192.168.1.3",8080
4,CONNECT
OK
AT+CIPSEND=4,14
OK
> The Quick Fox
Recv 14 bytes
SEND OK
server response
+IPD,4,5:?The Quick Fox
Talking to the internet
Its possible, once the wifi is running that you would want to talk to websites over the wider internet. First one needs a wifi router thats on the web of course but assuming that this is available you can connect your esp to it and then make connections to the wider world.
First you need to tell your esp to make a connection to the website you want. This assumes you already logged into the wifi on it etc.
This example will get the time in JSON format. See http://www.jsontest.com/#date for more details.
We will use a single connection.
AT+CIPMUX=0
AT+CIPSTART="TCP","time.jsontest.com",80
This should reply with something encouraging like CONNECTED or LINKED
Now the fun starts - web servers will not reply to you unless you correctly terminate your commands. If you just send some bytes to one it will generally ignore you unless the end of the command string is terminated with <CR><LF><CR><LF> - yes thats right - twice.
The string you need to send is
GET / HTTP/1.1
host: time.jsontest.com
<CR><LF><CR><LF>
