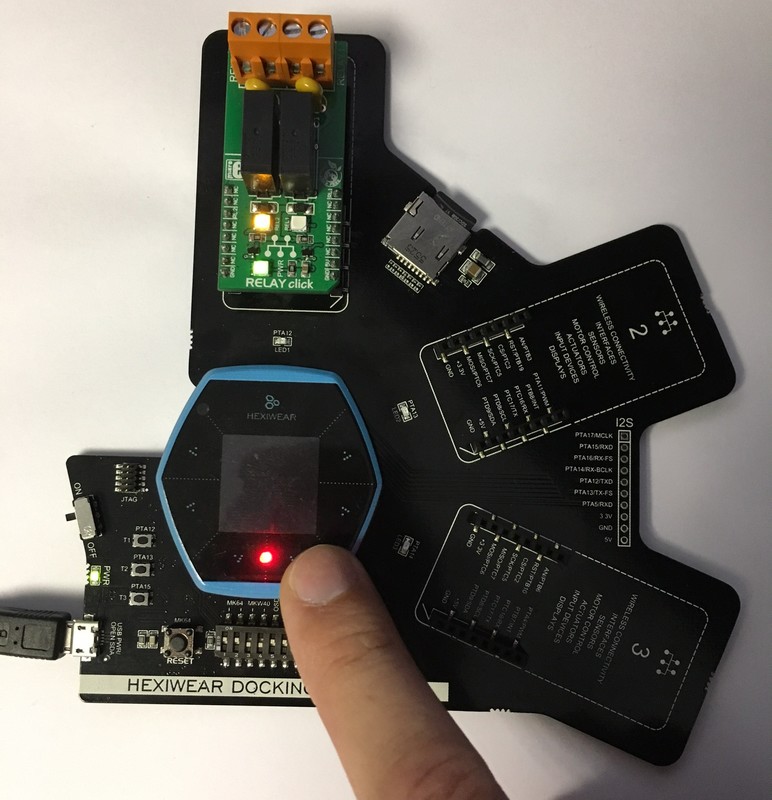
Click Relay example for Hexiwear featuring Touch buttons and Haptic feedback
Dependencies: Hexi_KW40Z
This project demonstrates the use of the Mikroelektronika Click Relay module with hexiwear featuring the Touch buttons and Haptic feedback
Plug Hexiwear into the Docking Station and the RELAY Click to the Click Socket 1
Connect the USB cable to your computer and to the micro-USB port of the Docking Station
Compile the project and copy the binary "Hexi_Click_Relay-v2_Example_HEXIWEAR.bin" in the DAP-LINK drive from your computer file explorer
Press the K64F-RESET button on the docking station to start the program on your board
Touch the left or right electrodes/buttons located below the screen to control the relay 1 or 2
Haptic motor will vibrate to acknowledge that a touch command has been received
RGB LED will briefly turn orange for Relay 1 and red for Relay 2 position change.

main.cpp@0:a9a4819ff9dc, 2016-09-20 (annotated)
- Committer:
- GregC
- Date:
- Tue Sep 20 21:16:44 2016 +0000
- Revision:
- 0:a9a4819ff9dc
Click Relay example for Hexiwear featuring Touch buttons and Haptic feedback
Who changed what in which revision?
| User | Revision | Line number | New contents of line |
|---|---|---|---|
| GregC | 0:a9a4819ff9dc | 1 | #include "mbed.h" |
| GregC | 0:a9a4819ff9dc | 2 | #include "Hexi_KW40Z.h" |
| GregC | 0:a9a4819ff9dc | 3 | |
| GregC | 0:a9a4819ff9dc | 4 | #define LED_ON 0 |
| GregC | 0:a9a4819ff9dc | 5 | #define LED_OFF 1 |
| GregC | 0:a9a4819ff9dc | 6 | |
| GregC | 0:a9a4819ff9dc | 7 | void StartHaptic(void); |
| GregC | 0:a9a4819ff9dc | 8 | void StopHaptic(void const *n); |
| GregC | 0:a9a4819ff9dc | 9 | |
| GregC | 0:a9a4819ff9dc | 10 | DigitalOut relay1(PTA10); |
| GregC | 0:a9a4819ff9dc | 11 | DigitalOut relay2(PTC4); |
| GregC | 0:a9a4819ff9dc | 12 | |
| GregC | 0:a9a4819ff9dc | 13 | DigitalOut redLed(LED1); |
| GregC | 0:a9a4819ff9dc | 14 | DigitalOut greenLed(LED2); |
| GregC | 0:a9a4819ff9dc | 15 | DigitalOut blueLed(LED3); |
| GregC | 0:a9a4819ff9dc | 16 | DigitalOut haptic(PTB9); |
| GregC | 0:a9a4819ff9dc | 17 | |
| GregC | 0:a9a4819ff9dc | 18 | /* Define timer for haptic feedback */ |
| GregC | 0:a9a4819ff9dc | 19 | RtosTimer hapticTimer(StopHaptic, osTimerOnce); |
| GregC | 0:a9a4819ff9dc | 20 | |
| GregC | 0:a9a4819ff9dc | 21 | /* Instantiate the Hexi KW40Z Driver (UART TX, UART RX) */ |
| GregC | 0:a9a4819ff9dc | 22 | KW40Z kw40z_device(PTE24, PTE25); |
| GregC | 0:a9a4819ff9dc | 23 | |
| GregC | 0:a9a4819ff9dc | 24 | void ButtonLeft(void) |
| GregC | 0:a9a4819ff9dc | 25 | { |
| GregC | 0:a9a4819ff9dc | 26 | StartHaptic(); |
| GregC | 0:a9a4819ff9dc | 27 | |
| GregC | 0:a9a4819ff9dc | 28 | redLed = LED_ON; |
| GregC | 0:a9a4819ff9dc | 29 | greenLed = LED_ON; |
| GregC | 0:a9a4819ff9dc | 30 | blueLed = LED_OFF; |
| GregC | 0:a9a4819ff9dc | 31 | |
| GregC | 0:a9a4819ff9dc | 32 | relay2 = !relay2; |
| GregC | 0:a9a4819ff9dc | 33 | } |
| GregC | 0:a9a4819ff9dc | 34 | |
| GregC | 0:a9a4819ff9dc | 35 | void ButtonRight(void) |
| GregC | 0:a9a4819ff9dc | 36 | { |
| GregC | 0:a9a4819ff9dc | 37 | StartHaptic(); |
| GregC | 0:a9a4819ff9dc | 38 | |
| GregC | 0:a9a4819ff9dc | 39 | redLed = LED_ON; |
| GregC | 0:a9a4819ff9dc | 40 | greenLed = LED_OFF; |
| GregC | 0:a9a4819ff9dc | 41 | blueLed = LED_OFF; |
| GregC | 0:a9a4819ff9dc | 42 | |
| GregC | 0:a9a4819ff9dc | 43 | relay1 = !relay1; |
| GregC | 0:a9a4819ff9dc | 44 | } |
| GregC | 0:a9a4819ff9dc | 45 | |
| GregC | 0:a9a4819ff9dc | 46 | void StartHaptic(void) |
| GregC | 0:a9a4819ff9dc | 47 | { |
| GregC | 0:a9a4819ff9dc | 48 | hapticTimer.start(75); |
| GregC | 0:a9a4819ff9dc | 49 | haptic = 1; |
| GregC | 0:a9a4819ff9dc | 50 | } |
| GregC | 0:a9a4819ff9dc | 51 | |
| GregC | 0:a9a4819ff9dc | 52 | void StopHaptic(void const *n) { |
| GregC | 0:a9a4819ff9dc | 53 | haptic = 0; |
| GregC | 0:a9a4819ff9dc | 54 | hapticTimer.stop(); |
| GregC | 0:a9a4819ff9dc | 55 | redLed = LED_OFF; |
| GregC | 0:a9a4819ff9dc | 56 | greenLed = LED_OFF; |
| GregC | 0:a9a4819ff9dc | 57 | blueLed = LED_OFF; |
| GregC | 0:a9a4819ff9dc | 58 | } |
| GregC | 0:a9a4819ff9dc | 59 | |
| GregC | 0:a9a4819ff9dc | 60 | int main() |
| GregC | 0:a9a4819ff9dc | 61 | { |
| GregC | 0:a9a4819ff9dc | 62 | redLed = LED_OFF; |
| GregC | 0:a9a4819ff9dc | 63 | greenLed = LED_OFF; |
| GregC | 0:a9a4819ff9dc | 64 | blueLed = LED_OFF; |
| GregC | 0:a9a4819ff9dc | 65 | /* Register callbacks to application functions */ |
| GregC | 0:a9a4819ff9dc | 66 | kw40z_device.attach_buttonLeft(&ButtonLeft); |
| GregC | 0:a9a4819ff9dc | 67 | kw40z_device.attach_buttonRight(&ButtonRight); |
| GregC | 0:a9a4819ff9dc | 68 | |
| GregC | 0:a9a4819ff9dc | 69 | while (true) { |
| GregC | 0:a9a4819ff9dc | 70 | Thread::wait(500); |
| GregC | 0:a9a4819ff9dc | 71 | } |
| GregC | 0:a9a4819ff9dc | 72 | } |
| GregC | 0:a9a4819ff9dc | 73 | |
| GregC | 0:a9a4819ff9dc | 74 |