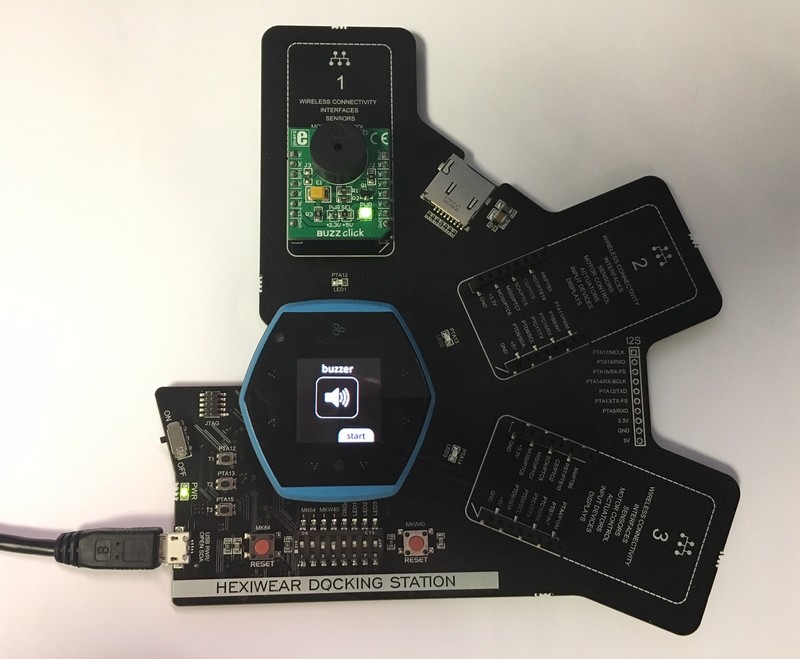
Advanced Click Buzzer example for Hexiwear featuring OLED Display and Touch
Dependencies: Hexi_KW40Z Hexi_OLED_SSD1351 PWM_Tone_Library
This project demonstrates the use of the Mikroelektronika Click Buzzer module with hexiwear featuring Display and Touch
Plug Hexiwear into the Docking Station and the BUZZER Click to the Click Socket 1
Connect the USB cable to your computer and to the micro-USB port of the Docking Station
Compile the project and copy the binary "Hexi_Click_Buzzer_Example-v2_HEXIWEAR.bin" in the DAP-LINK drive from your computer file explorer
Press the K64F-RESET button on the docking station to start the program on your board
Touch the Hexiwear Electrode located on the right below to the start icone
The buzzer will start play a melody of 32 tones

Diff: main.cpp
- Revision:
- 0:ac3116125c60
--- /dev/null	Thu Jan 01 00:00:00 1970 +0000
+++ b/main.cpp	Fri Oct 07 22:43:31 2016 +0000
@@ -0,0 +1,93 @@
+#include "mbed.h"
+#include "pwm_tone.h"
+#include "Hexi_OLED_SSD1351.h"
+#include "images.h"
+#include "Hexi_KW40Z.h"
+
+// Pin connections
+PwmOut Buzzer(PTA10);                               // Define the Buzzer Pinout (PWM Out)
+SSD1351 oled(PTB22,PTB21,PTC13,PTB20,PTE6, PTD15);  // SSD1351 OLED Driver (MOSI,SCLK,POWER,CS,RST,DC)
+KW40Z kw40z_device(PTE24, PTE25);                   // Instantiate the Hexi KW40Z Driver (UART TX, UART RX)
+
+// Variables
+float C_3 = 1000000/Do3,
+       Cs_3 = 1000000/Do3s,
+       D_3 = 1000000/Re3,
+       Ds_3 = 1000000/Re3s,
+       E_3 = 1000000/Mi3,
+       F_3 = 1000000/Fa3,
+       Fs_3 = 1000000/Fa3s,
+       G_3 = 1000000/So3,
+       Gs_3 = 1000000/So3s,
+       A_3 = 1000000/La3,
+       As_3 = 1000000/La3s,
+       B_3 = 1000000/Ti3,
+       C_4 = 1000000/Do4,
+       Cs_4 = 1000000/Do4s,
+       D_4 = 1000000/Re4,
+       Ds_4 = 1000000/Re4s,
+       E_4 = 1000000/Mi4,
+       F_4 = 1000000/Fa4,
+       Fs_4 = 1000000/Fa4s,
+       G_4 = 1000000/So4,
+       Gs_4 = 1000000/So4s,
+       A_4 = 1000000/La4,
+       As_4 = 1000000/La4s,
+       B_4 = 1000000/Ti4,
+       C_5 = 1000000/Do5,
+       Cs_5 = 1000000/Do5s,
+       D_5 = 1000000/Re5,
+       Ds_5 = 1000000/Re5s,
+       E_5 = 1000000/Mi5,
+       F_5 = 1000000/Fa5,
+       Fs_5 = 1000000/Fa5s,
+       G_5 = 1000000/So5,
+       Gs_5 = 1000000/So5s,
+       A_5 = 1000000/La5,
+       As_5 = 1000000/La5s,
+       B_5 = 1000000/Ti5;
+int tones[] = {E_4, D_4, C_4, D_4, E_4, E_4, E_4, 0, D_4, D_4, D_4, 0, E_4, G_4, G_4, 0, E_4, D_4, C_4, D_4, E_4, E_4, E_4, 0, D_4, D_4, E_4, D_4, C_4, 0, 0, 0};
+int tones_num = 32; // Auto performance
+int i;
+const uint8_t *image1; // Pointer for the image to be displayed
+
+void ButtonLeft(void)
+{
+    Tune(Buzzer, E_4, 4);  //4 Octave E beat 4/16
+}
+
+void ButtonRight(void)
+{
+    Tune(Buzzer, C_4, 4);  //4 Octave C beat 4/16
+    wait_ms(250);
+    Tune(Buzzer, D_4, 4);  //4 Octave D beat 4/16
+    wait_ms(250);
+    Tune(Buzzer, E_4, 4);  //4 Octave E beat 4/16
+    wait_ms(250);
+
+    for(i=0; i<tones_num; i++)
+    {
+        Auto_tunes(Buzzer, tones[i], 4); // Auto performance
+        Stop_tunes(Buzzer);
+    }
+}
+
+
+
+// main() runs in its own thread in the OS
+// (note the calls to Thread::wait below for delays)
+int main()
+{
+    kw40z_device.attach_buttonLeft(&ButtonLeft);
+    kw40z_device.attach_buttonRight(&ButtonRight);
+
+
+    image1  = Buzzer96;            // Setting pointer location of the 96 by 96 pixel bitmap
+    oled.DrawImage(image1,0,0);     // Fill 96px by 96px Screen with 96px by 96px NXP Image starting at x=0,y=0
+
+    while (true)
+    {
+        Thread::wait(500);
+    }
+}
+