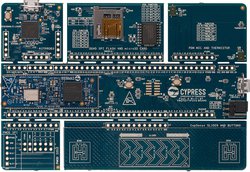
PSoC 6 Wi-Fi BT Prototyping Kit
The PSoC® 6 Wi-Fi BT Prototyping Kit (CY8CPROTO-062-4343W) is a low-cost hardware platform that enables design and debug of PSoC 62 MCUs and the Murata LBEE5KL1DX Module (CYW4343W WiFi + Bluetooth combo chip).
Overview
The PSoC 6 Wi-Fi BT Prototyping Kit is a low-cost hardware platoform, designed for users to develop next-generation Internet of Things (IoT) applications quickly. It comes with the PSoC 62 MCU, which provides IoT developers with an ultra-low power, flexible and secure MCU architecture. User's can choose from the various combinations of power, performance and peripherals provided by the PSoC 62 MCU architecture, to enable features such as extended battery life, small form factors, and security for connected devices. This kit also comes with a Murata LBEE5KL1DX Module (based on the CYW4343W), which provides robust and reliable Wi-Fi AND Bluetooth connectivity in one chip.
The PSoC 6 Wi-Fi BT Prototyping Kit provides Digilent Pmod™ compatible headers, comes with an on-board debugger/programmer (KitProg) to easily debug and program the target device, and a snap-away form factor to independently use the different hardware peripherals provided with this kit. In addition, software libraries and code examples are provided to help user's along with their development process.
MCU Features
-
CY8C624ABZI-D44 in 124-BGA package
- Dual-core: Arm® Cortex®-M4 w/ FPU @ 150-MHz & Arm® Cortex®-M0+ @ 100-MHz
- Up to 1MB Flash and 512Kb SRAM
- User-selectable core logic operation at either 1.1-V or 0.9-V
- Inter-processor communication (IPC) support in HW
- Low-power 1.7-V to 3.6-V operation
- Cortex-M4 can run as low as 22-μA/MHz in a low-power active mode
- Cortex-M0+ can run as low as 15-μA/MHz in a low-power active mode
- Cryptography accelerators
- Industry-leading CapSense® capacitive-sensing block
- FS-USB (Host/Device)
- 3x DMA controllers (2x 29 channels, 1x 4 channels)
- 13x Serial Communication Blocks (SCBs), configurable as I2C/SPI/UART (see data sheet for details)
- 2x Secure Digital High Capacity (SDHC) blocks
- 32x Timer/Counter/Pulse Width Modulator (TCPWM)
- 2x PDM-PCM channels
- 2x I2S channels
- 2x Low-power comparators
- 1x 12-bit SAR ADC (1-Msps)
- Execute-in-place (XIP) QSPI Interface (supports 1, 2, 4 and dual-quad interfaces)
- Up to 104 user accessible GPIO
Kit Features
-
PSoC 6 WiFi-BT Prototyping Kit:
- CY8CMOD-062-4343W Daughter Card that includes:
- PSoC 62 MCU with up to 2MB Flash, 1MB SRAM, and 104 GPIO
- Murata LBEE5KL1DX Wi-Fi/BT combo module
- On-board 512Mb QSPI NOR Flash Memory
- CapSense touch slider, buttons and proximity sensor
- On-board debugger/programmer (KitProg)
- Digilent Pmod interface
- 2x PDM-PCM microphone
- Temperature sensor
- microSD card socket
- CY8CMOD-062-4343W Daughter Card that includes:
Board Block Diagram

Board Pinout

For the full schematic of the PSoC 6 Wi-Fi BT Prototyping Kit, click PSoC 6 Wi-Fi BT Prototyping Kit Schematic.
Important Notice
Important Notes
- There is a known issue with projects built for this platform with IAR compiler and Mbed OS 5.11.4. Please use Mbed OS 5.11.5-alpha or later.
- An update to the debug interface is necessary to use the Mbed tools. See Board Setup section below.
- This target does not support the LittleFileSystem implementation. Please use LittleFileSystem2 documented here. https://github.com/ARMmbed/mbed-os/tree/latest/storage/filesystem/littlefsv2
Board Setup
- Use the USB lead to connect your Mbed to a PC. The status light will come on, indicating it has power.
- Check if kit is in CMSIS-DAP mode LED1 (POWER) and LED2 (STATUS) as shown in the image below, LED2 can be blinking or solid.

- Download the fw-loader from Cypress Semiconductor Github.
- Execute the following command in command line,
fw-loader.exe --update-kp3. If the connected kit is not detected after executing this command, please enter into bootloader mode by holding down the "Mode Select" button (SW3) before plugging in the board. Then run the fw-loader.exe again. - After command is executed successfully please press the SW3 Mode button for 3 seconds and release.
- Kit should now be connected in DAPLink mode as shown in the image below (LED1 should glow).

Getting Started with Mbed OS
1. Connect your microcontroller to a PC
Use the USB lead to connect your Mbed to a PC. The status light will come on, indicating it has power. After a few seconds of activity, the PC will recognise the Mbed Microcontroller as a standard USB drive.
 |  |
| Windows 10 example | Mac OS X example |
2. Click the MBED.HTM link to get logged in
Go to the new USB Drive, and click MBED.HTM to open it in a web browser.
If you do not have an Mbed account, choose "Signup", and create your Mbed Account. Otherwise, log in with your normal username and password.
This will give you access to the website, tools, libraries and documentation.
PC Configuration
Your Mbed Microcontroller can appear on your computer as a serial port. On Mac and Linux, this will happen by default. For Windows, you need to install a driver:
Windows
See Windows-serial-configuration for full details about setting up Windows for serial communication with your Mbed Microcontroller
From a host PC to communicate with Mbed you will need a terminal application. This allows the Mbed Microcontroller to print to your PC screen, and for you to send characters back to your Mbed.
Default baud rate value for the serial port is 9600. Default baud rate value is set in the platform config file: https://github.com/ARMmbed/mbed-os/blob/master/platform/mbed_lib.json.
- Terminals - Using Terminal applications to communicate between the Host PC and the Mbed Microntroller
Some terminal programs (e.g. TeraTerm) list the available serial ports by name. However, if you do need to know the identity of the serial port so that you can attach a terminal or an application to it:
| Windows | Mac | Linux | ||||
| Find the identity of the COM port by opening ''Device Manager''. To do this navigate ''Start -> Control Panel -> System -> Hardware -> Device Manager''. | To find the device name under Mac OS X, use the command ''ls /dev/tty.usbmodem*'' | To find the device name under Linux, use the command ''ls /dev/ttyACM*'' | ||||
 |  |  |
Install and configure Mbed CLI
Follow the url to install and configure Mbed CLI according to your OS:
Make sure the Mbed python packages are updated to versions compatible with Cypress PSoC 6 kits using following command:
pip install --upgrade pip 'mbed-ls>=1.7.1' 'pyocd>=0.16'
Compile and Download Program
1. Compile "blinky"
Open Mbed CLI prompt, and create the directory for Mbed examples
mkdir mbed-examples
cd mbed-examples
Import mbed-os-example-blinky code example https://github.com/ARMmbed/mbed-os-example-blinky
mbed import mbed-os-example-blinky
cd mbed-os-example-blinky
Compile the mbed application for one of the supported target boards with one of the supported toolchains
mbed compile -m TARGET -t TOOLCHAIN
where TARGET is one of:
- CY8CKIT_062_WIFI_BT
- CY8CKIT_062_BLE
- CY8CPROTO_062_4343W
and TOOLCHAIN is one of:
- GCC_ARM
- ARM
- IAR
2. Save a program hex (.hex) to the Platform
Hex file is Built:
- CY8CPROTO-062-4343W : BUILD/CY8CPROTO_062_4343W/GCC_ARM/mbed-os-example-blinky.hex
Save the program hex file to your Mbed Microcontroller Disk, just like you would with a normal USB disk. The Status LED will flash as the PC writes the file to the Microcontroller disk. The file is now consumed.
3. Press the Reset Button
When the Reset Button in pressed, the microcontroller will be reset and the last programmed application will begin to run.
4. Blinky!
The Microcontroller is now running the program; flashing the LED forever! If you reset the Microcontroller, or disconnect and reconnect the power, the program will simply restart.
Where Next
For more information on available tools and software, see Arm Mbed OS Quick Start Guide
Technical Reference Manuals
- PSoC 6 MCU: PSoC 62 Architecture Technical Reference Manual
- PSoC 6 MCU: PSoC 62 Register Technical Reference Manual User's Manual
Datasheets
Where to buy
You need to log in to post a discussion
Discussion topics
| Topic | Replies | Last post |
|---|---|---|
| not, working mbed-os-example-wifi fails with mbed os 5.13.4 | 22 |
25 Oct 2019
by
 jim hamblen
|
Questions

To compile a program for this board using Mbed CLI, use cy8cproto_062_4343w as the target name.
Board Partner

Cypress Semiconductor
Cypress is a leader in providing best-in-class semiconductors and wireless connectivity technologies for the growing Internet of Things (IoT).
Mbed OS support
- Mbed OS 5.11
- Mbed OS 5.12
- Mbed OS 5.13
- Mbed OS 5.14
- Mbed OS 5.15
- Mbed OS 6.0
- Mbed OS 6.1
- Mbed OS 6.10
- Mbed OS 6.11
- Mbed OS 6.12
- Mbed OS 6.13
- Mbed OS 6.14
- Mbed OS 6.15
- Mbed OS 6.2
- Mbed OS 6.3
- Mbed OS 6.4
- Mbed OS 6.5
- Mbed OS 6.6
- Mbed OS 6.7
- Mbed OS 6.8
- Mbed OS 6.9
Example programs