SWO viewer
Serial Wire Output (SWO) viewer for tracing purposes
Hello World
Import programmbed_nucleo_swo
Test for SWO viewer library.
Library
Import librarySWO
Serial Wire Output (SWO) viewer for tracing purposes. Tested on F401 and ST-LINK Utility as well as for F103 and Segger J-Link SWO viewer.
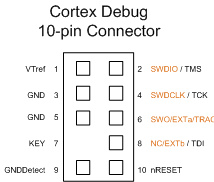
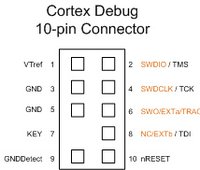
Pinout

Datasheet
http://www.st.com/st-web-ui/static/active/en/resource/technical/document/user_manual/CD00262073.pdfNotes
Using SWO with mbed online
The ARM Cortex M series supports tracing capabilities through the Serial Wire Debug (SWD) en Serial Wire Output(SWO) port. This mbed lib presents a simple implementation for tracing via SWO. This sample implementation ensures that output via SWO is enabled in order to guarantee that the application does not hang.
The latest release of the lib has a Class SWO_Channel that supports Stream putc() and printf(). In addition, the class now supports ''stdout'' claim and redirect.
Example code
#include "mbed.h"
#include "SWO.h"

DigitalOut myled(LED1);

Serial pc(SERIAL_TX, SERIAL_RX);
SWO_Channel swo("channel");

int main() {
  pc.printf("Hello World\n\r");

  swo.printf("\r\nHello World from SWO\r\n");
  swo.printf("CPU SystemCoreClock is %d Hz\r\n", SystemCoreClock);

  printf("Message on stdout\r\n");

  if (swo.claim() == true) {
    pc.printf("SWO has claimed stdout\r\n");
    printf("Message on stdout redirected to SWO\r\n");
  }
  else {
    pc.printf("SWO failed to claim stdout\r\n");
  }

  while(1) {
    myled = 1; // LED is ON
    wait(0.2); // 200 ms
    myled = 0; // LED is OFF
    wait(1.0); // 1 sec

    swo.putc('#');
   }
}
The code was tested on an F401, F446 and F103 using the ST-LINK Utility software on the Host PC. It is also possible to use a Segger J-Link SWO viewer when you have access to a Segger J-Link and the SWO port. You need to download and install the ST-LINK Utility software found here. The ST-Link Utility software may also be used to flash code produced by the online compiler. Just compile as usual, save the file on your PC, import the file in ST-LINK and press 'target' and ''automatic mode''. See the manual for details. Start the SWV when flashing has completed.
Make sure you select the correct systemclock in the Serial Wire Viewer window (84MHz for the F401, 180MHz for F446, 74MHz for F103).
The result in the SWV window of ST-LINK is shown below.

Note that the nucleo firmware supports both the SWO and the regular Serial connection to the host PC simultaneously. Your code will still be able to use the Serial console as usual.
Limitations
Note that the SWO, SWDIO and SWCLK pins may not be used for anything else or the SWO viewer wont work.
// SWO is on pin PB_3
// SWDIO is on pin PA_13
// SWCLK is on pin PA_14
//
//I2C i2c(PB_9, PB_8); //I2C, OK
//DigitalIn in(PB_3);  //SWO, breaks SWO viewer
//DigitalIn in(PA_10); //RX UART1, OK
//DigitalIn in(PA_13); //SWDIO, breaks SWO viewer
//DigitalIn in(PA_14); //SWCLK, breaks SWO viewer
Note that Cortex M0 and Cortex M0+ devices (eg the STM32L053) dont have the ITM en SWO in its core (see datasheet). The ITM_SendChar() is therefore not implemented in the CMSIS file core_cm0plus.h which is why you will get a compiler/link error with the SWO lib. The STM32F103 is a Cortex M3 and that device supports the SWO and it has the ITM_SendChar() implementation in core_cm3.h
You can still use the regular printf on M0/M0+ or do testing/debugging on the M3 (eg F103) and then move the code to the M0 when it is ready.
STM Studio
In case you need some more advanced monitoring and logging features for your application check out the STM Studio tool. Example code may be found here and some instructions are here.
References
ST-LINK Utility software is here.


