Sparkfun Touch Keypad
The Freescale MPR121 is a second generation capacitive touch sensor controller with 12 capacitive sensing inputs. It has an I2C interface. Sparkfun has two breakout boards that use the MPR121.
Hello World
Import programMPR121_Demo
MPR121 demo code for 12 key Sparkfun touch keypad - sends key number to LEDs. Based on Sparkfun MPR121 code ported to mbed by Anthony Buckton
Last commit 16 Mar 2011 by  jim hamblen
Library
Import programMPR121_Demo
MPR121 demo code for 12 key Sparkfun touch keypad - sends key number to LEDs. Based on Sparkfun MPR121 code ported to mbed by Anthony Buckton
Last commit 16 Mar 2011 by jim hamblen
Datasheet
http://www.sparkfun.com/datasheets/Components/MPR121.pdfNotes
Touch sensors are used in many embedded devices. The Freescale MPR121 is a second generation capacitive touch sensor controller with 12 capacitive sensing inputs. It has an I2C interface. Sparkfun recently introduced two breakout boards that use the MPR121. There are also a number of new lower-cost clones of the Sparkfun breakout boards that should work the same - even the PCB looks the same (search for "Touch keypad breakout").

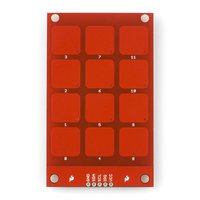
Sparkfun MPR121 Capacitive Touch Keypad
The Sparkfun Capacitive Touch Keypad breakout includes 12 keys and a MPR121 mounted on the back of the PCB. Header pins can be soldered to the board for use on a breadboard.

MPR121 Capacitive Touch Sensor Breakout Board
With the breakout board you can make slider wheels and slide bars with a custom designed electrode pattern or have up to 20 touch buttons in a matrix pattern.

A typical slide wheel and slide bar electrode pattern using 10 channels
More information can be found in the data sheet and application notes from Freescale.
MPR121 Datasheet
Application Notes
Here is a short video showing the touch keypad running on mbed. As each key is hit, note that the binary number for the key (1..12) appears in the LEDs. As each key is released the LEDs return to a value of 0 (i.e., no key hit).
The demo code seen in the touch keypad video is based on C++ code posted earlier in the forum at http://mbed.org/forum/electronics/topic/1873/ by Anthony Buckton that can be found at http://mbed.org/users/abuckton/programs/MPR121/lnag0q.
A minor change was made to his demo code to output the key code to the LEDs for use in the video. After a somewhat involved initial power-on configuration sequence, each key hit or release generates an interrupt. By reading two 8-bit I2C registers, you can obtain the status of the 12-keys. Each key is a bit in a register. The interrupt routine reads the registers and outputs the keycode (1..12) to the LEDs in binary.
Import programMPR121_Demo
MPR121 demo code for 12 key Sparkfun touch keypad - sends key number to LEDs. Based on Sparkfun MPR121 code ported to mbed by Anthony Buckton
Last commit 16 Mar 2011 by jim hamblen
The existing demo code is based on a Sparkfun example and it prints some test data to the PC's USB virtual com port (not seen in video). Once you have the touch pad working, you will probably want to delete that portion of the demo code. Two additional files are used in the project, mpr121.cpp and mpr121.h. Here is the minimal demo code with the debug printfs removed:
Touch_keypad_demo_code
#include <mbed.h>
#include <mpr121.h>
DigitalOut led1(LED1);
DigitalOut led2(LED2);
DigitalOut led3(LED3);
DigitalOut led4(LED4);
// Create the interrupt receiver object on pin 26
InterruptIn interrupt(p26);
// Setup the i2c bus on pins 9 and 10
I2C i2c(p9, p10);
// Setup the Mpr121:
// constructor(i2c object, i2c address of the mpr121)
Mpr121 mpr121(&i2c, Mpr121::ADD_VSS);

// Key hit/release interrupt routine
void fallInterrupt() {
  int key_code=0;
  int i=0;
  int value=mpr121.read(0x00);
  value +=mpr121.read(0x01)<<8;
  // LED demo mod
  i=0;
  // puts key number out to LEDs for demo
  for (i=0; i<12; i++) {
  if (((value>>i)&0x01)==1) key_code=i+1;
  }
  led4=key_code & 0x01;
  led3=(key_code>>1) & 0x01;
  led2=(key_code>>2) & 0x01;
  led1=(key_code>>3) & 0x01;
}

int main() {
  interrupt.fall(&fallInterrupt);
  interrupt.mode(PullUp);
  while (1) {}
}
After soldering header pins to the touch keypad, some small plastic or felt sticky pads on the back side of the PCB about the same thickness as the black plastic on the header pins helps quite a bit to stabilize the touch keypad on top of a breadboard. It can also be attached using the screw holes provided.

Bottom of Touch Keypad
Wiring
Here are the connections for the demo code:
| mbed | Touch Keypad |
|---|---|
| Gnd | Gnd |
| p9 | SDA |
| p10 | SCL |
| p26 | IRQ |
| Vout(3.3V) | Vcc |
The I2C pullups on SDA and SCL are not provided on the touch keypad board, so add two 4.7K ohm pullups to 3.3V to the circuit. The other breakout board with the MPR121 only, has the pullups on the board.
You need to log in to post a discussion

Tested boards
