ShiftBrites, MegaBrites, ShiftBars, and the Allegro A6281 RGB LED driver
The small low-cost ShiftBrite module has an Allegro A6281 3-channel constant current LED driver and a bright RGB LED on a breakout board with the header pins. They use an SPI interface with 10-bits per color. They are buffered so that they can be connected together in a large chain. Similar hardware is used for each pixel in the new large outdoor digital billboards. ShiftBrites are available from Sparkfun, Pololu, and even direct from Macetech.
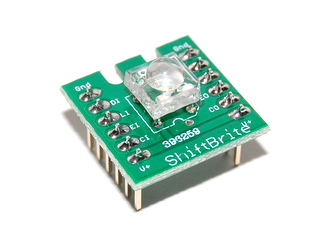
ShiftBrite Color LED breakout with driver
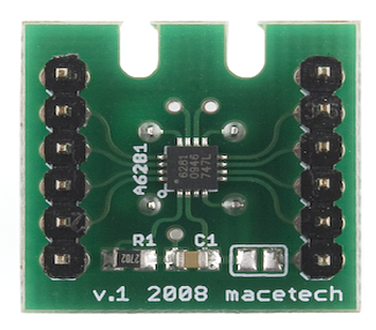
Bottom view of ShiftBrite module showing the driver IC
Controlling a ShiftBrite using mbed's SPI hardware
Here is a quick demo using two ShiftBrites. The second ShiftBrite in the chain just gets the previous value of the first. They are so bright you have to turn them down or it hurts your eyes. Here are a couple set to a maximum of 50 out of 1023 jumping around through RGB color space with a delay long enough to see the color. It is difficult to capture the colors accurately with a video camera.
Each module in the chain needs two 00s then three 10-bit color fields of shift data
Then toggle the latch pin high. A couple will run OK off of mbed's 5V USB power, but you would need external power for a long chain and probably want 5+ volts to allow for voltage drops in the wires in the chain.
Here is the format for the Allegro A6281 control registers:

PWM0 is Green, PWM1 is Red and PWM2 is Blue. More information can be found in the Allegro A6281 Datasheet. For information on the ShiftBrite module, see the ShiftBrite documentation.
Wiring Table
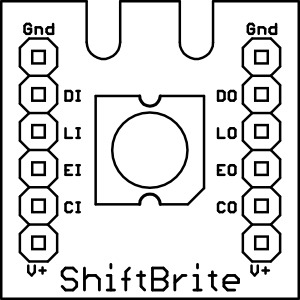
ShiftBrite pins are shown on the module's silkscreen.
| mbed | ShiftBrite |
|---|---|
| gnd | Gnd |
| p11 | DI |
| p15 | LI |
| p16 | EI |
| p13 | CI |
| VU(5V) | V+* |
- Note: An external 5-9V DC power supply is needed for more than 3-4 ShiftBrites.
The mbed SPI API makes it easy to use the SPI hardware to send data to the ShiftBrite and wait is handy for time delays. The code for the basic demo seen in the video is shown below:
Single_ShiftBrite_Demo
<#include "mbed.h"

DigitalOut latch(p15);
DigitalOut enable(p16);


SPI spi(p11, p12, p13);

void RGB_LED(int red, int green, int blue) {
    unsigned int low_color=0;
    unsigned int high_color=0;
    high_color=(blue<<4)|((red&0x3C0)>>6);
    low_color=(((red&0x3F)<<10)|(green));
    spi.write(high_color);
    spi.write(low_color);
    latch=1;
    latch=0;
}

int main() {
    int red=0;
    int green=0;
    int blue=0;
    spi.format(16,0);
    spi.frequency(500000);
    enable=0;
    latch=0;
    wait(2);
    for (red = 0; red<50; red = red+10) {
        for (blue = 0; blue<50; blue = blue+10) {
            for (green = 0; green<50; green = green+10)

            {
                RGB_LED( red, green, blue);
                wait(.25);
            }
        }
    }

}
Import programShiftbrite_Demo
Simple demo for a ShiftBrite RGB LED module that cycles through different colors.
Controlling a chain of ShiftBrites using mbed
Each module has buffered outputs so that they can be chained together in long chains by just connecting the output pins (DO,LO,EO,CO) on one to the input pins (DI,LI,EI,CI) on the next as seen in the Figure below. The power connections can also be chained.

Hooking up a chain of ShiftBrites
For the next demo, a single chain of 35 ShiftBrites is arranged in a 5 by 7 array. On breadboards with a narrow bus strip, you can just plug the modules across the board for the chain connections and run wires back serpentine style to the next row. The Global Specialties PB-104 and larger PB-105 breadboards have the narrow power bus, but some of the less expensive boards have a wider bus strip that will not work for a row of ShiftBrites without a gap between modules and extra jumper wires. They also sell cables to connect them in a chain. It takes about 2Amps at 5V to power this many of the ShiftBrites, so an external power supply is used. Each module needs 60MA.
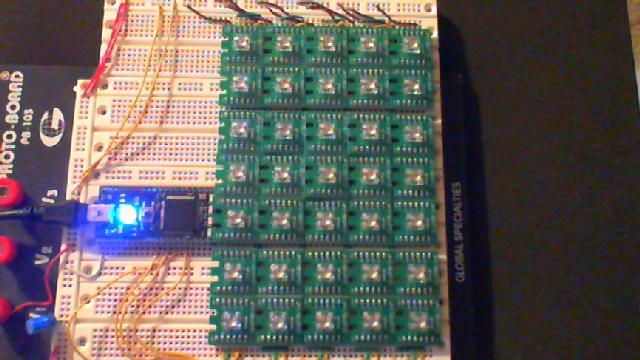
The mbed ShiftBrite array has 35 modules arranged in a 5 by 7 array.
Here is a video demo of the array showing several lighting effects coded into a basic sequencer
mbed ShiftBrite Sequencer Demo
As seen in the video, the lighting effects are fading slowly from one color to another (red to green to blue), a random flicker effect that is sometimes used in stage lighting for a fire effect, a flashing marquee style sign effect, a shift effect, all white with dimming by fading to black, random colors, and using individual LEDs to generate characters. The sequencer stores the initial color values for each step in a 3D array, LED_Color[step][LED][RGB_color]. One dimension for the three 10-bit RGB color values, the next dimension for each LED, and the third for the sequence step value. Using the initial value from the array and the lighting effect selected, the sequencer code computes new value for the lighting effects on the fly while shifting the values out. Two additional 1D arrays contain the lighting effect for each sequencer step and the delay time for each step (i.e., Sequence_Effect[step] and Sequence_Delay[step]). To generate the initial color data for each step, functions are provided to select a default background color, and to set the color for each LED. LED 0 is the last LED in the chain.
Quite a bit of initialization code is required to setup all of the arrays with appropriate data for the demo. Once the arrays are initialized, the sequencer steps through the arrays and updates the LED color values. Write_Init_Command() initializes a register that controls the relative brightness of the three LEDs in each of the modules. Nested for loops step through each sequence step, and the inner for loop though each of the LEDs in the chain. A case statement selects the lighting effect for each step in the sequence. Write_LED() uses mbed's SPI hardware to shift out the color data for a single LED. After shifting out the color data for all LEDs in the chain, the latch pin is toggled high to load the new color values in the entire chain of LEDs.
Here is the section of code that sequences through the LED array data to drive the ShiftBrite array:
Sequencer_code_segment_for_a_chain_of_ShiftBrites
 // Repeat Sequence Forever
    while (1) {
        Write_Init_Command(120, 100, 100);
        //Step through the Sequence Values
        for (j = 0; j < Sequence_Length; j++) {
             switch (Sequence_Effect[j]) {
                case 0: {
                    //No Lighting effect so just send out new RGB color data from arrays
                    // Step through each LED in chain at each sequence step
                    for (i = 0; i < num_LEDS; i++) {
                        //Writes 32-bits of RGB color data to LED using SPI hardware
                        Write_LED( LED_Color[j][i][0], LED_Color[j][i][1], LED_Color[j][i][2]);
                    }
                    //Load in new values just shifted out to LED chain by setting latch high
                    wait(.000015);
                    latch=1;
                    wait(.000015);
                    latch=0;
                    //Delay for this step in the sequence
                    wait(Sequence_Delay[j]);
                    break;
                }
                case 1: {
                    //Lighing Effect: Fade into new color from previous color (note: can't fade first sequence step!)
                    for (k = 0; k<=Fade_Steps; k++) {
                        // Step through each LED in chain at each fade sequence step
                        for (i = 0; i < num_LEDS; i++) {
                            red = LED_Color[j-1][i][0] + k*(LED_Color[j][i][0]-LED_Color[j-1][i][0])/Fade_Steps;
                            green = LED_Color[j-1][i][1] + k*(LED_Color[j][i][1]-LED_Color[j-1][i][1])/Fade_Steps;
                            blue = LED_Color[j-1][i][2] + k*(LED_Color[j][i][2]-LED_Color[j-1][i][2])/Fade_Steps;
                            //Writes 32-bits of RGB color data to LED using SPI hardware
                            Write_LED(red, green, blue);
                          }
                        //Load in new values just shifted out to LED chain by setting latch high
                        wait(.000015);
                        latch=1;
                        wait(.000015);
                        latch=0;
                        //Delay for this step in the fade sequence
                        wait(Sequence_Delay[j]/Fade_Steps);
                    }
                    break;
                }
                case 2: {
                    //Lighting Effect: Flicker or Twinkle somewhat like a flame
                    time_counter.reset();
                    time_counter.start();
                    while (time_counter.read()<Sequence_Delay[j]) {
                        for (i = 0; i < num_LEDS; i++) {
                            flicker = rand();
                            if (flicker>0x40000000)
                                //Writes 32-bits of RGB color data to LED using SPI hardware
                                Write_LED( LED_Color[j][i][0], LED_Color[j][i][1], LED_Color[j][i][2]);
                            else
                                Write_LED( LED_Color[j][i][0]/2, LED_Color[j][i][1]/2, LED_Color[j][i][2]/2);
                        }
                        //Load in new values just shifted out to LED chain by setting latch high
                        wait(.000015);
                        latch=1;
                        wait(.000015);
                        latch=0;
                        wait(.05);
                    }
                    time_counter.stop();
                    break;
                }
                case 3: {
                    //Lighting Effect: Flashing Broadway Marquee Sign Style
                    time_counter.reset();
                    time_counter.start();
                    while (time_counter.read()<Sequence_Delay[j]) {
                        for (i = 0; i < num_LEDS; i++) {
                            if (((i+odd)&0x01)==0)
                                //Writes 32-bits of RGB color data to LED using SPI hardware
                                Write_LED( LED_Color[j][i][0], LED_Color[j][i][1], LED_Color[j][i][2]);
                             else
                                Write_LED( LED_Color[j][i][0]/4, LED_Color[j][i][1]/4, LED_Color[j][i][2]/4);
                        }
                        //Load in new values just shifted out to LED chain by setting latch high
                        wait(.000015);
                        latch=1;
                        wait(.000015);
                        latch=0;
                        wait(.15);
                        odd = !odd;
                    }
                    time_counter.stop();
                    break;
                }
                case 4: {
                    //Lighting Effect: Circular Shift of Colors
                    time_counter.reset();
                    time_counter.start();
                    k=0;
                    while (time_counter.read()<Sequence_Delay[j]) {
                        k = (k+1)%num_LEDS;
                        for (i = 0; i < num_LEDS; i++) {
                            //Writes 32-bits of RGB color data to LED using SPI hardware
                            Write_LED( LED_Color[j][(i+k)%num_LEDS][0], LED_Color[j][(i+k)%num_LEDS][1], LED_Color[j][(i+k)%num_LEDS][2]);
                         }
                        //Load in new values just shifted out to LED chain by setting latch high
                        wait(.000015);
                        latch=1;
                        wait(.000015);
                        latch=0;
                        wait(.10);
                    }
                    time_counter.stop();
                    break;
                    case 5: {
                        //Random Bright Colors
                        time_counter.reset();
                        time_counter.start();
                        while (time_counter.read()<Sequence_Delay[j]) {
                            for (i = 0; i < num_LEDS; i++) {
                                //Writes 32-bits of RGB color data to LED using SPI hardware
                                Write_LED( (rand()&0x00F000)>>6,(rand()&0x00F000)>>6,(rand()&0x00F000)>>6);
                              }
                            //Load in new values just shifted out to LED chain by setting latch high
                            wait(.000015);
                            latch=1;
                            wait(.000015);
                            latch=0;
                            wait(.08);
                        }
                        time_counter.stop();
                        break;
                    }
                }
            }
        }
    }
Here is the entire demo program for the array as seen in the video:
Import programShiftbrite_Sequencer
Shiftbrite sequencer demo program. Controls a chain of 35 shiftbrites
The mbed timer API comes in handy for timing steps in the sequencer that must loop updating values. After starting it, a read will return the elapsed time. The sequencer code should work on any chain of ShiftBrites by changing the #define for the number of LEDs in the chain, num_LEDS, and adjusting the test data that sets individual LEDS (for characters at the end) if it contains less than 35 LEDs. There is also a #define for the number of steps in the sequence, Sequence_Length. Users can also add thier own custom lighting effects by adding another case to the switch statement. Interesting effects can also be generated by using various 2D and 3D mathematical functions that are carefully scaled to generate the color data.
The video below shows an example using two sine waves in the row and col directions to modulate the RGB colors in the array. A small phase shift is added each time through the loop to move the color wave. All computations are performed in floating point in real time.
mbed ShiftBrite Plasma Wave Effect
Plasma_Effect_Demo
case 6: {
 //Sine Plasma Effect
 time_counter.start();
 c=0.0;
 while (time_counter.read()<Sequence_Delay[j]) {
 //loop through LED array using sine function to generate colors
      for (k=0; k<num_cols; k++) {
         b= (1+sin(3.14159*k*0.75/(num_cols-1.0)+c))*0.5;
         for (i=0; i<num_rows; i++) {
             a= (1+sin(3.14159*i*0.75/(num_rows-1.0)+c))*0.5;
             // a and b will be a sine wave output between 0 and 1
             // sine wave was scaled for nice effect across array
             // uses a and b to compute LED colors based on rol and col location in array
             // also keeps colors at the same brightness level
             if ((a+b) <.667)
                 Set_LED_Color(j, i+(k*num_rows),1023-(1010.0*((a+b)/0.667)) ,1010.0*((a+b)/0.667), 0);
             else
                 if ((a+b)<1.333)
                    Set_LED_Color(j, i+(k*num_rows),0, 1023-(1010.0*((a+b-0.667)/0.667)), 1010.0*((a+b-0.667)/0.667));
                 else
                    Set_LED_Color(j, i+(k*num_rows), 1010.0*((a+b-1.33)/0.667), 0, 1023-(1010.0*((a+b-1.33)/0.667)));
           }
        }
        // Step through each LED in chain at each sequence step
        for (i = 0; i < num_LEDS; i++) {
             //Writes 32-bits of RGB color data to LED using SPI hardware
             Write_LED( LED_Color[j][i][0], LED_Color[j][i][1], LED_Color[j][i][2]);
        }
        //Load in new values just shifted out to LED chain by setting latch high
        //c moves the color wave - adjust to control the speed of the wave
        c=c+0.0314159*0.75;
        if (c>6.2831) c=0;
        wait(.000015);
        enable=1; //resync PWM counters - might flash without this with fast color updates
        latch=1;
        wait(.000015);
        latch=0;
        enable=0;
        wait(.005);
     }
     time_counter.stop();
     break;
  }
Interesting patterns can also be generated by Conway's Game of Life as seen in the video below:
Game of Life running on the mbed ShiftBrite array.
In the video, white is the initial random population. The random population is generated by the rand() function in C. New cells are blue, survivors are green, and cells that just died are red. Stable life is dull, so it generates a new random population. After one hundred generations, it will also switch to a new random generation. Since the area is small, the edges were setup to wrap around like a torus. The small standard life forms all show up and even gliders are occasionally seen.
Here are a couple of cautionary notes for anyone working with the A6281. If you note in the A6281 command register format table presented earlier, there are two Allegro test bits (ATB) that should always be set to 0 by users. Users have reported that if you set one of these bits by accident it goes into an internal test mode and the chip will not respond to new set color commands until another command is sent that sets the ATB bits back to zero. Test mode also turns off the outputs to the next module. This might also happen with a processor reset that does not cycle power on the A6281. On large arrays, ShiftBrites may be on a separate power supply. So it is a good idea to send out an initialization command (or two) at power on reset and even perhaps periodically while sending out new colors. Cycling power on the A6281 also clears the test mode. If the blue color value was somehow larger than 1023, it could cause the set color command to look like a set test mode command, so perhaps masking the blue color value with 0x3FF before combining the bits would be worthwhile. It might not even be a bad idea in a complex program to mask or limit all of the color values to be certain that they are less than 1023 before combining them all together to shift out. While developing these code examples, several ShiftBrites did stop responding to new color values until power was cycled, but it seemed to happen only when there were bugs in the code generating bad color or shift values.
When updating the colors at very high speeds, a quick bright flash might be seen occasionally. The theory on this is that the PWM counter is in exactly the wrong state when the new color value is latched in the register (some sort of synchronization issue inside the chip). It typically is not seen at lower update rates (or perhaps it is less likely to be seen often). The best way to fix this problem is to toggle enable and latch at the same time when loading in a new color value (see Plasma Effect Demo Code). It turns out that enable going high resets the internal PWM counter, if you read the datasheet carefully. This issue was seen in an earlier version of the Plasma Effect code and it went away by adding the toggle on the enable line every time latch was toggled to load a new color value.
Ideas for Further Work
Long term, reading the data from a file, or developing a GUI tool to design the colors and patterns in an interactive visual editor would be worth considering. It could work somewhat like the current movie editors. There is such a tool already for the more expensive BlinkM modules, but it has very few of the features that are really needed to make it useful. The I2C BlinkM modules run about 3X more in cost, but they have an on-module processor so that they can run standalone. Another possibility would be a program that generates the LED color data by converting and scaling a standard bitmap file. Many of the large outdoor digital billboards use a cell phone modem to download the new images for ads or a web-page style interface could be added. For other ideas, here are several videos using these RGB LEDs (but not mbed yet!) for interesting lighting effects. The first is a video of a light show using the Megabrite (a larger version of a ShiftBrite) and it shows some additional ideas for lighting effects. The RGB LEDS are such an intense small source of light they are often projected onto a translucent panel to diffuse the light a bit. A DJ turns four knobs to select and control the lighting effects. The second video is a recent demo of a commercial night club lighting system that uses 162 MegaBrite modules.
The MegaBrite Blinker Wall
A Commercial Night Club Lighting System using 162 MegaBrites
One of the MegaBrite modules like those used in the videos above is seen below. It also uses the Allegro A6281 driver, but it has three LED modules each one each for red, green, and blue. Each LED has five chips and it requires 300MA per MegaBrite module (5X ShiftBrite power). The cost runs about 2X the ShiftBrite with about 4X the mcd light output levels. The ShiftBar also seen below has the Allegro A6281 with connectors for three off board LEDs at up to 150MA each. Since the same driver IC is used, no software changes are needed to use MegaBrites or ShiftBars instead of ShiftBrites. Just get bigger wires and power supplies.
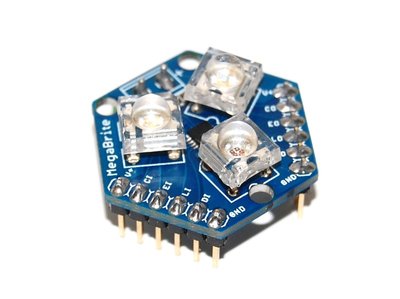
The MegaBrite module also uses the Allegro A6281
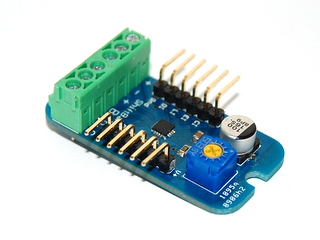
The ShiftBar drives off board LEDs using the Allegro A6281
And of course, someone has already used ShiftBrites for outdoor holiday lighting at home. The special 6-pin cables are real handy for this application. If only they had a weatherproof housing, you could leave them up all year and just change the colors for each holiday.
A ShiftBrite Chirstmas
LED lighting is moving into the home at a rapid pace and it may just be a matter of time until everyone has computer controlled RGB LED home mood lighting as seen in this video. It samples the low frequency audio to control the lights.
The MonkeyLectric color image bike wheel displays seen in the video below use RGB LEDS and a magnetic wheel sensor. There is a similar student project using mbed and Shiftbrites.
A Shiftbrite student project using mbed is seen in the video below. The user swings a stick of 8 Shiftbrites to generate a text display or simple image based on persistence of vision.
Building a Larger ShiftBrite Array
On a PB-104 breadboard, there is just enough room for a 5 by 7 array and the mbed module. The Global Specialties PB-105 breadboard will support a larger 7 by 11 array, but it leaves no extra room open for the mbed module. The mbed could be on a nearby small breadboard since only a few wires are needed. Larger arrays can be also built using the ShiftBrite cables or a custom PCB. The replacement breadboard sockets and bus strips can be purchased separately and screwed down to a large sheet of plastic or sheet metal to build even larger arrays without excessive jumper cables or a custom PCB, but there will be a small gap between every 7 ShiftBrites because of the screw mounting holes. On larger arrays, the current limits and voltage drops on the interconnect wires used will need to be carefully evaluated.
1 comment on ShiftBrites, MegaBrites, ShiftBars, and the Allegro A6281 RGB LED driver:
Please log in to post comments.

Thanks