BuzzAccess
Team Members
Pahul Matharu, James Song, George Vellaringattu, Ryan Williams
Overview
Import programBuzzAccess
Buzz Access
In this project, an Mbed is used for key-less door entry. The user can do this by one of three methods: An RFID card, a key code, or a secret knock. The two LCD monitors will serve as menus, one on the inside of the door and one on the outside. Lastly, the user can export data with logs of who has attempted to receive access. The components that the Mbed interfaces with are as follows:
- XCeedID XF1050 RFID Reader
- Sparkun 12 Button Keypad
- Piezo Speaker (Knock Sensor)
- Sparkfun USB Breakout Board
- 4D Systems 1.44" LCD Monitor x2
- Servo
Video Demo
RFID Reader
The XF1050 RFID Reader is implemented with a database where the user can store and delete cards, this is done through the code below:
void rfid_thread(void const *args){
    allowedCards = new char*[CARDSALLOWED];
    for (int i = 0; i < CARDSALLOWED; ++i){
        allowedCards[i] = new char[11];
    }
    readCardsFromFile();
    while(1){
        rfid.doEvents();
        Thread::wait(100);
    }
}

void onCardRead() {
    /*pc.printf("%d\n",rfid.bitsRead());
    uint64_t rawCardData = rfid.getBits(14,33);
    pc.printf("%" PRIx64 "\n",rawCardData);
    pc.printf("%" PRIx64 "\n",rfid.getBits(0,34));*/
    uint64_t cardData = rfid.getBits(0,34);
    ostringstream o;
    string str;
    o << cardData;
    str += o.str();
    if(addCard){
        storeCard(str.c_str());
    }else if(removeCard){

    }else if(isAllowed(str.c_str())) {
       access = true;
    }else{
        denied = true;
    }
}

bool isAllowed(const char *card){
    for(int i = 0;i<allowedCount;i++){
        for(int j = 0;j<11;j++){
            if(card[j]!=allowedCards[i][j]){
                break;
            }else if(j==10){
                return true;
            }
        }
    }
    return false;
}
void storeCard(const char *card){
    if(allowedCount < 10 && !isAllowed(card)){
        FILE *fp = fopen("/local/cards.txt", "a");
        if(fp==NULL){
            //ERROR
        }
        fprintf(fp, "%c%c%c%c%c%c%c%c%c%c%c\r\n",card[0],card[1],card[2],card[3],card[4],card[5],card[6],card[7],card[8],card[9],card[10]);
        fclose(fp);
        for(int transfer = 0;transfer<11;transfer++){
            allowedCards[allowedCount][transfer] = card[transfer];
        }
        allowedCount++;
    }
    addCard = false;
}


void removeCardFromFile(const char *card){
    if(isAllowed(card)){
        FILE *fp = fopen("/local/cards.txt", "r");
    }
}

int readCardsFromFile(){
    FILE *fp = fopen("/local/cards.txt", "r");
    int ret = readCardsFromFile(fp);
    return ret;
}

int readCardsFromFile(FILE *fp){
    int c,transfer = 0;
    if(fp!=NULL){
        c = fgetc(fp);
        while(c!=EOF){
            allowedCards[allowedCount][transfer] = c;
            transfer++;
            if(transfer==11){
                allowedCount++;
                if(allowedCount==CARDSALLOWED){
                    break;
                }
                transfer = 0;
                fgetc(fp);
                fgetc(fp);
            }
            c = fgetc(fp);
        }
        fclose(fp);
        return 1;
    }else{
        return 0;
    }
}
The user can interact with the menu located on the inside of the door to add and remove cards from "cards.txt" in the local directory. This file allows the Mbed to 'remember' which cards have access. If a card is registered in the database, the XF1050 will show a green light and the outside LED will display an "Access Granted" message. This will then prompt the servo to turn the lock. If the card has not been registered, the outside LED will display an "Access Denied".
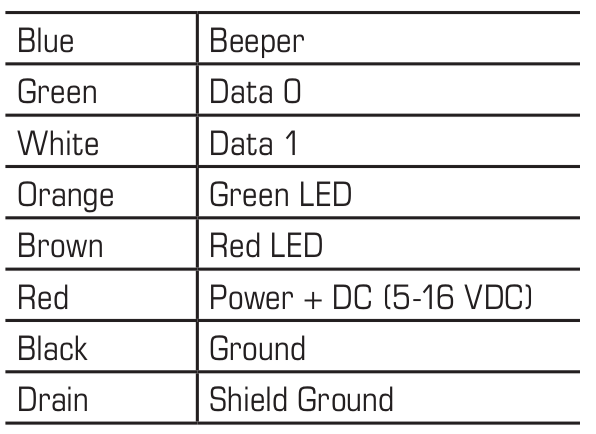
Sample wiring table for XF1050 below:

12 Button Keypad
The 12 Button keypad is set up on the outside of the door as a means of gaining access without the use of an RFID card.
Existing code was utilized to work with the 12 Button Keypad and is shown below:
Import libraryKeyPad
Keypad that has 12 keys for input
The secret code can be initialized and reset from the menu on the inside of the door. The code is displayed as it is being entered outside the door and after the code is entered, the user presses the pound key and the LEDs will either display "Access Granted" or "Access Denied" as necessary. The code for these methods is listed below:
bool checkCode(std::vector<int> master,std::vector<int> v1){
    if(v1.size() != master.size()){
        return false;
    }else{
        for(int i = 0;i<master.size();i++){
            if(master[i] != v1[i]){
                return false;
            }
        }
        return true;
    }
}

void changeCode(){
    std::vector<int> tempMaster;
    key.clear();
    key.push_back(0);
    while(key.front() != 12){
        key = keypad.getkey();
        if(key.size()>0){
            tempMaster.push_back(key.front());
        }
        Thread::wait(100);
    }
    key.clear();
    key.push_back(0);
    tempMaster.pop_back();
    if(tempMaster.size() >= 4){
        master.clear();
        for(int i = 0;i<tempMaster.size();i++){
            master.push_back(tempMaster[i]);
        }
    }else{
    }
    changeCodeBool = false;
}

void keypad_thread(void const *args){
    key.clear();
    key.push_back(0);
    while(1) {
        while(key.front() != 12){
            if(changeCodeBool){
                changeCode();
            }
            key = keypad.getkey();
            if(key.size()>0){
                keys.push_back(key.front());
            }
            Thread::wait(100);
        }
        keys.pop_back();
        bool result = checkCode(master,keys);
        if(result){
            access = true;
        }else{
            denied = true;
        }
        int size = keys.size();
        for(int i = 0;i<size;i++){
            keys.erase(keys.begin());
        }
        keys.clear();
        key.clear();
        key.push_back(0);
        Thread::wait(100);
    }
}
Secret Knock
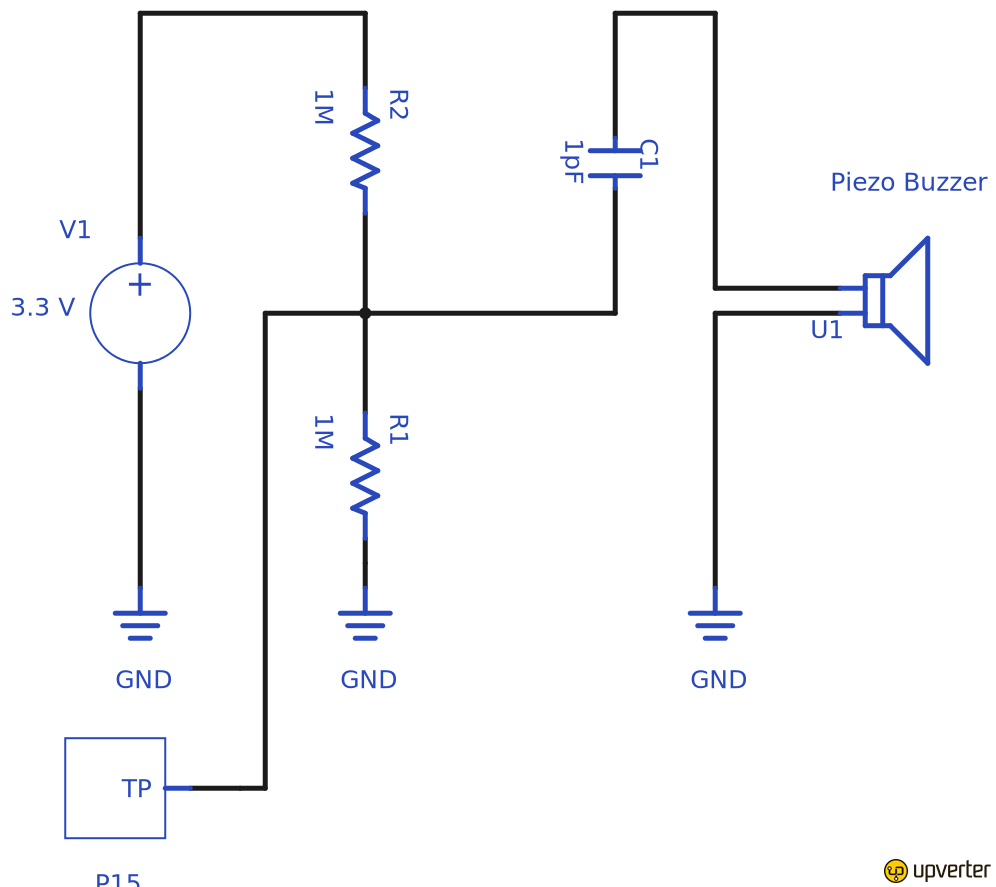
The secret knock allows for a knock sequence to be set up that will allow users to replicate this knock for access. To achieve this, a piezo speaker was converted to a contact speaker. A contact speaker is perfect for this use because it turns mechanical vibrations into electricity, and focuses on the vibrations coming from the door it is mounted to, ignoring any ambient noises. A contact speaker is created by using a piezo speaker in conjunction with a capacitor and a voltage divider. The diagram for this is shown below:

When the user sets up the 'secret knock', the code counts the amount of time between each knock. Then, whenever the user attempts to replicate the knock, it is checked to see if it matches the original, with a tolerance of 30%.
void knock_thread(void const *args){
    Thread::wait(1000);
    changeSecretKnock();
    float newval;
    while(1){
        newval = ain.read();
        if(newval > 0.508 && newval < 0.538){
            Thread::wait(50);
            captureKnock();
            checkKnocks();
        }else if(changeKnockBool){
            changeSecretKnock();
        }
        Thread::wait(1);
    }
}

void checkKnocks(){
    if(userKnock.size()!=0){
        if(knock.size() != userKnock.size()){
            denied = true;
        }else{
            bool accessCheck = true;
            for(int i = 0; i<knock.size(); i++){
                if(!(abs(1-((float)knock[i])/((float)userKnock[i]))<0.15)){
                    accessCheck = false;
                }
            }
            if(accessCheck){
                access = true;
            }else{
                denied = true;
            }
        }
    }
}

void captureKnock(){
    float val;
    userKnock.clear();
    timer.reset();
    int time;
    while(timer.read() < 2){
        val = ain.read();
        if(val > 0.508 && val < 0.538){
            time = timer.read_ms();
            userKnock.push_back(time);
            Thread::wait(50);
            pc.printf("%d\n",time);
            timer.reset();
        }
        Thread::wait(1);
    }
}

void changeSecretKnock(){
    pc.printf("Changing Secret Knock\n");
    float val;
    Timer t;
    while(true){
        val = ain.read();
        if(val > 0.508 && val < 0.538){
            Thread::wait(50);
            break;
        }
        Thread::wait(1);
    }
    t.start();
    int time;
    while(t.read() < 2){
        val = ain.read();
        if(val > 0.508 && val < 0.538){
            time = t.read_ms();
            knock.push_back(time);
            Thread::wait(50);
            pc.printf("%d\n",time);
            t.reset();
        }{{/media/uploads/otis22894/img_0829.jpg}}

        Thread::wait(1);
    }
    pc.printf("Size: %d\n",knock.size());
    changeKnockBool = false;
}
Servo
The servo is the final step of this project and is responsible for turning the lock. Two methods were set up for this, one to lock (turn left), and one to unlock (turn right), and are located below:
Servo myservo(p22);

void openServo()
{
    for(float p=0; p<1.0; p += 1) {
        myservo = p;
        wait(0.2);
        }
}

void closeServo()
{
    for(float p2=1.0; p2>0.0; p2 -= 1) {
        myservo = p2;
    wait(0.2);
    }
}


int main() {
    while(1){
        openServo();
        wait(0.1);
        closeServo();
        wait(0.2);
    }
}
USB
A USB can be plugged in to the USB breakout board installed to load a .txt file with a log of all attempts to get access via RFID cards or the key code. The log will display a time stamp, the RFID card number or the key code entered, and whether or not that particular user was granted access.
1 comment on BuzzAccess :
Please log in to post comments.

Hello ..if i want to make double phase like rfid and knock as to gain access where do i change the code? Thanx