Real time 32x32 LED Display

リアルタイムLEDディスプレイを作ってみました。ヽ(´ー`)ノ
パソコン画面を256階調で表示できます。
I made Real time LED Display.
256 Steps LED PWM. Display a PC screen.
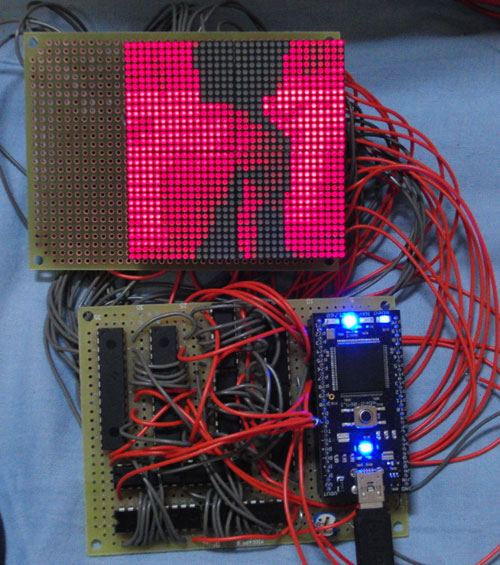
使用部品 Used parts
mbed NXP LPC1768. (6000yen)
SHARP LT5013T 16x16 Red LED 4 Unit. (420yen*4)
Texas Instruments TLC5940 16ch LED Diver 2 Unit. (390yen*2)
74HC164 Shift register 4 Unit. (75yen*4)
TOSHIBA TD62783APG Transistor array 4 Unit (100yen*4)
シフトレジスタにより一行づつ表示させ、高速にスキャンすることで 残像現象により画像として表示させます。
トランジスタアレイを使用してシフトレジスタの電流不足を補います。
LEDドライバは日本でたぶん唯一、一般人が安価に入手可能であるTLC5940を使用しました。
パソコン画面に映っている映像をリアルタイムでマイコンに送信します。
マウスポインタを原点として、32x32のドットを取得しmbedのUSBにBaudRate 921600 で送信します。
このソフトはC#で作りました。
参考文献:http://support.microsoft.com/kb/892462/ja
LED画面が少しちらつきます。暗いところでみればあまり気になりません。
原因はたぶんTLC5940のGSCLKの周波数が遅すぎることではないかと思います。
mbedのPWMの最小単位usで操作しているので、これ以上速くできません。
それとも他の原因かな・・・!?
C# Program
using System;
using System.Collections.Generic;
using System.ComponentModel;
using System.Data;
using System.Drawing;
using System.Linq;
using System.Text;
using System.Windows.Forms;
using System.Runtime.InteropServices;

namespace LED_Display
{
    public partial class Form1 : Form
    {
        private Bitmap myBitmap;
        int i = 0;
        int j = 0;

        public byte[] SendData = new byte[1];

        public class Win32APICall
        {


            [DllImport("gdi32.dll", EntryPoint = "DeleteDC")]
            public static extern IntPtr DeleteDC(IntPtr hdc);

            [DllImport("gdi32.dll", EntryPoint = "DeleteObject")]
            public static extern IntPtr DeleteObject(IntPtr hObject);

            [DllImport("gdi32.dll", EntryPoint = "BitBlt")]
            public static extern bool BitBlt(IntPtr hdcDest, int nXDest,
                int nYDest, int nWidth, int nHeight, IntPtr hdcSrc,
                int nXSrc, int nYSrc, int dwRop);

            [DllImport("gdi32.dll", EntryPoint = "CreateCompatibleBitmap")]
            public static extern IntPtr CreateCompatibleBitmap(IntPtr hdc,
                int nWidth, int nHeight);

            [DllImport("gdi32.dll", EntryPoint = "CreateCompatibleDC")]
            public static extern IntPtr CreateCompatibleDC(IntPtr hdc);

            [DllImport("gdi32.dll", EntryPoint = "SelectObject")]
            public static extern IntPtr SelectObject(IntPtr hdc, IntPtr hgdiobjBmp);

            [DllImport("user32.dll", EntryPoint = "GetDesktopWindow")]
            public static extern IntPtr GetDesktopWindow();

            [DllImport("user32.dll", EntryPoint = "GetDC")]
            public static extern IntPtr GetDC(IntPtr hWnd);

            [DllImport("user32.dll", EntryPoint = "GetSystemMetrics")]
            public static extern int GetSystemMetrics(int nIndex);

            [DllImport("user32.dll", EntryPoint = "ReleaseDC")]
            public static extern IntPtr ReleaseDC(IntPtr hWnd, IntPtr hDC);

            public static Bitmap GetDesktop()
            {
                IntPtr hBmp;
                IntPtr hdcScreen = GetDC(GetDesktopWindow());
                IntPtr hdcCompatible = CreateCompatibleDC(hdcScreen);

                int screenX;
                int screenY;

                screenX = GetSystemMetrics(0) ;
                screenY = GetSystemMetrics(1) ;

                hBmp = CreateCompatibleBitmap(hdcScreen, screenX, screenY);

                if (hBmp != IntPtr.Zero)
                {
                    IntPtr hOldBmp = (IntPtr)SelectObject(hdcCompatible, hBmp);
                    //BitBlt(hdcCompatible, 0, 0, screenX, screenY, hdcScreen, 0, 0, 13369376);

                    BitBlt(hdcCompatible, 0, 0, screenX, screenY, hdcScreen, 0, 0, 13369376);

                    SelectObject(hdcCompatible, hOldBmp);
                    DeleteDC(hdcCompatible);
                    ReleaseDC(GetDesktopWindow(), hdcScreen);

                    Bitmap bmp = System.Drawing.Image.FromHbitmap(hBmp);

                    DeleteObject(hBmp);
                    GC.Collect();

                    return bmp;
                }

                return null;
            }


        }


        public Form1()
        {
            InitializeComponent();
        }

        private void Form1_Load(object sender, EventArgs e)
        {
            serialPort1.Open();
        }

        private void led_send()
        {

            myBitmap = Win32APICall.GetDesktop();

            //Graphicsオブジェクトの作成
             Graphics g = groupBox1.CreateGraphics();


            for (int y = 0; y < 32; y++)
            {
                j = j + 7;

                for (int x = 0; x < 32; x++)
                {

                    i = i + 7;
                    try
                    {

                        Color myColor = myBitmap.GetPixel(MousePosition.X + (31 - x) * (int)(numericUpDown1.Value), MousePosition.Y + y * (int)(numericUpDown1.Value));

              //Brushオブジェクトの作成
                          SolidBrush b = new SolidBrush(myColor);

                        //(10,20,100,80)の長方形を塗りつぶす
                          g.FillRectangle(b, 240 - i, 10 + j, 5, 5);

                        //Color myColor2 = myBitmap.GetPixel(MousePosition.X, MousePosition.Y);
                        //textBox1.Text = myColor2.R.ToString();
                        //textBox2.Text = myColor2.G.ToString();
                        //textBox3.Text = myColor2.B.ToString();

                        if (radioButton1.Checked)
                        {
                            SendData[0] = Convert.ToByte(myColor.R);
                        }
                        if (radioButton2.Checked)
                        {
                            SendData[0] = Convert.ToByte(myColor.G);
                        }
                        if (radioButton3.Checked)
                        {
                            SendData[0] = Convert.ToByte(myColor.B);
                        }

                        serialPort1.Write(SendData, 0, 1);//送信
                    }
                    catch
                    {
                    }

                }

                i = 0;
            }

            j = 0;

        }
        private void timer1_Tick(object sender, EventArgs e)
        {
            led_send();
        }
    }
}
mbed Program
#include "mbed.h"

DigitalOut myled(LED1);
DigitalOut myled3(LED3);

DigitalOut SIN(p21);
DigitalOut SCLK(p22);
DigitalOut XLAT(p23);
PwmOut GSCLK(p24);
DigitalOut BLANK(p25);
DigitalOut CK_164(p26);
DigitalOut SIN_164(p27);
DigitalOut CLR_164(p28);

Serial pc(USBTX, USBRX); // tx, rx

int q;

int i=0;
int j=0;
int k=0;
int l=0;
int m=0;
int o=0;
int p=0;
int r=0;

int xy[1024]={1,4,7,10,13,16,19,21,24,27,30,33,36,39,42,45,90,100,255};
int nishin[12];
int x_temp;

void led_data() {
    myled=1;
    xy[l]=pc.getc()-48;

    l++;


    if (l==1024) {
        l=0;
    }
    myled=0;
}


int main() {


    pc.baud(921600);
    pc.attach(&led_data);


    GSCLK.pulsewidth_us(0);
    GSCLK.period_us(2);

    //ShiftRegister_reset
    CLR_164=1;
    CLR_164=0;
    CLR_164=1;

    SIN_164=1;
    SIN_164=0;


    XLAT = 1;
    XLAT = 0;

    wait(1);

    while (1) {

        while (o<32) {

            while (i<32) {

                k=0;
                //nisin syokika
                while (k<12) {
                    nishin[11-k]=0;
                    k++;
                }

                x_temp=xy[r];


                k=0;

                if (x_temp!=0) {
                    while (x_temp >0 ) {
                        nishin[11-k]=x_temp%2;
                        x_temp=x_temp/2;
                        k++;
                    }
                }


                j=0;
                while (j<12) {
                    if (nishin[j]==1) {
                        SIN=1;
                        SCLK=1;
                        SCLK=0;
                        //pc.putc('1');
                        //wait(0.01);
                    } else {
                        SIN=0;
                        SCLK=1;
                        SCLK=0;
                        //pc.putc('0');
                        //wait(0.01);
                    }
                    j++;
                }

                i++;


                // pc.printf("num=%d\r\n",r);

                r++;

                if (r==1024) {
                    r=0;
                }
                // pc.putc('\r');
                // pc.putc('\n');

            }


            i=0;


            GSCLK.pulsewidth_us(1);
            wait_us(256);
            GSCLK.pulsewidth_us(0);

            BLANK=1;
            BLANK=0;


            XLAT = 1;
            XLAT = 0;

            //pc.printf("num=%d num=%d\r\n",r,o);
            //wait(0.1);

            if (o==0) {
                SIN_164=1;
            } else {
                SIN_164=0;
            }

            CK_164=1;
            CK_164=0;

            //wait(0.05);

            SCLK=1;
            SCLK=0;
            myled3=1;


            o++;
        }

        o=0;


    }

}
1 comment
You need to log in to post a comment
Very nice project.
Very good demonstration of making a project with mbed and associated software on the PC.
You succeed in spite of challenges.
Congratulations to you!
Best Wishes to you!
Dave Eaton