BongoBot
Project Description
The goal of this project is to create a Bluetooth controlled bongo player. The device will also be able to play beats autonomously based off a text file read through an SD card reader. The text file should be formatted with a series of numbers: 1, 2, and 3. A number one represents hitting the large drum, a number two represents hitting the smaller drum, and a number three will make the bot hit both drums. The Adafruit Bluetooth App has been changed to connect to the bot to create a user-controlled experienced. LEDs also line the bottom of each drum and will light up blue when one drum is hit and red when both drums are hit.
Team Members
- Helen Zhang
- Lauren Kearley
- Randy Michnovicz
- Theodore Johnson
Parts List
- LPC1768 mbed
- (x2) RBG LED Tape Lights
- (x2) 400 Pin Breadboards
- (x3) N-channel power MOSFET
- (x2) Car Door Lock Actuator Motor
- H Bridge
- Adafruit Bluefruit LE UART
- 2' x 2' Plywood Sheet
- (x4) 6-32 x 2" Nuts and Bolts
- 3/4" x 2' 22 Gauge Steel Hanger Strap
- (x2) 1-1/2" Binding Posts
- 9V 2A Battery Power Supply
- Bongos
- Drum Sticks
- (x2) Counterweights (we used a AA and D battery)
- Tiny Hands
Hardware Setup
Wiring
| Adafruit Bluefruit LE UART | mbed |
|---|---|
| Gnd | Gnd |
| Vin | Vu |
| CTS | Gnd |
| TXO | p28 |
| RXI | p27 |
| SDCard Reader | mbed |
|---|---|
| Gnd | Gnd |
| Vcc | Vout |
| CS | p14 |
| SCK | p13 |
| DI | p11 |
| DO | p12 |
| H Bridge | mbed | Car Lock Actuator Motor |
|---|---|---|
| PWMA/PWMB/STBY | Vout (3.3 V) | |
| Gnd | Gnd | |
| Vcc | Vout | |
| Vmot | 9v | |
| AIN1 | p5 | |
| AIN2 | p6 | |
| BIN1 | p29 | |
| BIN2 | p30 | |
| AO1 | Pole A2 | |
| AO2 | Pole A1 | |
| BO1 | Pole B1 | |
| BO2 | Pole B2 |
| N-channel power MOSFET | mbed | RGB LED | |
|---|---|---|---|
| MOSFET 1 | pin 1 | p25 | |
| pin 2 | R | ||
| pin 3 | gnd | ||
| MOSFET 2 | pin 1 | p24 | |
| pin 2 | G | ||
| pin 3 | gnd | ||
| MOSFET 3 | pin 1 | p23 | |
| pin 2 | B | ||
| pin 3 | gnd |

Creating Motor Casings
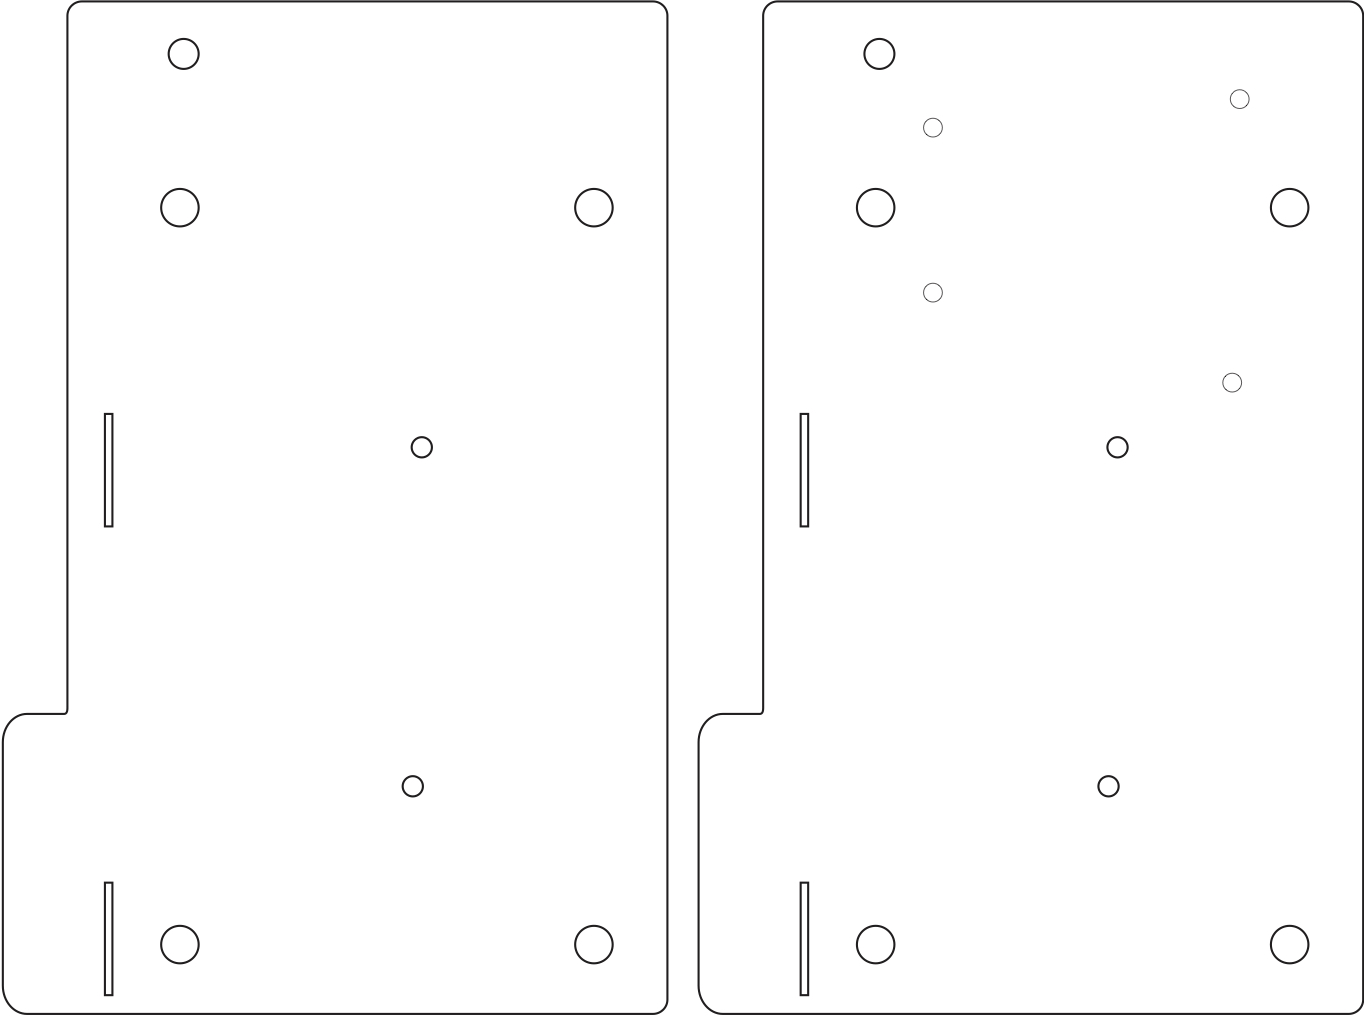
The motor mounts were laser cut from the plywood according to the design below. Then assembled by attacking the motors between the two brackets using the 6-32 x 2" nuts and bolts.

Next holes were drilled 8 3/8" from the tip of the drum stick for the smaller drum and 8 3/4" from the tip for the larger drum using a 5/32" drill bit. These are then attached to the motor casings using the 1-1/2" binding posts.
Since the wires on the motors are too short to be attached to the breadboard we extended the wires by soldering them to generic 22 AWG threaded core wires using heat shrink to encase the wire connections. To ensure the threaded core wire can be used with the breadboard we soldered the ends of the wires to jumper wires.
LEDs
We used two RGB LED strips controlled by PWM pins which light up blue when each drum is hit individually and red when both are hit. To control voltage and current flow to each RGB pin we used an N-Channel MOSFET to control each of the RGB pins. To power the strip we used the 5V Vu pin on the Mbed. Since the Vu pin of the Mbed does not function when the device is not powered by the USB port we kept the device connected when running.
Assembling Bot
These motor casing are attached the the bongo drums using the steel hanger strap, 6-32 x 1" nuts and bolts, and some washers for added stability. Next we attached the drum sticks to the casings using the 1-1/2" Binding Posts aligned such that when the motors fire they push the drum stick down.


After attaching the drumsticks, we put counterweights on the back of them so that after they hit the drum they will go back to their up position. Since the drum sticks have holes at different positions due to the different size of the drum sticks they did not need the same counterweight to achieve this function. We put a D battery on the larger drum's stick and a AA on the smaller one's stick as counterweights.

Since we used two smaller breadboards because they were the correct size to mount easily to the bongos, we had to jump the connections across the breadboards.
Software
Mbed Code
Import programECE4180_BangoBot
Bangobot code
Bongo Bot Main.cpp
#include "mbed.h"
#include "Motor.h"
#include "SDFileSystem.h"
#include "rtos.h"

#define SONG_SIZE 60

//Class to control an RGB LED using three PWM pins
class RGBLed
{
public:
    RGBLed(PinName redpin, PinName greenpin, PinName bluepin);
    void write(float red,float green, float blue);
private:
    PwmOut _redpin;
    PwmOut _greenpin;
    PwmOut _bluepin;
};

RGBLed::RGBLed (PinName redpin, PinName greenpin, PinName bluepin)
    : _redpin(redpin), _greenpin(greenpin), _bluepin(bluepin)
{
    //50Hz PWM clock default a bit too low, go to 2000Hz (less flicker)
    _redpin.period(0.0005);
}

void RGBLed::write(float red,float green, float blue)
{
    _redpin = red;
    _greenpin = green;
    _bluepin = blue;
}

//Setup RGB led using PWM pins and class
microphone mymicrophone(p16);
RGBLed myRGBled(p25,p24,p23); //RGB PWM pins
Motor small(p21, p30, p29); // pins for large drum // pwm, fwd, rev
Motor largex`(p22, p6, p5); // pins for small drum
Serial blue(p28,p27); // pins for bluetooth module serial
Serial pc(USBTX,USBRX);
SDFileSystem sd(p11, p12, p13, p14, "sd");
Timer timer; // Timer to  for when recorded song is playing
Thread led_thread;
char buffer[SONG_SIZE];

DigitalOut smallLED(LED1);
DigitalOut largeLED(LED2);
DigitalOut bothLED(LED3);
DigitalOut led4(LED4);
int toggle = 0;

FILE *nfp = fopen("/sd/sdtest1.txt", "r");


float strikelength = .15; // amount of time in seconds that the motor will run when striking
float bpm = 240.0; // bpm of recorded song, 240 bpm is nearing the fastest that we can go
float intensity = 0.0;
volatile int color = 0;
float recover = .15;
float initial = .01;

// Hit the small drum
void small_hit(void) {
    myRGBled.write(1,1,0);
    smallLED = 1;
    wait(.1);
    smallLED = 0;
    color = 2;
    small.speed(1.0);
    wait(strikelength);
    small.speed(0);
    wait(initial);
    small.speed(-1.0);
    wait(recover);
    small.speed(0);
    myRGBled.write(0,0,0);
}

// Hit large drum
void large_hit(void) {
    myRGBled.write(1,1,0);
    largeLED = 1;
    wait(.1);
    largeLED = 0;
    color = 1;
    large.speed(1.0);
    wait(strikelength);
    large.speed(0);
    wait(initial);
    large.speed(-1.0);
    wait(recover);
    large.speed(0);
    myRGBled.write(0,0,0);
}

// Hit both drums
void both_hit(void) {
    myRGBled.write(0,0,1);
    bothLED = 1;
    wait(.1);
    bothLED = 0;
    color = 3;
    small.speed(1.0);
    large.speed(1.0);
    wait(strikelength);
    small.speed(0);
    large.speed(0);
    wait(initial);
    small.speed(-1.0);
    large.speed(-1.0);
    wait(recover);
    small.speed(0);
    large.speed(0);
    myRGBled.write(0,0,0);
}

int main() {
    if(nfp == NULL) {
        error("Could not open file for read\n");
    }
    led4 = 1;

    while(true) {
        led4 = toggle;
        toggle = (toggle == 0) ? 1 : 0;
        if (blue.getc() == '!') { // The message should just be '!' and then a number 0-3. Ex. '!0','!1',...
            //pc.printf("Bluetooth message recieved");
            // '!0' and any other number corresponds to no action
            if (blue.getc() == 'B') {
                char c = blue.getc();
                if (blue.getc() == '1') {
                    if (c == '1') large_hit();
                    else if (c == '2') small_hit();
                    else if (c == '3') both_hit();
                    else {
                        fgets(buffer,SONG_SIZE,nfp);
                        for (int i = 0; i < sizeof(buffer); i++) {
                            timer.reset();
                            if (buffer[i] == NULL) break;
                            switch(buffer[i]) {
                                case '1': large_hit();
                                case '2': small_hit();
                                case '3': both_hit();
                            }
                            // Play the notes or rests at 240 bpm
                            //while (timer < 60.0/bpm);
                        }
                    }
                }

            }
        }
    }

    return 0;
}
Mobile App Code
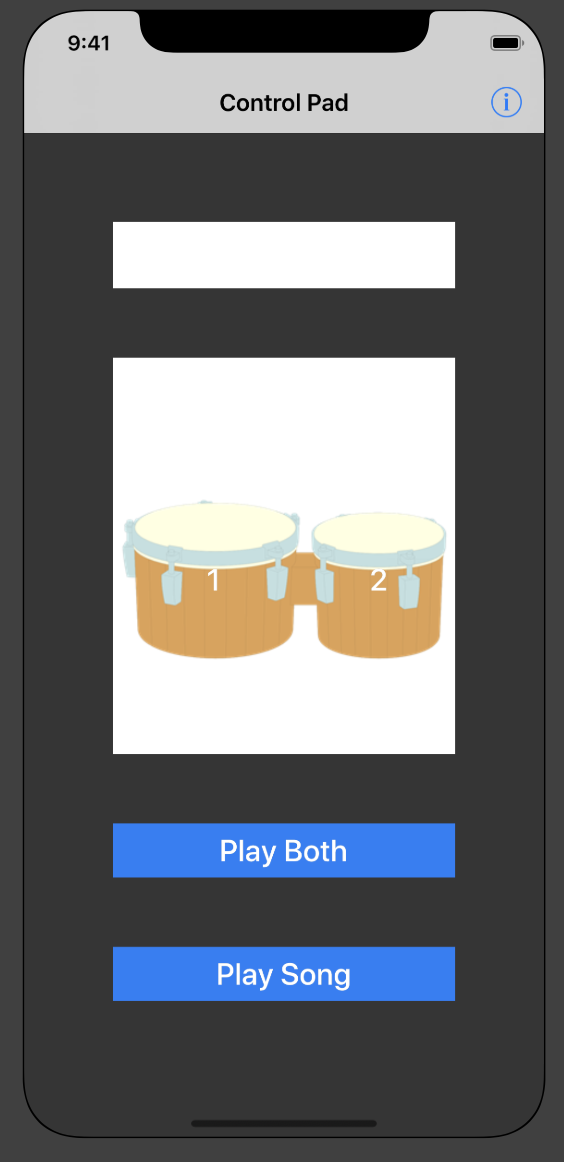
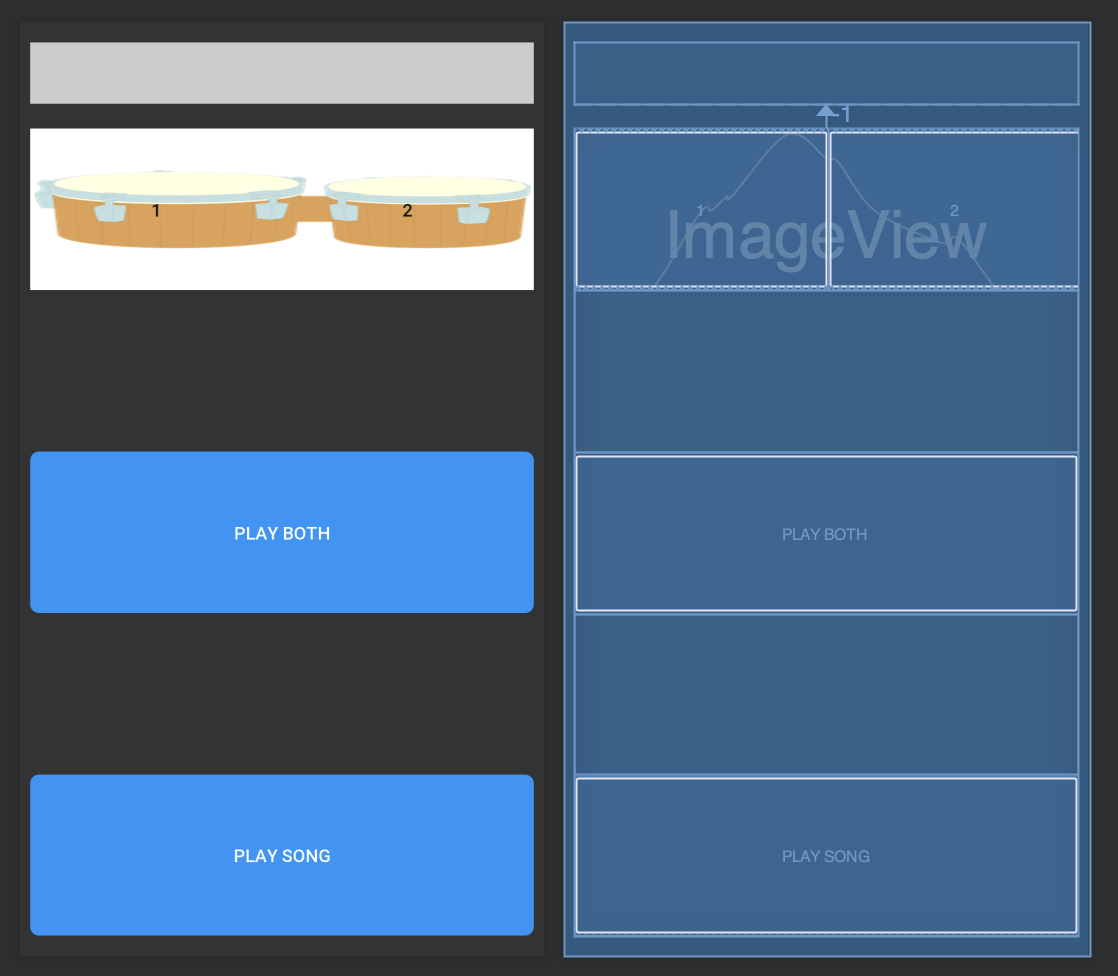
We edited the Bluetooth UART iOS and Android applications to reflect the project goals. To do this we changed the button scheme to have a bongo which can be pressed to play the large or smaller drum, a button which plays both drums, and a button which plays the song from the SD card.
iOS
To make the iOS app reflect the new controller button layout we changed the ControllerPadViewController.swift file to the following code and edited the corresponding view in the Main.storyboard file as shown below.

Updates to ViewController
import UIKit

protocol ControllerPadViewControllerDelegate: class {
    func onSendControllerPadButtonStatus(tag: Int, isPressed: Bool)
}

class ControllerPadViewController: UIViewController {

    // UI
    @IBOutlet weak var uartTextView: UITextView!
    @IBOutlet weak var uartView: UIView!
    @IBOutlet weak var button1: UIButton!
    @IBOutlet weak var button2: UIButton!
    @IBOutlet weak var button3: UIButton!
    @IBOutlet weak var button4: UIButton!

    // Data
    weak var delegate: ControllerPadViewControllerDelegate?

    override func viewDidLoad() {
        super.viewDidLoad()

        // UI
        uartView.layer.cornerRadius = 4
        uartView.layer.masksToBounds = true

        // Setup buttons targets
        setupButton(button1)
        setupButton(button2)
        setupButton(button3)
        setupButton(button4)

    }

    override func didReceiveMemoryWarning() {
        super.didReceiveMemoryWarning()
        // Dispose of any resources that can be recreated.
    }

    override func viewDidAppear(_ animated: Bool) {
        super.viewDidAppear(animated)

        // Fix: remove the UINavigationController pop gesture to avoid problems with the arrows left button
        DispatchQueue.main.asyncAfter(deadline: .now() + 0.1) {
            self.navigationController?.interactivePopGestureRecognizer?.delaysTouchesBegan = false
            self.navigationController?.interactivePopGestureRecognizer?.delaysTouchesEnded = false
            self.navigationController?.interactivePopGestureRecognizer?.isEnabled = false
        }
    }

    override func viewDidDisappear(_ animated: Bool) {
        super.viewDidDisappear(animated)
    }

    // MARK: - UI
    fileprivate func setupButton(_ button: UIButton) {

        button.addTarget(self, action: #selector(onTouchDown(_:)), for: .touchDown)
        button.addTarget(self, action: #selector(onTouchUp(_:)), for: .touchUpInside)
        button.addTarget(self, action: #selector(onTouchUp(_:)), for: .touchDragExit)
        button.addTarget(self, action: #selector(onTouchUp(_:)), for: .touchCancel)
    }

    func setUartText(_ text: String) {

        // Remove the last character if is a newline character
        let lastCharacter = text.last
        let shouldRemoveTrailingNewline = lastCharacter == "\n" || lastCharacter == "\r"
        let formattedText = shouldRemoveTrailingNewline ? String(text[..<text.index(before: text.endIndex)]) : text

        //
        uartTextView.text = formattedText

        // Scroll to bottom
        let bottom = max(0, uartTextView.contentSize.height - uartTextView.bounds.size.height)
        uartTextView.setContentOffset(CGPoint(x: 0, y: bottom), animated: true)
    }

    // MARK: - Actions
    @objc func onTouchDown(_ sender: UIButton) {
        sendTouchEvent(tag: sender.tag, isPressed: true)
    }

    @objc func onTouchUp(_ sender: UIButton) {
        sendTouchEvent(tag: sender.tag, isPressed: false)
    }

    private func sendTouchEvent(tag: Int, isPressed: Bool) {
        if let delegate = delegate {
            delegate.onSendControllerPadButtonStatus(tag: tag, isPressed: isPressed)
        }
    }

    @IBAction func onClickHelp(_ sender: UIBarButtonItem) {
        let localizationManager = LocalizationManager.shared
        let helpViewController = storyboard!.instantiateViewController(withIdentifier: "HelpViewController") as! HelpViewController
        helpViewController.setHelp(localizationManager.localizedString("controlpad_help_text"), title: localizationManager.localizedString("controlpad_help_title"))
        let helpNavigationController = UINavigationController(rootViewController: helpViewController)
        helpNavigationController.modalPresentationStyle = .popover
        helpNavigationController.popoverPresentationController?.barButtonItem = sender

        present(helpNavigationController, animated: true, completion: nil)
    }
}
Android
To make the Android app reflect the new controller button layout we changed the ControllerPadFragment.java file to the following code and edited the corresponding view in the fragment_controller_pad.xml file as shown below.

Updates to ControllerPadFragment
package com.adafruit.bluefruit.le.connect.app;

import android.content.Context;
import android.os.Bundle;
import android.os.Handler;
import android.support.annotation.NonNull;
import android.support.annotation.Nullable;
import android.support.v4.app.Fragment;
import android.support.v4.app.FragmentActivity;
import android.support.v4.app.FragmentManager;
import android.support.v4.app.FragmentTransaction;
import android.support.v7.app.ActionBar;
import android.support.v7.app.AppCompatActivity;
import android.view.LayoutInflater;
import android.view.Menu;
import android.view.MenuInflater;
import android.view.MenuItem;
import android.view.MotionEvent;
import android.view.View;
import android.view.ViewGroup;
import android.view.ViewTreeObserver;
import android.widget.EditText;
import android.widget.ImageButton;
import android.widget.Button;

import com.adafruit.bluefruit.le.connect.BluefruitApplication;
import com.adafruit.bluefruit.le.connect.BuildConfig;
import com.adafruit.bluefruit.le.connect.R;
import com.squareup.leakcanary.RefWatcher;

public class ControllerPadFragment extends Fragment {
    // Log
    @SuppressWarnings("unused")
    private final static String TAG = ControllerPadFragment.class.getSimpleName();

    // Config
    private final static float kMinAspectRatio = 1.8f;

    // UI TextBuffer (refreshing the text buffer is managed with a timer because a lot of changes can arrive really fast and could stall the main thread)
    private Handler mUIRefreshTimerHandler = new Handler();
    private Runnable mUIRefreshTimerRunnable = new Runnable() {
        @Override
        public void run() {
            if (isUITimerRunning) {
                updateTextDataUI();
                // Log.d(TAG, "updateDataUI");
                mUIRefreshTimerHandler.postDelayed(this, 200);
            }
        }
    };
    private boolean isUITimerRunning = false;

    // UI
    private ViewGroup mContentView;
    private EditText mBufferTextView;
    private ViewGroup mRootLayout;
    private View mTopSpacerView;
    private View mBottomSpacerView;

    // Data
    private ControllerPadFragmentListener mListener;
    private volatile StringBuilder mDataBuffer = new StringBuilder();
    private volatile StringBuilder mTextSpanBuffer = new StringBuilder();
    private int maxPacketsToPaintAsText;
    View.OnTouchListener mPadButtonTouchListener = new View.OnTouchListener() {
        @Override
        public boolean onTouch(View view, MotionEvent event) {
            final int tag = Integer.valueOf((String) view.getTag());
            if (event.getAction() == MotionEvent.ACTION_DOWN) {
                view.setPressed(true);
                mListener.onSendControllerPadButtonStatus(tag, true);
                return true;
            } else if (event.getAction() == MotionEvent.ACTION_UP) {
                view.setPressed(false);
                mListener.onSendControllerPadButtonStatus(tag, false);
                view.performClick();
                return true;
            }
            return false;
        }
    };

    // region Lifecycle
    @SuppressWarnings("UnnecessaryLocalVariable")
    public static ControllerPadFragment newInstance() {
        ControllerPadFragment fragment = new ControllerPadFragment();
        return fragment;
    }

    public ControllerPadFragment() {
        // Required empty public constructor
    }

    @Override
    public void onCreate(Bundle savedInstanceState) {
        super.onCreate(savedInstanceState);

        // Retain this fragment across configuration changes
        setRetainInstance(true);
    }

    @Override
    public View onCreateView(@NonNull LayoutInflater inflater, ViewGroup container, Bundle savedInstanceState) {
        // Inflate the layout for this fragment
        return inflater.inflate(R.layout.fragment_controller_pad, container, false);
    }

    @Override
    public void onViewCreated(@NonNull View view, @Nullable Bundle savedInstanceState) {
        super.onViewCreated(view, savedInstanceState);

        // Set title
        AppCompatActivity activity = (AppCompatActivity) getActivity();
        if (activity != null) {
            ActionBar actionBar = activity.getSupportActionBar();
            if (actionBar != null) {
                actionBar.setTitle(R.string.controlpad_title);
                actionBar.setDisplayHomeAsUpEnabled(true);
            }
        }

        // UI
        mRootLayout = view.findViewById(R.id.rootLayout);
        mTopSpacerView = view.findViewById(R.id.topSpacerView);
        mBottomSpacerView = view.findViewById(R.id.bottomSpacerView);

        mContentView = view.findViewById(R.id.contentView);
        mBufferTextView = view.findViewById(R.id.bufferTextView);
        if (mBufferTextView != null) {
            mBufferTextView.setKeyListener(null);     // make it not editable
        }

        Button button1ImageButton = view.findViewById(R.id.button1ImageButton);
        button1ImageButton.setOnTouchListener(mPadButtonTouchListener);
        Button button2ImageButton = view.findViewById(R.id.button2ImageButton);
        button2ImageButton.setOnTouchListener(mPadButtonTouchListener);
        Button button3ImageButton = view.findViewById(R.id.button3ImageButton);
        button3ImageButton.setOnTouchListener(mPadButtonTouchListener);
        Button button4ImageButton = view.findViewById(R.id.button4ImageButton);
        button4ImageButton.setOnTouchListener(mPadButtonTouchListener);

        // Read shared preferences
        maxPacketsToPaintAsText = UartBaseFragment.kDefaultMaxPacketsToPaintAsText; //PreferencesFragment.getUartTextMaxPackets(this);
    }

    @Override
    public void onAttach(Context context) {
        super.onAttach(context);
        if (context instanceof ControllerPadFragmentListener) {
            mListener = (ControllerPadFragmentListener) context;
        } else if (getTargetFragment() instanceof ControllerPadFragmentListener) {
            mListener = (ControllerPadFragmentListener) getTargetFragment();
        } else {
            throw new RuntimeException(context.toString() + " must implement ControllerPadFragmentListener");
        }
    }

    @Override
    public void onDetach() {
        super.onDetach();
        mListener = null;
    }

    @Override
    public void onResume() {
        super.onResume();

        ViewTreeObserver observer = mRootLayout.getViewTreeObserver();
        observer.addOnGlobalLayoutListener(new ViewTreeObserver.OnGlobalLayoutListener() {
            @Override
            public void onGlobalLayout() {
                adjustAspectRatio();
                mRootLayout.getViewTreeObserver().removeOnGlobalLayoutListener(this);
            }
        });

        // Refresh timer
        isUITimerRunning = true;
        mUIRefreshTimerHandler.postDelayed(mUIRefreshTimerRunnable, 0);
    }

    @Override
    public void onPause() {
        isUITimerRunning = false;
        mUIRefreshTimerHandler.removeCallbacksAndMessages(mUIRefreshTimerRunnable);

        super.onPause();
    }

    @Override
    public void onCreateOptionsMenu(Menu menu, MenuInflater inflater) {
        super.onCreateOptionsMenu(menu, inflater);
        inflater.inflate(R.menu.menu_help, menu);
    }

    @Override
    public boolean onOptionsItemSelected(MenuItem item) {
        FragmentActivity activity = getActivity();

        switch (item.getItemId()) {
            case R.id.action_help:
                if (activity != null) {
                    FragmentManager fragmentManager = activity.getSupportFragmentManager();
                    if (fragmentManager != null) {
                        CommonHelpFragment helpFragment = CommonHelpFragment.newInstance(getString(R.string.controlpad_help_title), getString(R.string.controlpad_help_text));
                        FragmentTransaction fragmentTransaction = fragmentManager.beginTransaction()
                                .replace(R.id.contentLayout, helpFragment, "Help");
                        fragmentTransaction.addToBackStack(null);
                        fragmentTransaction.commit();
                    }
                }
                return true;

            default:
                return super.onOptionsItemSelected(item);
        }
    }

    // endregion

    // region UI

    private void adjustAspectRatio() {
        ViewGroup rootLayout = mContentView;
        final int mainWidth = rootLayout.getWidth();

        if (mainWidth > 0) {
            final int mainHeight = rootLayout.getHeight() - mTopSpacerView.getLayoutParams().height - mBottomSpacerView.getLayoutParams().height;
            if (mainHeight > 0) {
                // Add black bars if aspect ratio is below min
                final float aspectRatio = mainWidth / (float) mainHeight;
                if (aspectRatio < kMinAspectRatio) {
                    final int spacerHeight = Math.round(mainHeight - mainWidth / kMinAspectRatio);
                    ViewGroup.LayoutParams topLayoutParams = mTopSpacerView.getLayoutParams();
                    topLayoutParams.height = spacerHeight / 2;
                    mTopSpacerView.setLayoutParams(topLayoutParams);

                    ViewGroup.LayoutParams bottomLayoutParams = mBottomSpacerView.getLayoutParams();
                    bottomLayoutParams.height = spacerHeight / 2;
                    mBottomSpacerView.setLayoutParams(bottomLayoutParams);
                }
            }
        }
    }

    public synchronized void addText(String text) {
        mDataBuffer.append(text);
    }


    private int mDataBufferLastSize = 0;

    private synchronized void updateTextDataUI() {

        final int bufferSize = mDataBuffer.length();
        if (mDataBufferLastSize != bufferSize) {

            if (bufferSize > maxPacketsToPaintAsText) {
                mDataBufferLastSize = bufferSize - maxPacketsToPaintAsText;
                mTextSpanBuffer.setLength(0);
                mTextSpanBuffer.append(getString(R.string.uart_text_dataomitted)).append("\n");
                mDataBuffer.replace(0, mDataBufferLastSize, "");
                mTextSpanBuffer.append(mDataBuffer);

            } else {
                mTextSpanBuffer.append(mDataBuffer.substring(mDataBufferLastSize, bufferSize));
            }

            mDataBufferLastSize = mDataBuffer.length();
            mBufferTextView.setText(mTextSpanBuffer);
            mBufferTextView.setSelection(0, mTextSpanBuffer.length());        // to automatically scroll to the end
        }
    }
    // endregion

    // region ControllerPadFragmentListener
    public interface ControllerPadFragmentListener {
        void onSendControllerPadButtonStatus(int tag, boolean isPressed);
    }
    // endregion
}
Finished Product
Future Work
Some improvement which could be made are to allow for song uploads from the mobile device rather than reading from the SD card. This could be implemented by an audio processing library which turn the mp3 song data into usable information before sending it to the bluetooth controller. Additionally adding a microphone to create a raise/dimming effect which lights the LEDs based on how loud the drum hit is another possible addition to this project.
Please log in to post comments.
