RedBot Sensor - Mechanical Bumper
RedBot Sensor - Mechanical Bumper
SEN-11999 ROHS

Description from Sparkfun.com:
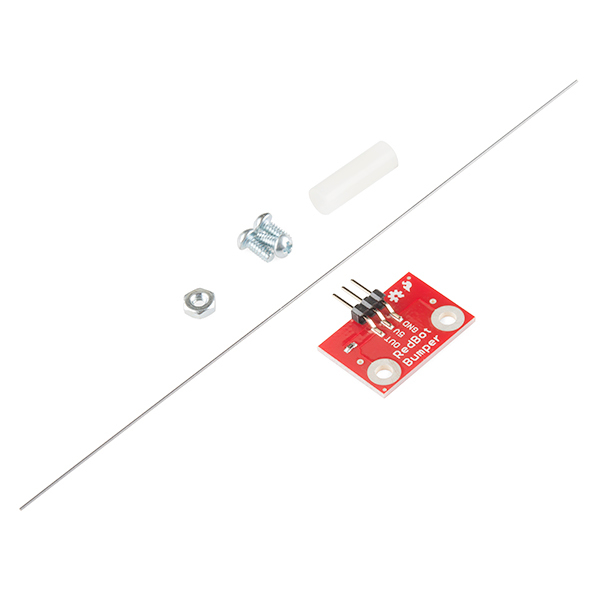
These simple switches are the Mechanical Bumper sensor for the SparkFun RedBot, giving you the ability to detect a collision before it really happens. This sensor works by acting as a SPST switch. When the “whisker” bumps into a foreign object it will make contact with a nut next to it, closing the connection and, by default, turning off the motor. By attaching these mechanical bumpers to you robot the whisker will bump something before your robot crashes into it.
The sensor has a 3-pin header which connects directly to the RedBot Mainboard via female to female jumper wires. Use the included RedBot library to make sure your robot never crashes into anything again.
Schematic

Parts Included

To Assemble

- For more detailed instructions, see Sparkfun's Assembly page.
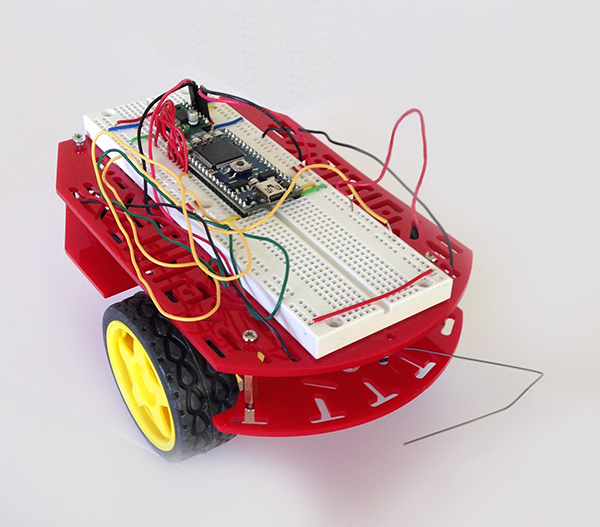
Demo RedBot with Mechanical Bumper
Note:
Typically, two of these sensors are used as a front bumper, as shown in the image above. However, the demo shown below uses only one mechanical bumper sensor, which is bent to act as a front facing bumper. A drawback with this design is that the robot detects strait-on collisions well, but is not optimal for angled collisions.

Wiring
| mbed | Bumper | |
|---|---|---|
| VU | 5V | |
| GND | GND | |
| p27 | OUT |

Here is a short code example that causes the RedBot to move forward at 75% full speed using a while loop. In the beginning of every iteration of the loop, the output from the mechanical bumper is checked using the mbed DigitalIn API at pin 27. Until the bumper comes into contact with a wall, the output of the bumper sensor is 5V. Thus, the input at pin 27 will be high. When it hits a wall, the mechanical bumper acts a single-pole, single-throw switch, connecting to ground, and the input at pin 27 will be low. In this event, the stop() function is called which causes the RedBot to back up and rotate to a different direction. From there, the robot returns to the while loop in the main program. This process continues ad inifitum.
- As an alternative to polling, interrupts may be used.
main.cpp
#include "mbed.h"
#include "motordriver.h"

DigitalOut myled(LED1);
DigitalIn bumper(p27);


//See http://mbed.org/cookbook/Motor
//Connections to dual H-brdige driver for the two drive motors
Motor  left(p21, p22, p23, 1); // pwm, fwd, rev, has brake feature
Motor right(p26, p25, p24, 1);

// Turn off motors, then back up and rotate to a different direction
void stop(){

    // Turn on LED1 to indicate a collision
    myled=1;

    // Stop the motors
    left.stop(1);
    right.stop(1);
    wait(.5);

    // Back up
    left.speed(-1);
    right.speed(-1);
    wait(.5);

    // Rotate to a different direction
    left.speed(-1);
    right.speed(1);
    wait (.5);

    // Stop when repositioned
    left.stop(1);
    right.stop(1);
    wait(1);

    // Turn off the LED1 indicator light
    myled=0;
}

// Main program causes robot to move forward at full speed until a collision is detected
int main() {
    while (1) {
        // Check for collision and stop if detected
        if (bumper == 0) stop();

        // Move forward at 75% full speed until collision is detected
        left.speed(.75);
        right.speed(.75);
    }
}
Demo Video
Please log in to post comments.
