Thermostat Demo
I have put together a web enabled thermostat demo project which uses the Mission: Cognition Baseboard. It makes use of the inexpensive Seeedstudio temperature sensor and relay Twig modules. The mbed program is here and the web server code can be found in this zip file thermostat_www.zip.
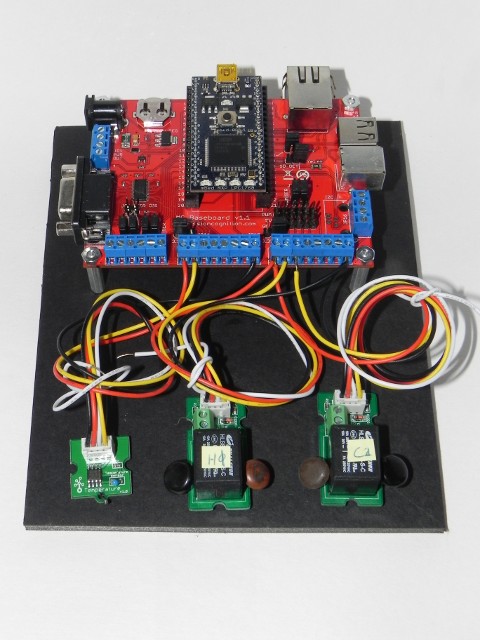
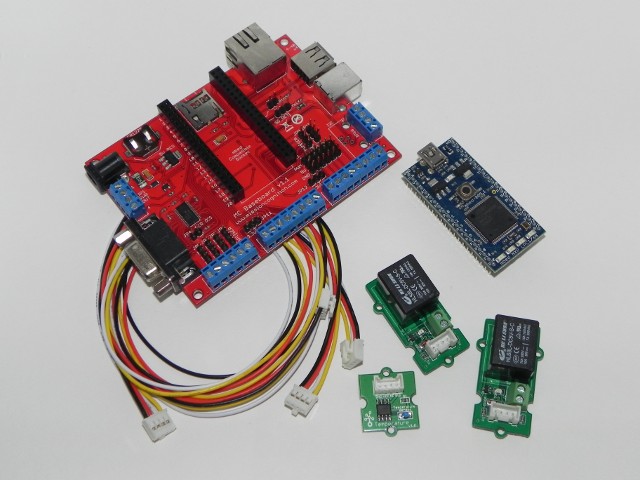
Parts List:
- mbed module
- MC-101 Baseboard (or other I/O breakout board / solderless breadboard setup with Ethernet)
- 1 Temperature Sensor Twig
- 2 Relay Twigs
- 3 Twig Cable halves (you are going to cut 2 cables in half).
- 1 Ethernet Cable
- 1 uSD card, any capacity / uSD card reader for your computer
- 1 Power Adapter (optional)
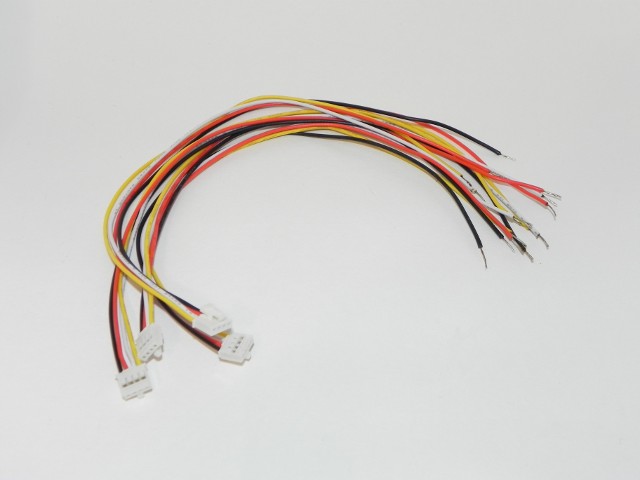
Step 1: Prepare Twig Cables
- Cut each Twig cable in half.
- Using wire strippers expose about 1/4 inch of bare wire.
- Using a soldering iron apply solder to exposed ends of wires (this step is optional but highly recommended). Don't use too much solder, keep the wire ends thin so they will fit in the terminal blocks easily.
Step 2: Configure MC-101 Jumpers
- Refer to the MC-101jumper settings documentation for detailed information.
- Set the jumper for JP11 to pins 1:2 (left position) to select 3.3V on the 'Analog' (middle) terminal block.
- Set the jumper for JP12 to pins 2:3 (right position) to select 5V on the 'PWM' (right) terminal block.
- The remainder of the jumpers can remain where they are since they do not affect this demo.
Step 3: Connect Cables
- Note: It is expected that the Twig cables color codes will match these red=Power, black=GND, yellow=Signal, white=NC the color of your cables can be verified by comparing the pinout printing on the Twig modules.
- Temp Sensor: Connect the wires as follows on the 'Analog' terminal block: red->1 yellow->2 black->8
- Relays: Connect the wires as follows on the 'PWM' terminal block: red(1,2)->1 yellow(1)->2 yellow(2)-3 black(1,2)->8 (you should be able to fit two wires in one hole)
- Ethernet: Connect the ethernet cable to the baseboard and your router (the mbed will request an ip address using DHCP).
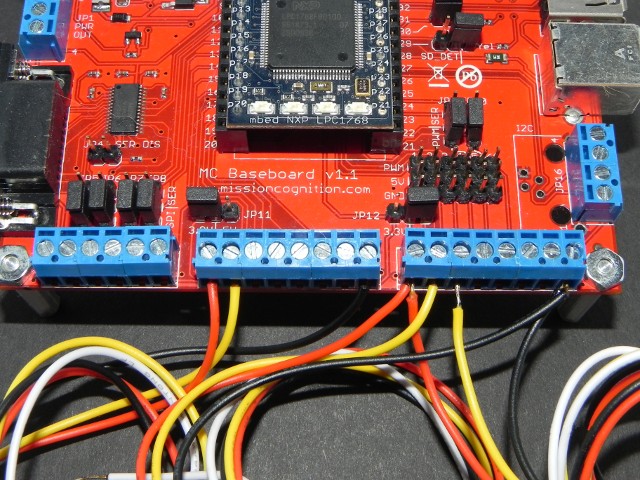
Step 4: Prepare uSD Card
- Using your computer copy the www directory onto the root path of the uSD card. Note that the mbed can only read old-style 8.3 DOS names.
- Install the uSD card into the slot under the mbed module (it should click into place).
Step 5: Prepare mbed Module
- Install the mbed module onto the MC-101 baseboard if you have not already.
- Connect the mbed to your computer using the USB cable included with the mbed module.
- Copy the thermostat program binary file onto the mbed drive. You can import the thermostat program into your compiler at mbed.org and build the binary file from scratch if you like.
- Reset the mbed module (by pressing the reset button on top).
Program Operation
It is recommended that you open a terminal to view the serial console output from the mbed (over the USB cable). Details of how this can be accomplished can be found in the 'Working with mbed' section of the mbed Handbook.
Determine the ip address assigned to the mbed module either by monitoring the serial console or from your dhcp server on your router (or perhaps a lucky guess).
From your computer browser (the client) put in the URL http://xxx.xxx.xxx.xxx/ where xxx... refers to the mbed module's ip address. With the default configuration your client computer must have internet access since the jQuery and related files are downloaded from Google and Mission: Cognition servers. If you do not have internet access on this computer you must edit /www/index.htm to use the local versions of the files.
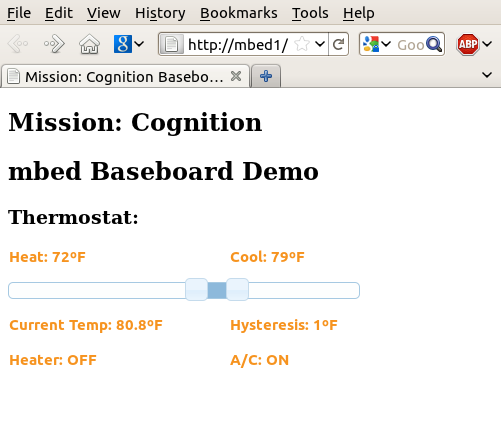
The web page pictured below should appear:

Use the slider knobs to adjust the heat and cool setpoints. Put your finger on the blue thermistor on the temperature module to raise the temperature and test the thermostat operation. You might want to configure your router to assign a fixed ip address based on the mac address of your mbed module (printed on the serial console) to make your life easier. If you can get it added as an entry in your DNS even better. That is how I was able to use the URL http://mbed1/ in the screenshot above.
How it Works
index.htm
<!DOCTYPE html>
<html>
	<head>
		<meta http-equiv="Content-Type" content="text/html; charset=iso-8859-1" />
		<title>Mission: Cognition Baseboard Demo</title>

        <!-- Use these to speed things up when your client has internet access -->
		<link type="text/css" href="http://ajax.googleapis.com/ajax/libs/jqueryui/1.8.16/themes/redmond/jquery-ui.css" rel="stylesheet" />
		<script type="text/javascript" src="http://ajax.googleapis.com/ajax/libs/jquery/1.6.3/jquery.min.js"></script>
		<script type="text/javascript" src="http://ajax.googleapis.com/ajax/libs/jqueryui/1.8.16/jquery-ui.min.js"></script>
        <!-- -->

        <!-- These includes are very slow, only use them if your client does not have internet access
        Note: Serving these locally may cause server crashes -- not sure why -- YMMV
        <link type="text/css" href="css/jqui.css" rel="stylesheet" />
		<script type="text/javascript" src="js/jqmin.js"></script>
		<script type="text/javascript" src="js/jquimin.js"></script>
        -->

		<style type="text/css">
            body { font: "Trebuchet MS", sans-serif;}
            #sliderHotCold {width:350px;}
        </style>

	</head>
	<body>
        <h2>Mission: Cognition</h2>
        <h2>mbed Baseboard Demo</h2>

		<!-- Slider -->
		<h3>Thermostat:</h3>
        <p>
            <input type="text" id="setpoint_h" style="border:0; color:#f6931f; font-weight:bold;" />
            <input type="text" id="setpoint_c" style="border:0; color:#f6931f; font-weight:bold;" />
        </p>
		<div id="sliderHotCold"></div>

        <p>
            <input type="text" id="currenttemp" style="border:0; color:#f6931f; font-weight:bold;"/>
            <input type="text" id="hysteresis" style="border:0; color:#f6931f; font-weight:bold;"/>
        </p>
        <p>
            <input type="text" id="heaterRelay" style="border:0; color:#f6931f; font-weight:bold;"/>
            <input type="text" id="acRelay" style="border:0; color:#f6931f; font-weight:bold;"/>
        </p>

        <script type="text/javascript">
            var Globals = {relay_h:0, relay_c:0, stat_current_temp:0.0, stat_hysteresis:0.0,
                            stat_cool_setpoint:0.0, stat_heat_setpoint:0.0};

            function ProcessStateData(StateData) {
                Globals.relay_h = StateData.rh;
                Globals.relay_c = StateData.rc;

                Globals.stat_current_temp = StateData.ct;
                Globals.stat_cool_setpoint = StateData.cs;
                Globals.stat_hysteresis = StateData.hy;
                Globals.stat_heat_setpoint = StateData.hs;

                // Now set everything to match
                $( "#heaterRelay" ).val( "Heater: " + (Globals.relay_h?"ON":"OFF"));
                $( "#acRelay" ).val( "A/C: " + (Globals.relay_c?"ON":"OFF"));

                $( "#currenttemp" ).val( "Current Temp: " + Globals.stat_current_temp + "ºF");
                $( "#hysteresis" ).val( "Hysteresis: " + Globals.stat_hysteresis + "ºF");

                // We have to test first to prevent unneeded updates to the server.
                if($('#sliderHotCold').slider("values", 0) != Globals.stat_heat_setpoint){
                    $('#sliderHotCold').slider("values", 0, Globals.stat_heat_setpoint);
                }

                if($('#sliderHotCold').slider("values", 1) != Globals.stat_cool_setpoint){
                    $('#sliderHotCold').slider("values", 1, Globals.stat_cool_setpoint);
                }

                // Generate the user setpoints display -- it is redundant in some cases but does not hurt
                $( "#setpoint" ).val( "Heat: " + $( "#sliderHotCold" ).slider( "values", 0 ) +
                    "ºF    Cool: " + $( "#sliderHotCold" ).slider( "values", 1 ) + "ºF");
            }

            function SyncFunc() {
                // Get the states so we stay in sync
                $.getJSON("/rpc/GetThermostat/run", ProcessStateData);
            }

            function Init() {
                // jqUI-ify our elements.

                // Slider
                $('#sliderHotCold').slider({
                    range: true,
                    animate: true,
                    min: 40,
                    max: 100,
                    values: [68, 74],
                    slide: function( event, ui ) {
                        $( "#setpoint_h" ).val( "Heat: " + ui.values[ 0 ] + "ºF");
                        $( "#setpoint_c" ).val( "Cool: " + ui.values[ 1 ] + "ºF");
                    },
                    change: function(event, ui){
                        $.get("/rpc/stat_heat_setpoint/write,"+ ui.values[0]);
                        setTimeout(function(){
                            // Delaying to try to prevent server crashes
                            $.get("/rpc/stat_cool_setpoint/write,"+ ui.values[1]);
                        }, 200);
                    }
                });

                SyncFunc(); // Get initial sync data
                var refreshId = setInterval(SyncFunc, 3334); // Repeat every few seconds.
            }

            $(document).ready(function(){
                setTimeout(function() {
                    Init();
                }, 1000); // Give a little bit of time for everything to be ready.
            });
        </script>
    </body>
</html>
main.cpp
/*
    Copyright (c) 2011 Jim Thomas, jt@missioncognition.net

    Permission is hereby granted, free of charge, to any person obtaining a copy
    of this software and associated documentation files (the "Software"), to deal
    in the Software without restriction, including without limitation the rights
    to use, copy, modify, merge, publish, distribute, sublicense, and/or sell
    copies of the Software, and to permit persons to whom the Software is
    furnished to do so, subject to the following conditions:

    The above copyright notice and this permission notice shall be included in
    all copies or substantial portions of the Software.

    THE SOFTWARE IS PROVIDED "AS IS", WITHOUT WARRANTY OF ANY KIND, EXPRESS OR
    IMPLIED, INCLUDING BUT NOT LIMITED TO THE WARRANTIES OF MERCHANTABILITY,
    FITNESS FOR A PARTICULAR PURPOSE AND NONINFRINGEMENT. IN NO EVENT SHALL THE
    AUTHORS OR COPYRIGHT HOLDERS BE LIABLE FOR ANY CLAIM, DAMAGES OR OTHER
    LIABILITY, WHETHER IN AN ACTION OF CONTRACT, TORT OR OTHERWISE, ARISING FROM,
    OUT OF OR IN CONNECTION WITH THE SOFTWARE OR THE USE OR OTHER DEALINGS IN
    THE SOFTWARE.
*/

#include "mbed.h"
#include "SDHCFileSystem.h"
#include "EthernetNetIf.h"
#include "HTTPClient.h"
#include "NTPClient.h"
#include "HTTPServer.h"
#include "RPCFunction.h"
#include "RPCVariable.h"
#include "AvailableMemory.h"


#define HOSTNAME "mbedSE"
#define PORT 80

// Setup the SD card file system on the /sd path
SDFileSystem sd(p5, p6, p7, p8, "sd");

EthernetNetIf eth(HOSTNAME);
HTTPClient http;
NTPClient ntp;
HTTPServer svr;

// Setup an analog input
AnalogIn rawtemp(p15, "temp"); // "AIN1"

// Setup Relay outputs
DigitalOut relay1(p26, "relay1"); // "PWM1"
DigitalOut relay2(p25, "relay2"); // "PWM2"

// Setup some variables for a thermostat (degress F)
float stat_heat_setpoint = 68.0;
float stat_hysteresis = 1.0;
float stat_cool_setpoint = 74.0;
float stat_current_temp = 0.0; // Will be updated from the temp sensor reading

// Make the variables RPC accessible individually
RPCVariable<float> rpc_stat_heat_setpoint(&stat_heat_setpoint, "stat_heat_setpoint");
RPCVariable<float> rpc_stat_hysteresis(&stat_hysteresis, "stat_hysteresis");
RPCVariable<float> rpc_stat_cool_setpoint(&stat_cool_setpoint, "stat_cool_setpoint");
RPCVariable<float> rpc_stat_current_temp(&stat_current_temp, "stat_current_temp");

// Make the whole state readable all at once as a JSON dict
void DoGetThermostat(char * input, char* output);
RPCFunction GetThermostat(&DoGetThermostat, "GetThermostat");

void DoGetThermostat(char * input, char* output) {
    // Input is ignored
    printf("Thermostat: %0.1f %0.1f %0.1f %0.1f\n", stat_heat_setpoint, stat_hysteresis, stat_cool_setpoint, stat_current_temp);
    printf("Relays: %d %d\n", relay1.read(), relay2.read());

    sprintf(output, "{\"hs\":%0.1f,\"hy\":%0.1f,\"cs\":%0.1f,\"ct\":%0.1f,\"rh\":%d,\"rc\":%d}",
            stat_heat_setpoint, stat_hysteresis, stat_cool_setpoint, stat_current_temp,
            relay1.read(), relay2.read());
}

// Setup the status LED
DigitalOut led1(LED1, "led1");

int main() {
    float aval;
    float res;
    int counter = 0;

    EthernetErr ethErr;
    int count = 0;
    do {
        printf("Setting up %d...\n", ++count);
        ethErr = eth.setup();
        if (ethErr) printf("Timeout\n", ethErr);
    } while (ethErr != ETH_OK);

    printf("Connected OK\n");
    const char* hwAddr = eth.getHwAddr();
    printf("HW address : %02x:%02x:%02x:%02x:%02x:%02x\n",
           hwAddr[0], hwAddr[1], hwAddr[2],
           hwAddr[3], hwAddr[4], hwAddr[5]);

    IpAddr ethIp = eth.getIp();
    printf("IP address : %d.%d.%d.%d\n", ethIp[0], ethIp[1], ethIp[2], ethIp[3]);
    printf("Check router DHCP table for name : %s\n", eth.getHostname());

    time_t ctTime;
    ctTime = time(NULL);
    printf("\nCurrent time is (UTC): %d %s\n", ctTime, ctime(&ctTime));
    printf("NTP setTime...\n");
    Host server(IpAddr(), 123, "pool.ntp.org");
    printf("Result : %d\n", ntp.setTime(server));

    ctTime = time(NULL);
    printf("\nTime is now (UTC): %d %s\n", ctTime, ctime(&ctTime));

    char ip[16];
    sprintf(ip, "%d.%d.%d.%d", ethIp[0], ethIp[1], ethIp[2], ethIp[3]);

    FSHandler::mount("/sd/www", "/"); //Mount uSD www path on web root path

    svr.addHandler<RPCHandler>("/rpc");  // Enable RPC functionality under the /rpc path
    svr.addHandler<FSHandler>("/"); // Add the file handler at the root

    svr.bind(PORT);
    printf("Server listening (port %d)\n", PORT);
    printf("- LED1 flashes server heartbeat\n");
    printf("- URL for RPC commands: %s/rpc \n", ip);

    Timer tm;
    tm.start();

    while (true) {
        Net::poll();
        if (tm.read() > 0.5) {
            tm.start();

            if (counter % 128 == 0) printf("Available memory (exact bytes) : %d\n", AvailableMemory(1));

            // Keep a loop counter
            counter++;

            // Toggle the LED
            led1 = !led1;

            // Read our rawtemp sensor and convert to degrees F
            // ref http://www.seeedstudio.com/wiki/index.php?title=Project_Seven_-_rawtemp
            // ref http://www.seeedstudio.com/wiki/index.php?title=GROVE_-_Starter_Bundle_V1.0b#rawtemp_Sensor_Twig
            aval = rawtemp.read();
            res = (10000.0 / aval) - 10000.0; // Reference resistor is 10k ohm
            stat_current_temp = (1.0 / ((log(res / 10000.0) / 3975.0) + 1 / 298.15) - 273.15) * 9.0 / 5.0 + 32.0;

            // Make sure that the setpoints don't cross
            if (stat_cool_setpoint < stat_heat_setpoint + 2 * stat_hysteresis)
                stat_cool_setpoint = stat_heat_setpoint + 2 * stat_hysteresis;

            // Update relays once every 8 loops (~ 4 seconds)
            // ref http://www.seeedstudio.com/wiki/index.php?title=Project_Five_%E2%80%93_Relay_Control
            if (counter % 8 == 0) {
                printf("Thermostat: %0.1f %0.1f %0.1f %0.1f\n", stat_heat_setpoint, stat_hysteresis, stat_cool_setpoint, stat_current_temp);

                if ((stat_current_temp < stat_heat_setpoint - stat_hysteresis) && !relay1) {
                    relay1 = 1;
                    printf("Turning Relay 1 On\n");
                }
                if ((stat_current_temp > stat_heat_setpoint + stat_hysteresis) && relay1) {
                    relay1 = 0;
                    printf("Turning Relay 1 Off\n");
                }
                if ((stat_current_temp < stat_cool_setpoint - stat_hysteresis) && relay2) {
                    relay2 = 0;
                    printf("Turning Relay 2 Off\n");
                }
                if ((stat_current_temp > stat_cool_setpoint + stat_hysteresis) && !relay2) {
                    relay2 = 1;
                    printf("Turning Relay 2 On\n");
                }
            }
        }
    }
}
An RPC function is setup in main.cpp to respond to /GetThermostat/run queries with a JSON compatible string [see GetThermostat(), DoGetThermostat()](unfortunately I could not change the mime type on the response to application/json so this is not strictly correct HTML). The javascript code does a getJSON request to that URL every three seconds or so [see setInterval(), SyncFunc()] and updates the displays and the slider to match [ProcessStateData()]
Meanwhile the mbed module is running a thermostat control loop in addition to polling for HTTP requests. Every half-second the temperature sensor is read and converted to degrees F. About once every four seconds setpoints are commpared to the current temperature to determine if one of the relays should be turned on or off. Hysteresis is used to ensure that the relays do not toggle back and forth if the temperature reading changes by a fraction of a degree across the threshold temperature.
At present there is a significant limitation for the HTTP server on the mbed. It does not handle multiple simultaneous requests well and may crash. The original design for this demo had many more small RPC requests but it proved unreliable. Loading the jquery and css files locally seems to trip up the server as well (multiple reset/reloads may eventually work). Fortunately there are people working on improved and alternative implementations for the HTTP server so this will hopefully be fixed before too long.
Suggested Improvments (Your Homework)
- Add a seperate relay for fan control. Include startup and shutdown delays.
- Add UI for adjusting the hysteresis.
- Add a UI On/Off switch.
- Add a schedule for system on and off times.
Please log in to post comments.
