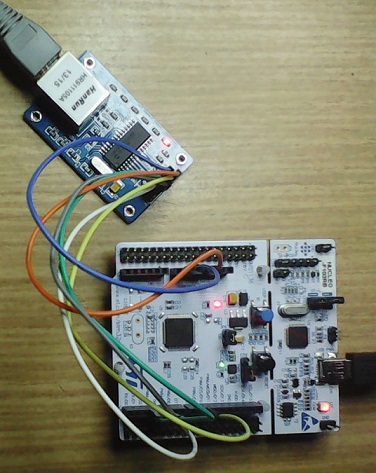
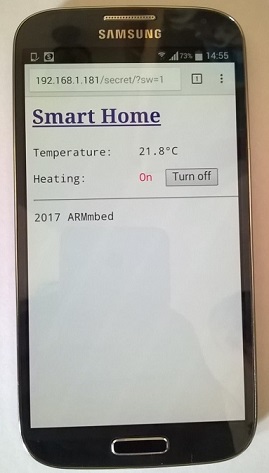
HTTP Server serving a simple webpage which enables to remotely turn a digital output on/off. Compile, download, run and type 'IP_address/secret/' (don't forget the last '/') into your web browser and hit ENTER.
Turn LED1, or other digital output, on/off using a web browser.
In this example we create a HTTP server that will serve a simple Web page to remotely turn LED1, or other digital output on the mbed board, on/off by using a web browser. An inexpensive ENC28J60 Ethernet module is used to assure connection between the mbed board and the Ethernet network (Internet). The ENC28J60 Ethernet module is driven by the UIPEthernet library.
Needed parts:
- mbed board
- ENC28J60 Ethernet module
- Wires
- Web browser (Internet Explorer, Safari, Firefox, Chrome ...) running on Windows, Mac, Linux, iPhone or Android device.
 |  |
Notice that DHCP is turned on by default. If you prefer to use static IP address then uncomment line 234
The IP address assigned to the WebSwitch server along with an instruction how to use it is printed in the connected PC's serial terminal window during program start up.
Warning
Please notice that the 3.3V power supply chip (RT8183-B) installed on an STM32F103C8T6 board is not rated to power also the ENC28J60 board.
The project was inspired by the Tuxgraphics Web Switch. Thank you Guido!
NOTE:
- For a Web Switch using a WIZ550io or W5500 Ethernet module see WebSwitch_Wiz550io.
- For a Web Switch using mbed's built in Ethernet PHY see WebSwitch_mbed-dev or WebSwitch_mbed-os .
Diff: main.cpp
- Revision:
- 4:d34811deedab
- Parent:
- 3:0133517ba02d
- Child:
- 5:0ab8292e37da
diff -r 0133517ba02d -r d34811deedab main.cpp
--- a/main.cpp	Sat Dec 20 11:23:20 2014 +0000
+++ b/main.cpp	Wed Feb 04 19:27:26 2015 +0000
@@ -1,6 +1,7 @@
 /* In this example LED1 is switched on/off using a web browser connected to this HTTP server.
- * The example is based on the Tuxgraphics Web Switch <tuxgraphics.org>.
- * This HTTP server is built around the the ENC28J60 chip driven by the UIPEthernet library <https://github.com/ntruchsess/arduino_uip>
+ * The example is based on the Tuxgraphics Web Switch <http://www.tuxgraphics.org/>.
+ * This HTTP server is built around the the ENC28J60 chip
+ * driven by the UIPEthernet library <https://github.com/ntruchsess/arduino_uip>
  * ported to mbed.
  */

@@ -14,17 +15,32 @@

 // UIPEthernet is the name of a global instance of UIPEthernetClass.
 // Do not change the name! It is used within the UIPEthernet library.
-// Adapt the SPI pin names to your mbed platform/board if not present yet.
 #if defined(TARGET_LPC1768)
-UIPEthernetClass UIPEthernet(p11, p12, p13, p8);          // mosi, miso, sck, cs
+UIPEthernetClass UIPEthernet(p11, p12, p13, p8);        // mosi, miso, sck, cs
 #elif defined(TARGET_LPC1114)
 UIPEthernetClass UIPEthernet(dp2, dp1, dp6, dp25);      // mosi, miso, sck, cs
 #elif defined(TARGET_LPC11U68)
 UIPEthernetClass UIPEthernet(P0_9, P0_8, P1_29, P0_2);  // mosi, miso, sck, cs
 #elif defined (TARGET_NUCLEO_F103RB)
 UIPEthernetClass UIPEthernet(PB_5, PB_4, PB_3, PB_6);   // mosi, miso, sck, cs
+#elif defined (TARGET_NUCLEO_F401RE)
+UIPEthernetClass UIPEthernet(PB_5, PB_4, PB_3, PB_6);   // mosi, miso, sck, cs
+#elif defined (TARGET_NUCLEO_F411RE)
+UIPEthernetClass UIPEthernet(PB_5, PB_4, PB_3, PB_6);   // mosi, miso, sck, cs
+
+// If your board/plaform is not present yet then uncomment the following two lines and replace TARGET_YOUR_BOARD as appropriate.
+
+//#elif defined (TARGET_YOUR_BOARD)
+//UIPEthernetClass UIPEthernet(SPI_MOSI, SPI_MISO, SPI_SCK, SPI_CS);   // mosi, miso, sck, cs
+
 #endif

+// Note:
+// If it happends that any of the SPI_MOSI, SPI_MISO, SPI_SCK, SPI_CS pins collide with LED1 pin
+// then either use different SPI port (if available on the board) and change the pin names in the constructor UIPEthernet(...) accordingly
+// or instead of using LED1 pin, select a free pin (not used by SPI port) and connect to it an external LED which is connected to a resitor that is connected to the groud.
+// In the second case remember to replace LED1 in sw(LED1) constructor (see below).
+

 // MAC number must be unique within the connected network. Modify as appropriate.
 const uint8_t    MY_MAC[6] = {0x00,0x01,0x02,0x03,0x04,0x06};
@@ -33,9 +49,7 @@
 const uint16_t   MY_PORT = 80;      // for HTTP connection
 EthernetServer   myServer = EthernetServer(MY_PORT);
 // In this example we are turning on/off LED1.
-// Change the pin name if you would like to switch on/off something else.
-// However, make sure you avoid SPI pin names used already for UIPEthernet.
-DigitalOut       sw(LED1);
+DigitalOut       sw(LED1);  // Change LED1 to a pin of your choice. However, make sure that it does not collide with any of the SPI pins already used in the UIPEthernet(...) constructor above!

 const string PASSWORD     = "secret";   // change as you like
 const string HTTP_OK      = "HTTP/1.0 200 OK";