Crouching LandTiger Hidden mbed
LandTiger has this really neat board with an LPC7168 micro-controller. Since it has the same micro-controller as the mbed, it would be great if some of the example mbed code could run on it. These are some notes that I took which could help others get their boards working.
#include "mbed.h"

//DigitalOut myled(LED1);
//LandTiger uses P2_7 for LED1

DigitalOut myled(P2_7);

int main() {
    while(1) {
        myled = 1;
        wait(0.2);
        myled = 0;
        wait(0.2);
    }
}
This example mbed hello world blinky program was complied using the online mbed complier. Some i/o pins on the LandTiger are not compatible with the mbed and the LED's are one of them.
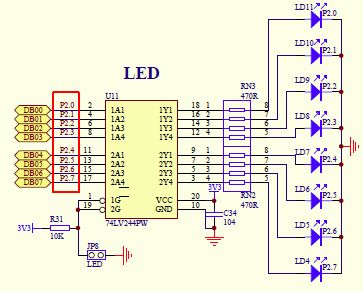
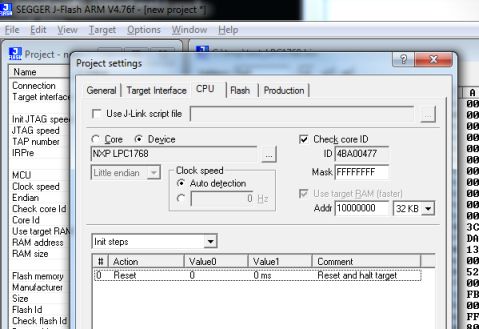
I changed the LED1 pin name to match the LandTiger's schematics. After the .bin file was created it had to be flashed onto the LandTiger. Since I didn't have a USB to RS232 cable I couldn't use flashmagic, but fortunately the LandTiger board has a built in J-Link so I was able to use the J-Flash program from Seggar. Saves an extra step in not having to do a bin2hex conversion since J-Flash can take a .bin file. Hooked up a cable from CN4 to the PC, then opened J-Flash, File->New project. Click Options->Project settings->CPU and select the Device and click the [...] button, Select device NXP LPC1768 and Clock speed Auto detection as shown in the above picture. Then choose your data file using File->Open data file and choose the address 0. Then click Target->Connect, then Target->Program & Verify. After a successful flash click Target->Start application and viola, it works.
Secondary USB Bootloader
Why can't I just drag and drop a .bin file to the LandTiger just like the mbed. Can I get drag-n-drop mbed style on a LandTiger ? Fortunately it is possible from an application note on NXP's website describing Secondary USB bootloader. You can download AN10866.zip and read the technical details and follow what I did.
http://www.lpcware.com/content/nxpfile/an10866-lpc1700-secondary-usb-bootloader
Basically, the Secondary USB Bootloader turns the LandTiger into a USB drive which you can then drag and drop a .bin file like mbed style. The bootloader then acts as a IAP and flashes the user program and then starts it. The package comes with all the source code and uVision project files so it is much easier if you have a Keil development system installed on your PC. The documentation and code is geared towards the Keil MCB1700 development board which is similar to the LandTiger. I started out by unzipping the LPC1700 Secondary USB bootloader code, change some project options, configure the board, fix some code, then compiling and flashing that onto the LandTiger using the built in J-Link that is supported on uVision. I didn't need to use the J-Flash program anymore.
J-Link
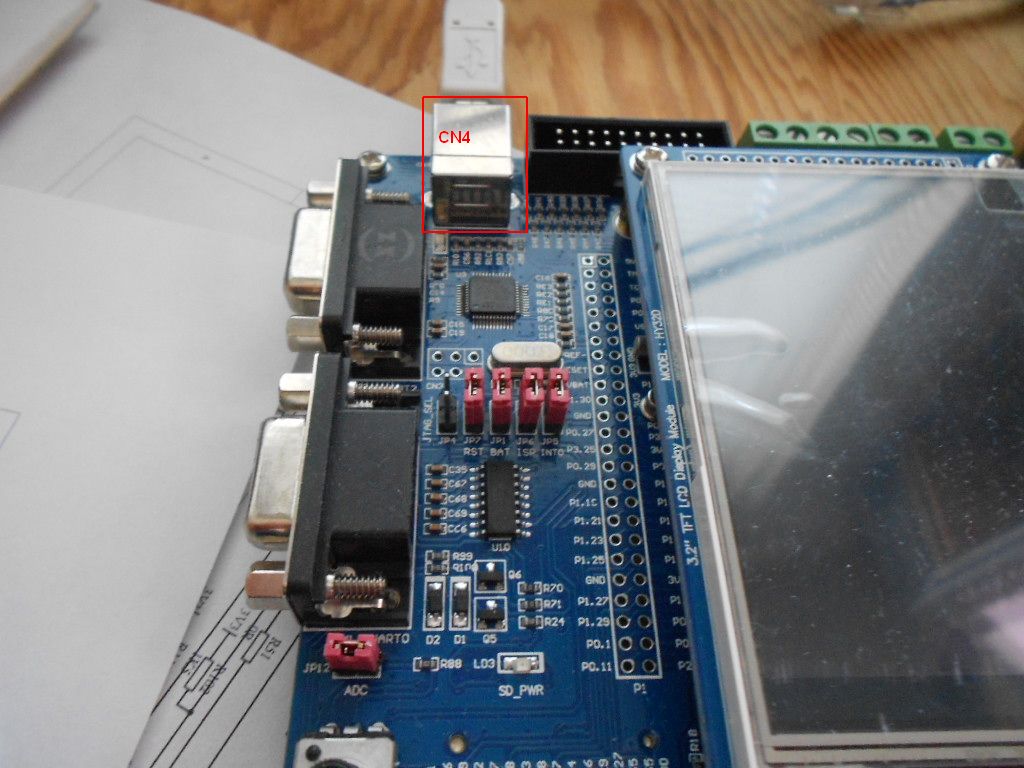
Need to hookup a USB B cable from CN4 to the PC for the J-Link connection.
Options for Target
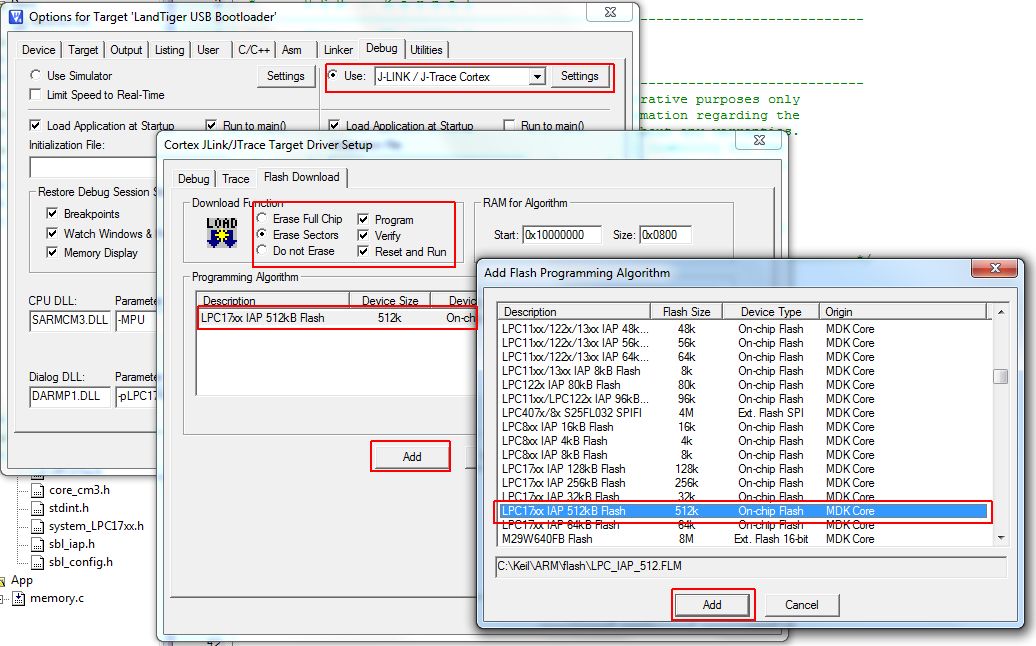
Before getting it all to work I had to set the uVision project target options in the Debug Section and Utilities Section to use J-Link since the the default was U-Link. Also changed the J-Link target Flash Download to 512kB then set program, verify, reset and run options.
Debug Section
Utilities Section
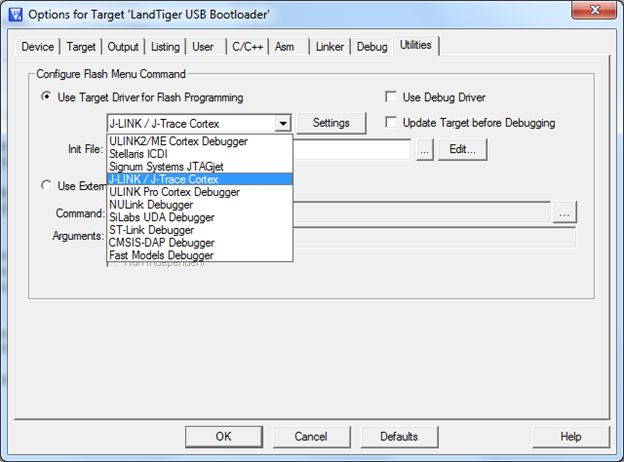
Configure the Board
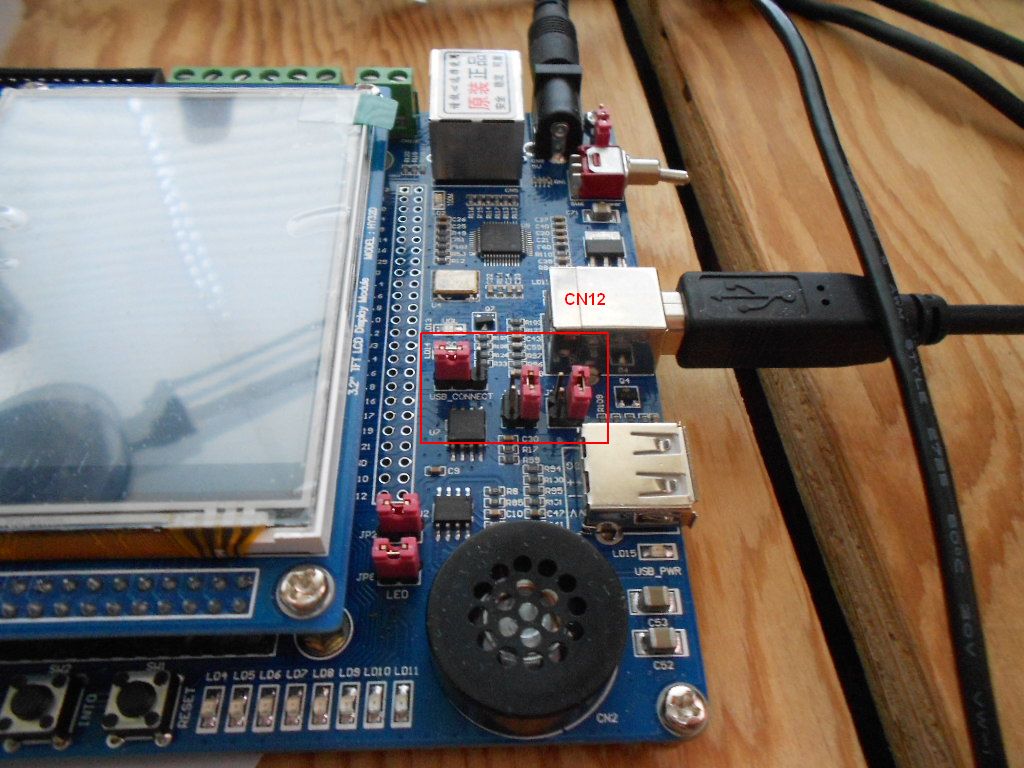
Hookup a USB B cable from CN12 to the PC. The jumper switches J10, J11, and J9 have to be setup properly so that the LandTiger will look like a USB mass storage device to the PC. See the picture below.
Code Modifications
\iap\sbl_config.h
#ifdef LANDTIGER
#define ISP_ENTRY_GPIO_REG 0x2009C054  /* Port */
#define ISP_ENTRY_PIN 	   11          /* Pin  */
#else
#define ISP_ENTRY_GPIO_REG 0x2009C034  /* Port */
#define ISP_ENTRY_PIN 	   20          /* Pin  */
#endif
The LandTiger is not exactly a MCB1700 board so some code changes had to be made because the input KEY pins are different on both boards. The changes above were made in the \iap\sbl_config.h file where the usb flash updater defines are.
Run
After using J-Link to flash the Secondary USB bootloader, you can put the LandTiger in USB flash drive mode by doing the following sequence:
- While holding down KEY1 (SW1)
- Press and release RESET (SW4)
This should cause the PC to recognize the LandTiger as a pnp USB drive.
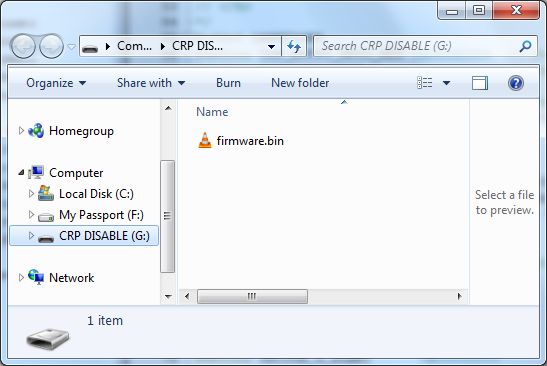
Now you can delete the firmware.bin file and drop in your own .bin file. The example Secondary USB Bootloader program also comes with a specially setup matching blinky user program for the MCB1700. You can build it for the LandTiger provided you modify the LED ports since they are different than the MCB1700. You have to build the 0x2000 version to run with the Bootloader. Copy the .bin file to the LandTiger USB drive and then press and release the RESET(SW4) switch and the blinky program should run.
User Program
I wanted to use programs written using the mbed SDK to run on the LandTiger using drag and drop style just to see if it they would work. So the first baby step was to get the mbed blinky program to work on the LandTiger. Unfortunately you can't just drag the .bin file over to the LandTiger and expect it to work. The Secondary USB bootloader program runs as a IAP and occupies the first 2 sectors (0 and 1) of flash memory. This means that user programs load starting in sector 2 or address 0x00002000. Since the mbed inline complier built the binaries for loading at address 0x00000000, they won't work. In order to fix this problem I had to do it from an external build system. So I exported the mbed blinky source along with the mbed-src to a uVision project.
Options For Target
In the application notes AN10866, it shows you what uVision project target option sections need to be modify. Since the project target option files I used were created by the mbed export, some options will be different than that of the application note. At this point I am opening up the mbed blinky uVision project file in separate window so now I have two uVision projects going on at the same time.
Target Section
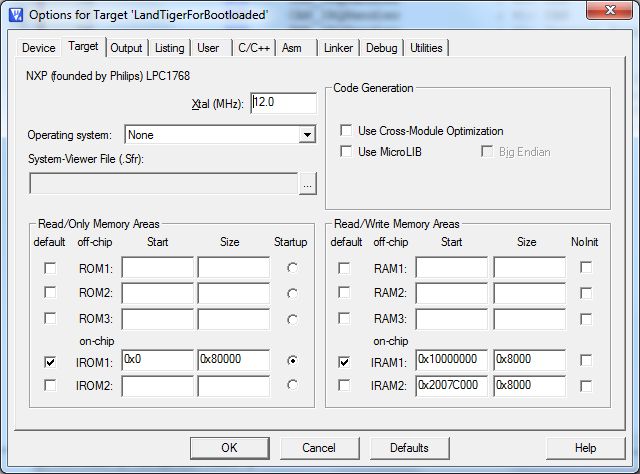
I left the Target Section alone as-is because mbed exported a scatter file. A scatter file is used instead of the Target Section options which can be seen later in the Linker Section. Below shows how I modified the scatter file so that the new load and execution address begins at 0x00002000.
\mbed-src\targets\cmsis\TARGET_NXP\TARGET_LPC176X\TOOLCHAIN_ARM_STD\lpc1768.sct
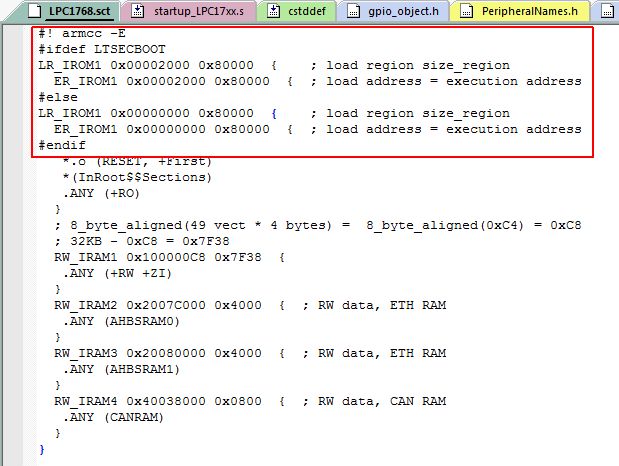
User Section
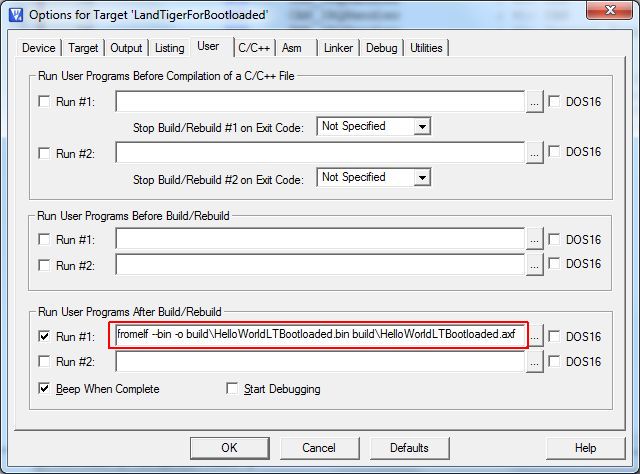
I left the User Section alone because it already had a line for creating a .bin file using the uVision fromelf utility.
Asm Section
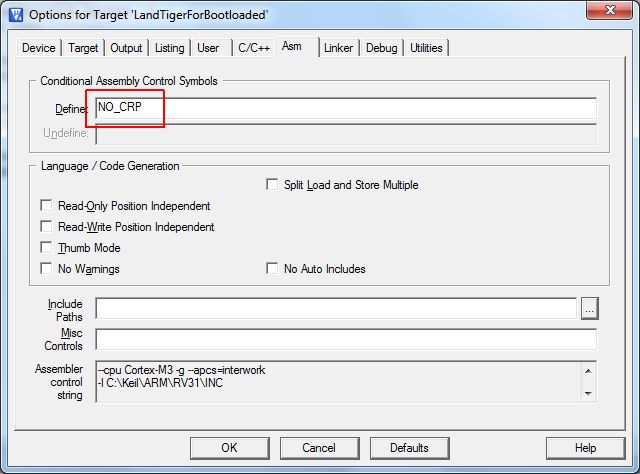
In the Asm Section add the define NO_CRP.
Linker Section
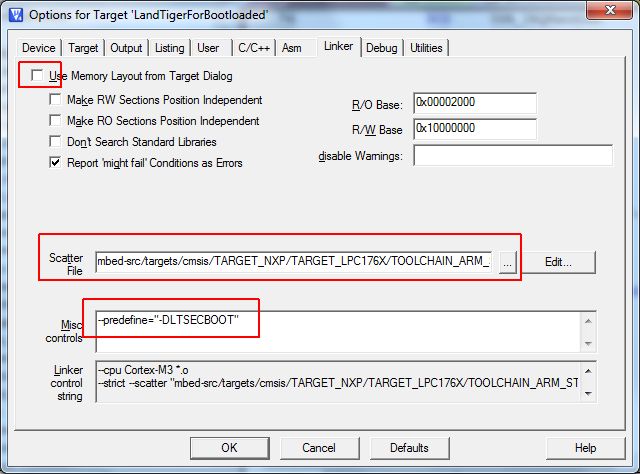
In the Linker Section you can see Use Memory Layout from Target Dialog is not checked because there is a scatter file entry that the linker uses. I added the define for LTSECBOOT (LandTiger Secondary Boot) for the scatter file.
The Debug and Utilities Sections are not touched because I won't be flashing this program. I'll use drag and drop to let the bootloader work as the IAP.
At this point I compiled the mbed blinky program, drag and dropped it to the LandTiger USB drive, hit the RESET switch and nothing happened. Since I still had the J-Linked hooked up from when I flashed the Secondard USB Bootloader, I restarted the Bootloader from the debugger, pressed KEY1 and RESET, deleted the firmware.bin file, dragged over the mbed blinky .bin program again and then hit RESET. It hung again, so this time I broke into the debugger to see what was going on.
The PC(R15) showed the code was branching in a loop at 0x00002186. Since this mbed blinky program starts at 0x00002000 the PC was stuck in low memory somewhere in the NVIC vector table. Turns out it was looping on the HardFault handler. Using the Fault Report feature of uVision I saw that it had a Precise Bus Fault at address 0x00002050. This turned out to be the vector location for the TIMER3_IRQHandler. What the ???
I looked at the mbed blinky source code and saw that it called a wait() function, which eventually called us_ticker_init() and then NVIC_SetVector(). I then restarted eveything from the beginning while in the debug session and set a break point at NVIC_SetVector and traced that through until it caused a fault. Setting the break point was kind of tricky because you cannot use the function name for the break point otherwise you will be setting a break point in the Secondary USB Bootloader program. You have to use the mbed blinky .map file to figure out where the function is located in the user program that is loaded relative to address 0x00002000 and not 0x00000000.
The fault was occurring when the TIMER3 irq handler was being written into the vector table. Looking at the source file cmsis_nvic.c, it was not obvious to me what was wrong. Everything looked OK, it was writing the vector into a ram location, why is it crashing ?!! After a stupidly long while, I finally realized what was wrong with NVIC_SetVector() logic. I wouldn't say its a bug (what do you think ?) but it does catch a small corner case. The problem was that the function determines if the NVIC vector table is located in flash or in ram by checking if the base address starts at 0x00000000. Since the vector table for mbed blinky now starts at 0x00002000, it thinks the table is not in flash but in ram. This causes the bus fault because the user program cannot write to flash. The logic should have checked if the NVIC vector address was lower than the beginning of RAM instead of at 0x00000000. The logic assumes that a vector table in flash will always be at 0x00000000 otherwise its in RAM.
\mbed-src\targets\cmsis\TARGET_NXP\TARGET_LPC176X\cmsis_nvic.c
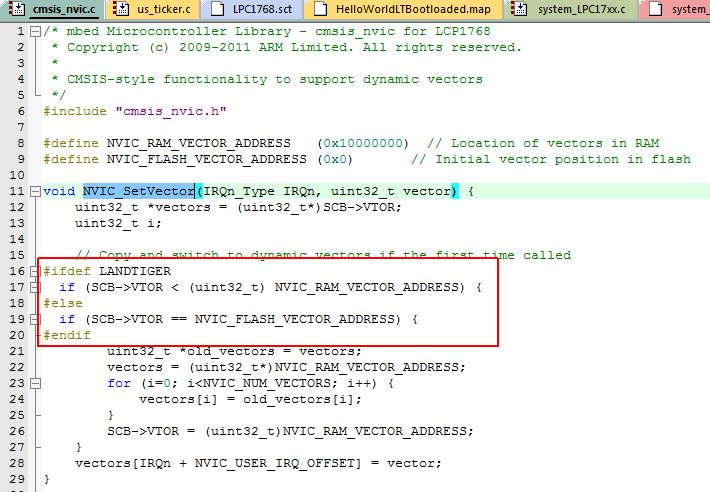
The cmsis_nvic.c file was modified for the LandTiger, though it would probably work for everything including the mbed. After making this change the drag and drop finally worked for this mbed blinky program.
The drag-n-drop mbed style for the LandTiger was successful but requires using an external compiler like Keil. Eventually I hope to verify the mbed SDK will work with the LandTiger with all the necessary changes.
-M
LandTiger Resources
2 comments on Crouching LandTiger Hidden mbed:
Please log in to post comments.

I know this post is written long time ago but I have some question maybe someone can answer: 1. In the post you modify two of mbed source files: cmsis_nvic.c and lpc1768.sct. How can you compile mbed source using keil? please explain the procedures. 2. I have precompiled mbed sample project in which when I modify lpc1768.sct to build a 2000 version of program it results in generating a blinky.bin folder instead of blinky.bin file and there are two files in that folder with strange names. what did I do wrong?