Mbed 4180 Final Project: 3D Printer
Introduction
This project explores the design aspects of a modern 3D printer. The support structure is an aluminum cube which supports motor motion on the three axes - x,y, and z. On each axis is mounted an NEMA stepper motor. Attached to the mount is a commodity extruder for melting ABS plastic printing material. All of the remaining control systems were implemented with mbed and the hardware in ECE 4180 kits. A production-grade printer would need to be able to read instructions from a file specified by a user or by CAD software. This project reads gcode instructions from a file with demo instructions for this project.
Hookup Guide
Below is a chart and image summarizing the mbed pins used for the demo code. All hardware components already have their own wiki pages which can be consulted for more detail.
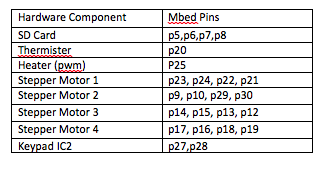
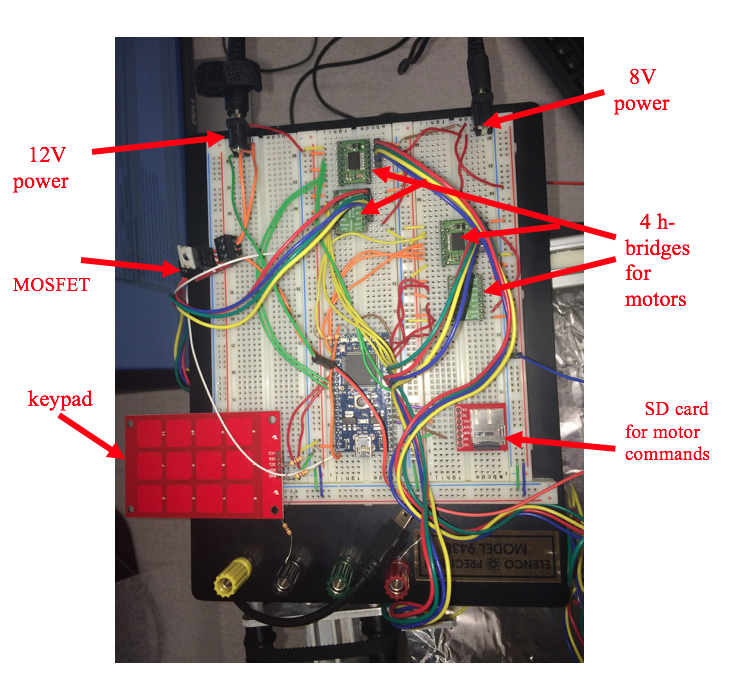
SD Reader
We used a SD Card reader to read the gcode instructions. For more information see https://developer.mbed.org/cookbook/SD-Card-File-System
Stepper Motors
There are four stepper motors in this project. Three are to control each axis, and the fourth is to push the plastic material through the extruder. For the scope of ECE 4180 final project, we did not implement the motor for feeding the plastic, but we did wire an h-bridge for it for future work. Since there are so many high power devices, external power was needed on motors and the extruder. The motors need 8V, so they were connected using a h-bridge from ECE 4180 kits and an 8V power supply. 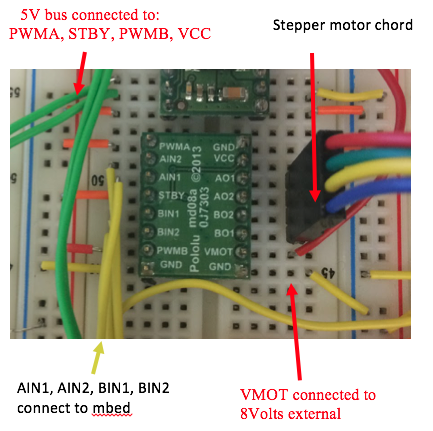
Extruder
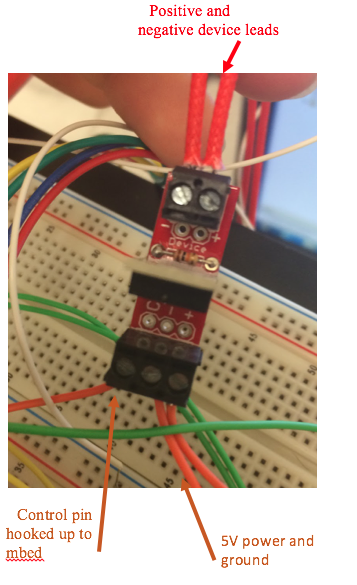
The extruder we bought was the 3D CAM Metal J-Head v6 Hot End for RepRap 3D Printer 1.75mm Filament Direct Feed Extruder 0.4mm Nozzle and is available on Amazon. The extruder needs a 12V power supply. Because of the high voltage and current load, a MOSFET is also needed. The device leads are attached to the extruder. The extruder can be mounted to the tracks in any way that is secure. In addition to the wiring image below, more information on MOSFETs can be found here https://developer.mbed.org/users/4180_1/notebook/relays1/
Keypad
Our group also connected a capacitative keypad to the mbed for debugging purposes. For example, we used it to manually set the temperature of the extruder for finding an optimal melting point for the plastic. At another point, we also used it to manually move the motors before we had completed the code for moving them in the desired pattern. See https://developer.mbed.org/components/MPR121-I2C-Capacitive-Touch-Keypad/ for information on the keypad. The key_code variable can be used to control many things in code such as motor direction or temperature settings.
Demo Video
Pictures
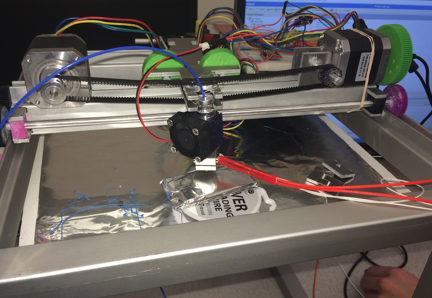
Below shows the axes the stepper motors move on - x,y, and z as well as the extruder mounted to the center.
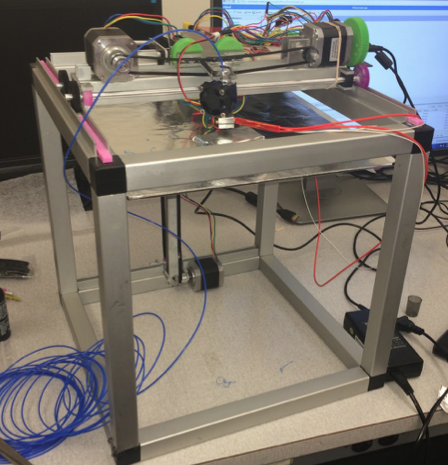
Below shows the entire structure - the large cube allows for significant growth in scale for projects that can be printed using our setup.
Source Code
Import programPrinter
commit
Please log in to post comments.
