Important changes to repositories hosted on mbed.com
Mbed hosted mercurial repositories are deprecated and are due to be permanently deleted in July 2026.
To keep a copy of this software download the repository Zip archive or clone locally using Mercurial.
It is also possible to export all your personal repositories from the account settings page.
Dependencies: WebSocketClient WiflyInterface mbed messages
You are viewing an older revision! See the latest version
Tour of the Code
This first part of the tour will focus on the wireless communication. At the end of this section will be a few notes on other interesting aspects of the code: the messaging system, and the manual configuration of the ADC module.
Wireless Communication and the WebSocket Client
Looking at the file structure of the IoT_Ex project, you can easily identify the two libraries necessary for the wireless communication: WiflyInterface and WebSocketClient. These two libraries were developed by other mbed users, and I have modified them slightly to improve their performance. I will not be going into detail on how they work, but on how they are being used for this project.
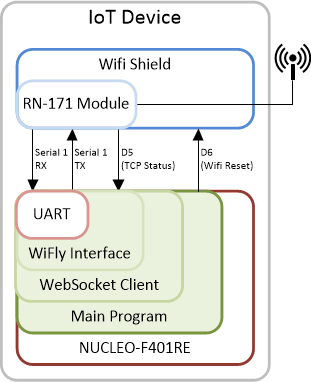
As shown in Figure 1, below, the Main Program interfaces with the “high level” WebSocket Client. Once a connection is established, the main program simply needs to call either ws.send() or ws.readmsg() to send or receive data from the server. After anyone of those function calls, the data goes through the WiFly Interface, then the UART module, then the physical wires to the RN-171 module. All of these lower level layers of code and hardware ensure everything is sent at the right time, and errors do not occur in the transmission, etc.

The next two subsections will parse through some of the important parts of main.cpp and globals.cpp that enable the wireless communication using the WebSocket Client and the WiFly Interface. I will also point out the areas of the code which you can modify to send and receive different types of data.