IMU Controlled Robot

Project Background
The idea is to design a robotic car to be able to move a certain path based on gesture commands that it receives such as “turn left”, “go forward”, and “turn right.” IR sensor(s) is/are used to detect the wall and prevent the robot from hitting the wall if there is a bad command given. The team will use two mbeds for this implementation. The mbeds uses Xbees to communicate with each other. One of the mbed will utilize the IMU to gather gesture commands and then send the gesture commands to another Mbed base on IMU values. The second Mbed is to receive commands and navigate the robot.
Team Members
| Name | Section |
|---|---|
| Tho Huynh | A |
| Like Deng | A |
| Xiaofei Qiu | A |
| Yushan Cai | A |
Parts Used
- Two mbeds
- Pair of Xbee
- H-Bridge
- ECE 4180 Robotic Car kit
- IMU
Wiring
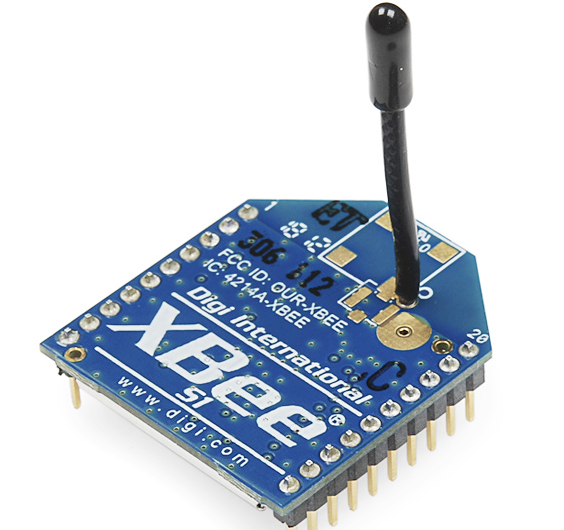
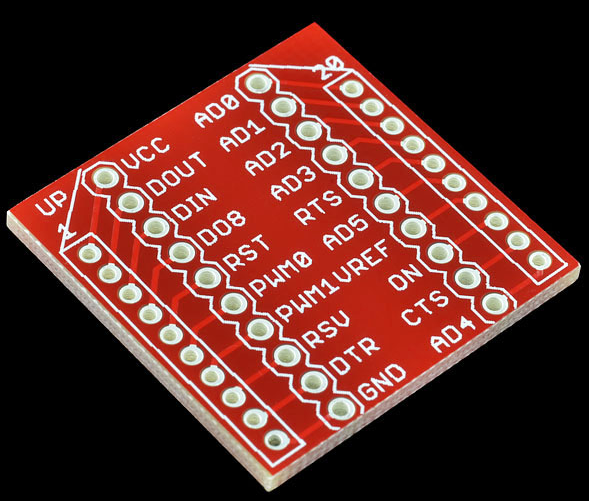
Two embed chips are needed for this project. One is used for the controller, another one is used for the robot car. For controller, three components connect with embed. There are a single push button(control stop or continue), a IMU chip(use accelerometer to detect the angles), and a Xbee chip(for sending command to robot car). For robot car, two components connect with embed. There are a H-bridge chip(Control the power and speed of the motor) and a Xbee chip(for receiving command from controller). Two Xbee adapters are need for inserting Xbee chip in both Robot car and Controller.


Robot Car Wiring
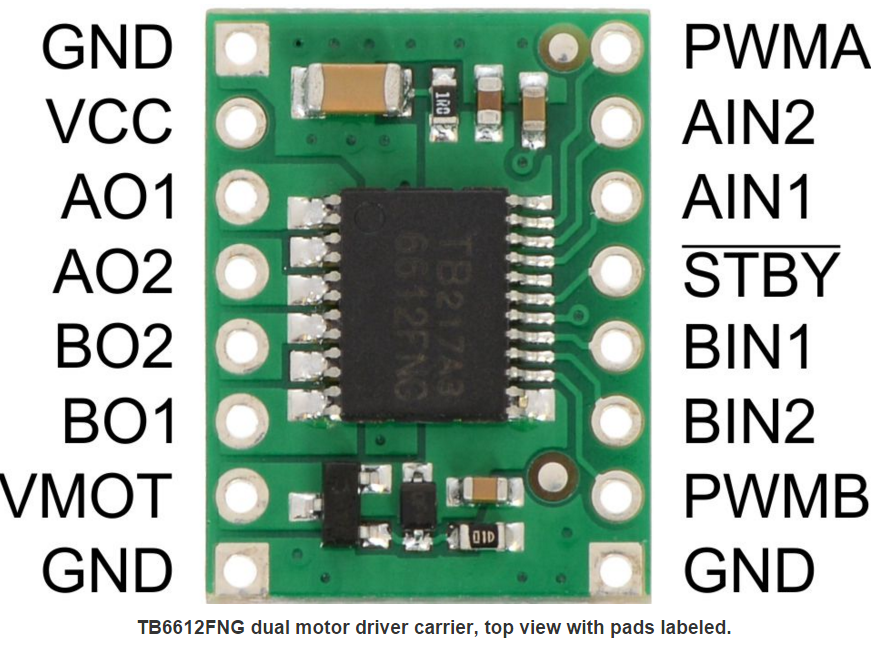
| MBED | H-Bridge |
|---|---|
| GND | GND |
| VOUT | VCC |
| p25 | PWMA |
| p26 | PWMB |
| p12 | STBY |
| p5 | AIN2 |
| p6 | AIN1 |
| p7 | BIN1 |
| p8 | BIN2 |
| Motor | H-Bridge |
|---|---|
| Right Motor(BLK) | A01 |
| Right Motor(RED) | A02 |
| Left Motor(BLK) | B02 |
| Left Motor(RED) | B01 |
| MBED | Xbee |
|---|---|
| GND | GND |
| VOUT | VCC |
| p10 | DOUT |
| p9 | DIN |
| p11 | RST |
And for VMOT, it should be connect to battery power supply 6.0V. Decoupling Capacitor can be used here between battery power supply and Ground. Also, another battery pack should supply power to MBED, positive to VIN, negative to GND. An switch can be add to turn on and turn off the embed of the robot car.
Controller Wiring
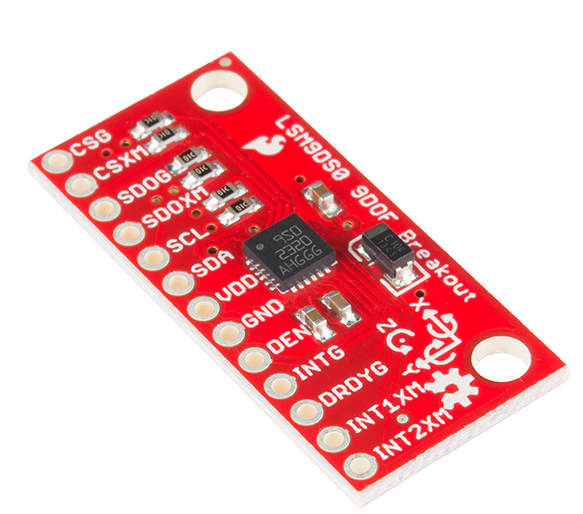
| MBED | IMU |
|---|---|
| GND | GND |
| VOUT | VDD |
| p27 | SCL |
| p28 | SDA |
| MBED | Xbee |
|---|---|
| GND | GND |
| VOUT | VCC |
| p10 | DOUT |
| p9 | DIN |
| p11 | RST |
| MBED | Push Button |
|---|---|
| GND | FIRST PIN |
| p8 | SECOND PIN |
Software Design
The software uses prototype software design pattern. The team developed Command, CommandPool, GenCMD, Mode, and Xbee libraries. For coding convenience, a protocol file is used to define all command names, showed below. The team uses 3 bits to define different commands, and use 3th bit to define the direction of the speed, uses 4th and 5th bit to define the moving speed. In total, the team uses 6 bits to define a single command, which reduces the respond time between two Xbees. Command class defines the all movement commands such as "TurnLeftCommand","TurnRightCommand"..CommandPool is used to store all of these command objects, and it is able to return these command objects based on command name. GenCMD class is used in robot controller. It generates different commands based on accelerometer values. Mode class is used in main function to indicate the current status (ON/OFF). Xbee is used to send the commands generated by GenCMD class wirelessly.
Protocol
#ifndef PROTOCOL_H
#define PROTOCOL_H

// Commands
const char LED = 0x00;
const char TURN_LEFT = 0x01;
const char TURN_RIGHT = 0x02;
const char STRAIGHT = 0x03;
const char STOP = 0x05;

// Speeds for left wheel
const char SPEED1 = 0x10;
const char SPEED2 = 0x20;
const char SPEED3 = 0x30;

const char NEGATIVE = 0x08;

#endif
Main Functions
Import programRobot_and_Controller
Contains Robot code, Controller code, and all libraries used.
Main function of robot controller is showed below. gen_cmd.init() function initializes the IMU device. gen_cmd.GenerateCMD(cmd_buffer) statement generates different commands based on accelerometer in the IMU device. Xbee sends the command to the Robot. Push button is used to change the mode value. if mode.on = 0, Xbee sends STOP command to the Robot.
Controller.cpp
#include "mbed.h"
#include "Xbee.h"
#include "GenCMD.h"
#include "PinDetect.h"
#include "Mode.h"

GenCMD      gen_cmd;                        // Command Generator
Xbee        xbee(p9,p10,p11);               // Xbee
DigitalOut  led(LED1);                      // LED
Mode        mode;                           // Mode
char        cmd_buffer = '\0';              // Command Buffer

Serial pc(USBTX,USBRX);

int main()
{
    gen_cmd.init();                                 // Init Command Generator
    xbee.Reset();                                   // Reset Xbee

    while(1)
    {
        if(mode.on)                                 // If mode on
        {
            gen_cmd.GenerateCMD(cmd_buffer);        // Generate command based on IMU value
            xbee.Send(cmd_buffer);                  // Send Command
            led = !led;
        }
        else
        {
            xbee.Send(STOP);                        // If mode off, Send STOP Command
        }

        wait(0.01);
    }
 return 0;
}
Main function of the Robot is showed below. pool.init() allocate all command objects in the heap memory. xbee.Reset() initialize xbee device. The robot will receive character command from the robot controller. Based on the command received, it gets command object from the command pool and execute it.
Robot.cpp
#pragma once
#include "mbed.h"
#include "CommandPool.h"
#include "Xbee.h"

Command* cmd;                   // Command Object
CommandPool pool;               // Command Pool
Xbee xbee(p9,p10,p11);          // Xbee
DigitalOut led(LED1);           // LED
char cmd_buffer='\0';           // Command Buffer

int main()
{
    pool.init();                // Init Command Pool
    xbee.Reset();               // Reset Xbee

    while(1)
    {
        xbee.Recv(cmd_buffer);              // Receive command from robot controller
        cmd = pool.getCommand(cmd_buffer);  // Get command object from command pool
        if(cmd)                             // If valid
        {
            cmd->execute();                 // Execute command
        }
        led = !led;
        wait(0.01);
    }
 return 0;
}
Libraries
Import program
Public Member Functions |
|
| virtual void | execute ()=0 |
|
Uses vitual function for dynamic binding.
|
|
| void | setSpeed (const std::int8_t &sp, const std::int8_t &is_negative=0) |
|
Sets Speed, if is_negative is true, then speed will be negative.
|
|
Protected Attributes |
|
| float | _SPEED |
|
Motor speed.
|
|
| bool | _IS_NEGATIVE |
|
Direction of the motor speed.
|
|
Import library
Public Member Functions |
|
| void | init () |
|
init pool, push all commands to _pool
|
|
| Command * | getCommand (const char &cmdstr) |
|
This will return a command object Check input commands in
protocol.h
file use first 3 bits are used to determine the command use 3th bit for speed direction use 4th bit and 5th bit to define the speed.
|
|
Import library
Public Member Functions |
|
| void | init () |
|
Initialize IMU device.
|
|
| void | GenerateCMD (char &, const size_t sz=1) |
|
Generate command and speed based on accelerometer value.
|
|
Demo Video
Please log in to post comments.
