Mbed Drink Mixer
Reid Clyburn and Muneer Abdella (Section B) ECE 4180 Design Project Fall 2018
Overview
Everybody’s seen those “DIY Robot Bartenders” and mixing machines on hackaday, and those are all well and good, but they seem to share two major flaws that would prevent them from being actually used in a social setting:
- They don’t provide options for different drink strengths
- They take way too much time to fill a glass
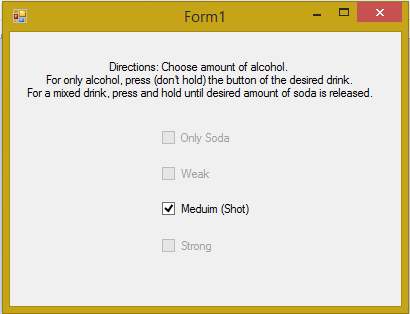
That’s why we made our machine. It combines a simple windows user interface with powerful DC air pumps to quickly get you a drink of any strength you desire. It also allows users to manually get their drink using pushbuttons. Permitting drinks of any volume to be made.
Demo
Parts
MBED LPC1768 (x1)
12V Micro Air Pump .11CFM (x2): https://amzn.to/2DQPqH1
12V Large Air Pump 21.2CFM (x2): https://amzn.to/2TXbN3x
1 Gallon Plastic Jars (x4): https://amzn.to/2PZB7HM
12V 10A Power Supply (x1): https://amzn.to/2raGqFu
1/4in Food Safe Tubing (10 feet): https://amzn.to/2E11I0B
7/16in Food Safe Tubing (10 feet): https://amzn.to/2RjVv2J
Relay Module (x2): https://amzn.to/2RmFfOw
Arcade Pushbuttons (x2): https://amzn.to/2P4qH4h
Enclosure (x2): https://amzn.to/2DMXTv4
Hot Glue
Scissors
Wiring

| Mbed | Relay Module A | Relay Module B |
|---|---|---|
| GND | GND | GND |
| VU | VCC | VCC |
| p19 | IN1 | N/A |
| p15 | IN2 | N/A |
| p29 | N/A | IN1 |
| p28 | N/A | IN2 |
| Mixer Motor | Liquor Motor | Relay Module | Power supply |
|---|---|---|---|
| + | N/A | NO1+ | N/A |
| - | N/A | N/A | - |
| N/A | + | NO2+ | N/A |
| N/A | - | N/A | - |
| N/A | N/A | NO1- | + |
| N/A | N/A | NO2- | + |
NO: Normally Open
Code
Mbed
Import programMbedDrinkMixer
Code to run drink mixer using Windows GUI.
#include "mbed.h"
#include "PinDetect.h"

DigitalOut sprite(p17);
DigitalOut vodka(p15);
DigitalOut rum(p28);
DigitalOut coke(p29);
PinDetect VSbutton(p7);
PinDetect RCbutton(p5);

Serial pc(USBTX,USBRX);

int alcTime = 2.5;

void VSbutton_hit_callback (void)
{
    if (VSbutton == 0 && alcTime!= 0)
        {vodka = 0;
         wait(alcTime);
         vodka = 1;}
        while(VSbutton == 0)
        {
            sprite = 0;
        }
        sprite = 1;
}

void RCbutton_hit_callback (void)
{
    if (RCbutton == 0 && alcTime!= 0)
        {rum = 0;
         wait(alcTime);
         rum = 1;}
        while(RCbutton == 0)
        {
            coke = 0;
        }
        coke = 1;
}

int main() {
  sprite = 1;
  vodka = 1;
  rum = 1;
  coke = 1;
  VSbutton.mode(PullUp);
  RCbutton.mode(PullUp);
  wait(0.1);
  VSbutton.attach_deasserted(&VSbutton_hit_callback);
  RCbutton.attach_deasserted(&RCbutton_hit_callback);
  VSbutton.setSampleFrequency();
  RCbutton.setSampleFrequency();

 while(1)
 {
      int choice = pc.getc();
      if(choice == 49)
      alcTime = 0;
      if(choice == 50)
      alcTime = 1.5;
      if(choice == 51)
      alcTime = 2.5;
      if (choice == 52)
      alcTime = 3.5;

      };
}
GUI Code

using System;
using System.Collections.Generic;
using System.ComponentModel;
using System.Data;
using System.Drawing;
using System.Linq;
using System.Text;
using System.IO.Ports;
using System.Threading.Tasks;
using System.Windows.Forms;

namespace newDesignGUI
{
    public partial class Form1 : Form
    {
        public Form1()
        {
            InitializeComponent();
        }

        private void checkBox1_CheckedChanged(object sender, EventArgs e)
        {
            if (checkBox1.Checked)
            {
                checkBox2.Enabled = false;
                checkBox3.Enabled = false;
                checkBox4.Enabled = false;
                serialPort1.Open();
                serialPort1.Write("1");
                serialPort1.Close();
            }
            else
            {
                checkBox2.Enabled = true;
                checkBox3.Enabled = true;
                checkBox4.Enabled = true;
            }
        }

        private void checkBox2_CheckedChanged(object sender, EventArgs e)
        {
            if (checkBox2.Checked)
            {
                serialPort1.Open();
                serialPort1.Write("2");
                serialPort1.Close();
                checkBox1.Enabled = false;
                checkBox3.Enabled = false;
                checkBox4.Enabled = false;
            }
            else
            {
                checkBox4.Enabled = true;
                checkBox3.Enabled = true;
                checkBox1.Enabled = true;
            }
        }

        private void checkBox3_CheckedChanged(object sender, EventArgs e)
        {
            if (checkBox3.Checked)
            {
                serialPort1.Open();
                serialPort1.Write("3");
                serialPort1.Close();
                checkBox2.Enabled = false;
                checkBox1.Enabled = false;
                checkBox4.Enabled = false;
            }
            else
            {
                checkBox2.Enabled = true;
                checkBox4.Enabled = true;
                checkBox1.Enabled = true;
            }
        }

        private void checkBox4_CheckedChanged(object sender, EventArgs e)
        {
            if (checkBox4.Checked)
            {
                serialPort1.Open();
                serialPort1.Write("4");
                serialPort1.Close();
                checkBox2.Enabled = false;
                checkBox3.Enabled = false;
                checkBox1.Enabled = false;
            }
            else
            {
                checkBox2.Enabled = true;
                checkBox3.Enabled = true;
                checkBox1.Enabled = true;
            }
        }

        private void textBox1_TextChanged(object sender, EventArgs e)
        {

        }
    }
}
Tubing
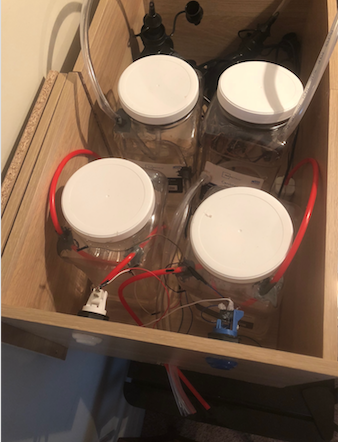
All connections made with the tubing should be air tight, as leaks will reduce or prevent the flow of liquid out of the containers.
Motors
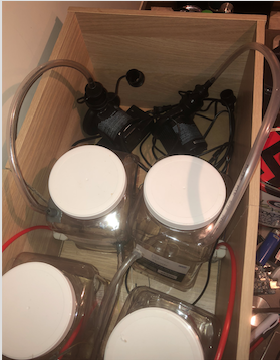
- Connect about 1.5 feet of tubing to the output of each of the DC air pumps. The larger diameter tubing should be connected to the larger pumps and the smaller tubing to the smaller pumps.
- The tubing should fit snugly around each of the pump outputs, so no additional sealing should be necessary

Container Inputs
- Use a soldering iron or hot glue gun to melt a small hole in the top, but not the lid, of each of the liquid containers.
- Gently rotate a sharp object, such as one of the blades on a pair of scissors, around the holes until they are slightly smaller than the outer diameter of the tubing.
- Insert each motor tubing into the containers. Then, using hot glue or epoxy, seal the area around the hole to create an airtight connection between the motor and the container.

Container Outputs
- For the liquor containers, connect another tube that goes from the top of the container to the eventual output of the system.
- For the soda containers, make the connecting hole in the container slightly higher than half way up the container. This will decrease the total pressure needed to push liquid through the tubing. Connect this hole with about 1.5 feet of tubing to the overall output of the system.
Double check that all connections are airtight, and that all tubes are connected properly before using actual liquid.
Please log in to post comments.
