GPS System with Google Maps
General Description
The goal of this system is to allow the user to display a local map based on current GPS coordinates. The BR355 GPS module generates latitude and longitude coordinates, which are used along with zoom level to craft a GET request which is sent to Google's static maps page via the wifly module. This request returns a jpg-baseline file which is subsequently stored on the mbed, decompressed, and displayed on the Nokia LCD 6610. The user controls the system using three push buttons. The primary button refreshes the display using the most current GPS coordinates, and the other two buttons are used to control the zoom level.
Information
Google map API returns image (map) in many graphics formats. We chose JPEG as it is a compressed version and provides the smallest image . We ended up using non-progressive jpg-baseline image because simple jpg image from google map was not displaying on Nokia LCD.
Components Required
Following components are required:
- Mbed (ofcourse)
- Wifly module RN-131g
- BR355 GPS
- Nokia LCD 6610
- RS-232 Breakout
- PS2 Breakout
- 3 push buttons
- Battery
- A lot of jumper wires
- We used a second mbed for more power, but a real battery would be better.
Hardware Connections
Mbed and Wifly Connections
Hardware configuration for RN-131g Wifly and Mbed (if you don't use a battery to power the module) is:
| Wifly Pins | Mbed Pins |
|---|---|
| 3.3V RIN | GND |
| GND | GND |
| VDD BATT | VOUT |
| VDD IN | VOUT |
| RX | TX |
| TX | RX |
| GPIO 6 | any DigitalIn |
| RESET | any DigitalIn |
The connections should be done beneath the wifly module.
Mbed and Nokia LCD Connections
Hardware Configuration for Mbed and Nokia LCD 6610 is as follows:
| LCD Pins | Mbed Pins |
|---|---|
| GND | GND |
| 3.3V | VOUT |
| VBATT | VOUT |
| CS | any DigitalIn |
| RESET | any DigitalIn |
| SCK | any DigitalIn |
| DIO | any MOSI Pin |
GPS Pins
| PS/2 b/o pin | Mbed b/o pin |
|---|---|
| Vcc | VV=5v |
| GND | GND |
| RS-232 b/o pin | Mbed b/o pin |
|---|---|
| Vcc | VV=5v |
| GND | GND |
| TX | p10 |
Overall Design
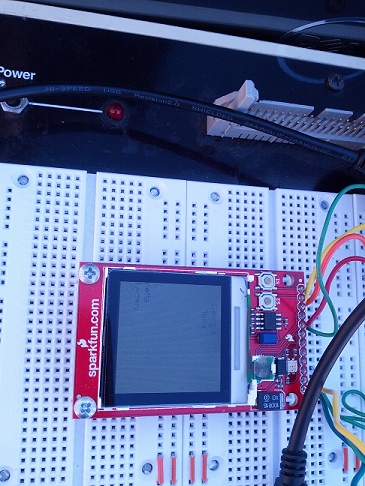
The overall design can be seen in the following figure. The LCD screen is nearly invisible due to the bright outdoor light, but you can barely make out the words "Georgia Tech".


The clearer image can be seen below

HTTP Response Parsing
The HTTP data returned by Google can be easily parsed to obtain the image using the .JPG start and end codes. Our code searches for /FF/D8, the start code, and writes bytes until it reaches /FF/D9. This eliminates the need to include a complicated HTTP header parsing library.
Image Decompression
Code for decompressing and displaying the .JPG image was borrowed from the ECE4180 Digital Photo Frame project.
Basic Configuration
For the basic configuration of mbed, follow the steps under Basic Configuration heading in this Wifly Page
Troubleshooting!
For the correct downloading of JPEG image, in addition to the basic configuration, do set comm close 0 'Set comm close <string>' sets the ASCI string that is sent to the local UART when the TCP port is closed. If no string is desired, use 0 as the <string> parameter. Max string length is 32 characters. Default is *CLOS* If 0 is not set, you will get *CLOS* along with image data that will distort the image.
Once done with the basic configuration of mbed, in order to run the code some other time, following steps are required:
- Run the following program
Import programWifly_configure
Configure wifly module
- Open any terminal and set the baud rate to 9600. When wifly gets connected, go to CMD mode by typing $$$.
- Join the network by typing join. Wifly would get IP address.
- Type get mac.
- Go to lawn authentication page and authenticate using the above mac address.
- Type exit in the terminal.
After doing the above steps, wifly is ready to run any code.
Warning!
Image greater than 4KB cannot be stored in mbed Local file System so you will get incomplete image of 4kb size. Storing images in SD card may solve the problem!
Video Demonstration
Please log in to post comments.
