Important changes to repositories hosted on mbed.com
Mbed hosted mercurial repositories are deprecated and are due to be permanently deleted in July 2026.
To keep a copy of this software download the repository Zip archive or clone locally using Mercurial.
It is also possible to export all your personal repositories from the account settings page.
You are viewing an older revision! See the latest version
Homepage
Information
In this page, there is English description is followed by Japanese one.
本ページは英語の説明の後に日本語の説明が続きます。
Getting Started
Installing Node.js and npm
You need to have Node.js and npm installed.
To check if you have them installed, open a terminal or command prompt and run the following commands:
node --version
npm --version
If you see an number output similar to x.x.x for each command, then they are both installed and you can continue to the next section.
To install on Windows or mac, you can download the installer from https://nodejs.org/en/download.
To install on Linux, you can use a package manager. Instructions for installing Node.js on your distribution can be found in the following link:
https://nodejs.org/en/download/package-manager
Prerequisite
This example assumes that you've already run the following program that can communicate the decoded result of barcode data with mbed Device Connector:
Import programGR-PEACH_mbed-os-client-ZXingSample
Fork of https://developer.mbed.org/teams/Renesas/code/GR-PEACH_mbed-os-client-ZXingSample/
Configuring the Applition
In order to run this app, you need to set up the options shown below via .env file stored in the folder GR-PEACH_mbed-os-QRCode-ShoppingCart-node which should be automatically created when cloning this program.
- ACCESS_KEY
Set this variable to your Access Key that you can create on mbed Device Connector. if you don't have an Access Key yet, please create it in accordance with the following procedure.
1. Access https://connector.mbed.com/#accesskeys.
2. Click CREATE NEW ACCESS KEY.

3. When prompted, enter a name for the access key (e.g. "demo") and click ADD.

After an access key is successfully created, please copy the access key you just created and use it in .env file as follows:
.env
ACCESS_KEY=...
- PORT
Set this variable as follows to override the default port for this example if needed. The default port is 8080.
.env
PORT=...
Also, user need to prepare for the comma-delimited list which includes "Item Name" and "Price" which is added to shopping cart, and save it by the name klist.txt as follows:

The list should be stored in GR-Peach_mbed-os_QRCode_ShoppingCart_node\public\list
Application Execution
This application consists of 2 tabs. One is Shopping Cart and the other is QR Code Login. In this section, it is described that how those work.
As mentioned above, GR-PEACH_mbed-os-client-ZXingSample should be executed beforehand. For details on how to set up and execute GR-PEACH_mbed-os-client-ZXingSample, please refer to its repository.
If the program works properly, you can see the following message in your terminal:

- How to launch this Web Application
If the configuration is successfully done, you can now run the application by invoking the following:
Then, you should see the following message:

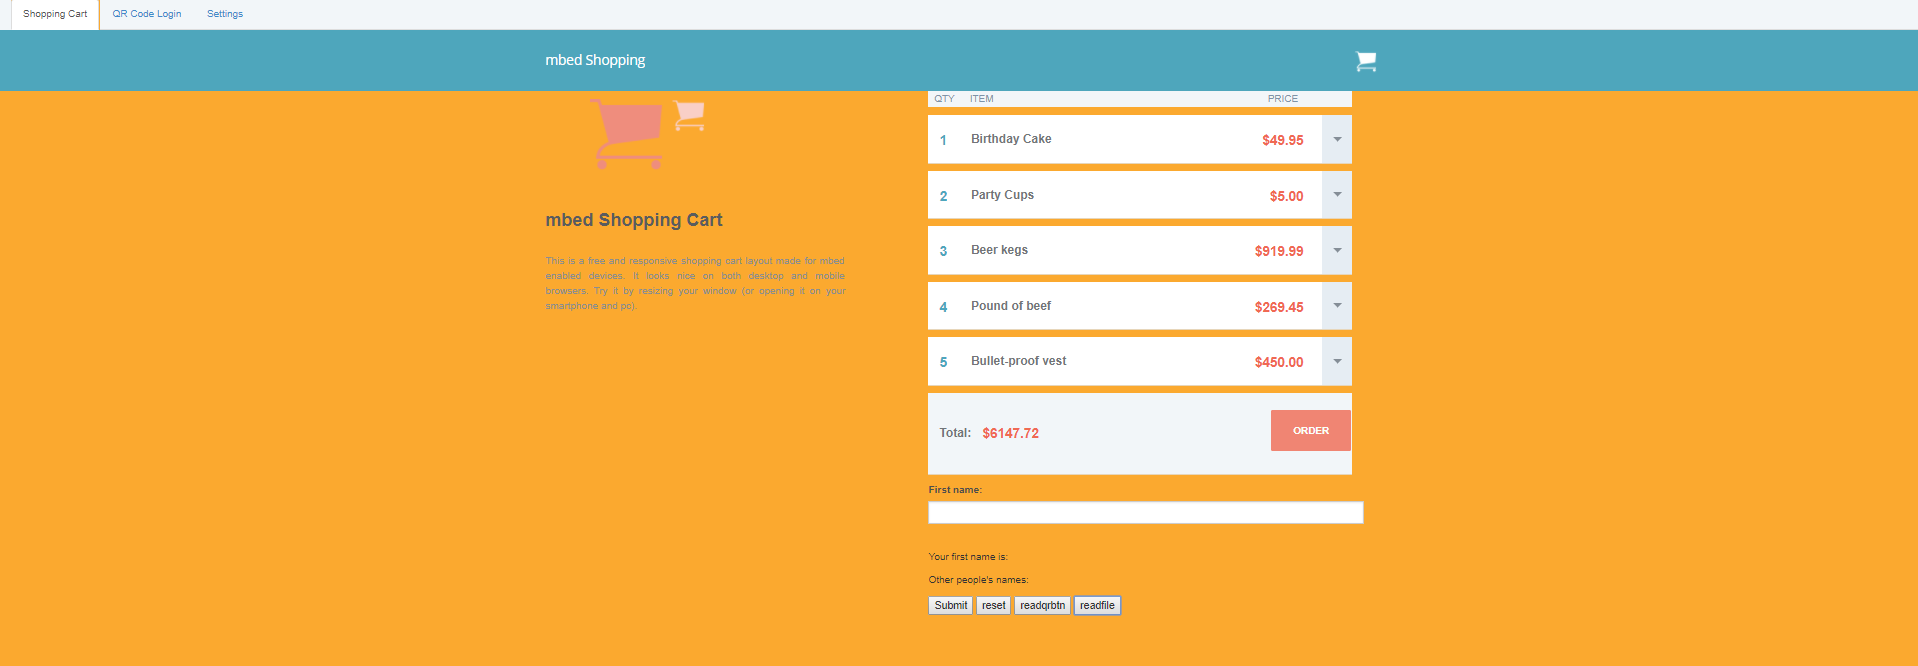
Please note that 8080 might be changed. It should depends on your PORT setting mentioned above. If you access the above URL using Web browser, you can see the following Smart Shopping Cart tab by default:
- How Shopping Cart tab works
When you decode QR code stored in GR-Peach_mbed-os_QRCode_ShoppingCart_node\qrcode by GR-PEACH successfully, the item should be added to shopping cart as follows:

- How QR Code Login tab works
When you choose QR Code Login tab, you can see the following screen indicating it's Locked status.

Then, if you decode the Unlock qrcode described in GR-Peach_mbed-os_QRCode_ShoppingCart_node\qrcode\qr.pdf, screen should transit to the following one indicating it's Unlocked status.

After that if you you decode the Lock qrcode described in the above qr.pdf, screen should re-transit to Locked status. In this way, the screen transits to Locked and Unlocked status in accordance with the decoded result of QR code.
-------------------------------------------------------------------------------------------------------------------------------------------------
Node.jsとnpmのインストール
本アプリケーションを実行するにあたっては、Node.jsとnpmのインストールが必要です。
お使いの開発環境(PC)にNode.js、npmがインストールされているかどうかは、下記コマンドで確認する事ができます。
node --version
npm --version
上記コマンド実行後、x.x.x というバージョン・リビジョン番号が表示されれば、Node.js、npmは既にインストールされていますので、次節以降の手順にしたがってアプリケーションのセットアップを行ってください。未インストールの場合は以降の手順にしたがってNode.js、npmをインストールしてください。
開発環境のホストOSがWindowsまたはmacの場合はhttps://nodejs.org/en/download から入手可能なインストーラを使用してインストールします。
開発環境のホストOSがLinuxの場合は、お使いのディストリビーションに応じたパッケージ管理システムを用いたインストールが可能です。詳細はhttps://nodejs.org/en/download/package-manager を参照ください。
前提条件
本アプリケーションを実行するにあたっては、GR-PEACH上のバーコードデータのデコード結果にmbed Device Connectorからアクセスする下記プログラムを事前にセットアップしておく必要があります。
Import programGR-PEACH_mbed-os-client-ZXingSample
Fork of https://developer.mbed.org/teams/Renesas/code/GR-PEACH_mbed-os-client-ZXingSample/
アプリケーションの設定
本アプリケーションの実行するためには、.envファイルを介して以下に示すオプションを設定する必要があります。なお、.envファイルはGR-PEACH_mbed-os-QRCode-ShoppingCart-nodeフォルダに格納されています。
- ACCESS_KEY
本変数にはmbed Device Connector上で生成可能なAccess Keyを設定します。Access Keyが未生成の場合は下記に従って作成してください。
1. https://connector.mbed.com/#accesskeys にアクセスします。
2. CREATE NEW ACCESS KEYをクリックします。

3. access keyの名称を入力するように促されたら、任意の名称(例えばdemo等)を入力し、ADDをクリックします。

access keyが正常に生成できたら、コピーして下記のように.envファイルでACCESS_KEYに設定します。
.env
ACCESS_KEY=...
- PORT
本変数にはWebアプリへのアクセスに使用するポート番号を下記のように設定します。デフォルトのポート番号は 8080 です。8080から変更の必要がなければ、設定は省略可能です。
.env
PORT=...
また、ショッピングカートに追加する品目と値段をカンマ区切りで下記のように記載したリストを準備し、klist.txtという名称でGR-Peach_mbed-os_QRCode_ShoppingCart_node\public\listフォルダに格納してください。

アプリケーションの実行
本アプリケーションでは、Shopping CartとQR Code Loginという2つのタブが実装されています。以下、それぞれの動作方法について記載します。
