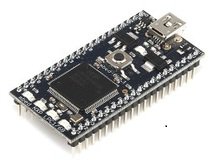
mbed NXP LPC1768 (exp)
Rapid Prototyping for general microcontroller applications, Ethernet, USB and 32-bit ARM® Cortex™-M3 based designs
Overview
The mbed NXP LPC1768 Microcontroller in particular is designed for prototyping all sorts of devices, especially those including Ethernet, USB, and the flexibility of lots of peripheral interfaces and FLASH memory. It is packaged as a small DIP form-factor for prototyping with through-hole PCBs, stripboard and breadboard, and includes a built-in USB FLASH programmer.

It is based on the NXP LPC1768, with a 32-bit ARM Cortex-M3 core running at 96MHz. It includes 512KB FLASH, 32KB RAM and lots of interfaces including built-in Ethernet, USB Host and Device, CAN, SPI, I2C, ADC, DAC, PWM and other I/O interfaces. The pinout above shows the commonly used interfaces and their locations. Note that all the numbered pins (p5-p30) can also be used as DigitalIn and DigitalOut interfaces.
The mbed Microcontrollers provide experienced embedded developers a powerful and productive platform for building proof-of-concepts. For developers new to 32-bit microcontrollers, mbed provides an accessible prototyping solution to get projects built with the backing of libraries, resources and support shared in the mbed community.
The mbed NXP LPC1768 is one of a range of Microcontrollers based on the mbed HDK. Packaged as a small 40-pin DIP, 0.1-inch pitch form-factor, it is convenient for prototyping with solderless breadboard, stripboard, and through-hole PCBs. It includes a built-in USB programming interface that is as simple as using a USB Flash Drive. Plug it in, drop on an ARM program binary, and its up and running! It is our most full featured board and is great for all kinds of general prototyping. If you're not sure which mbed to get, this is your best choice.
Features
- NXP LPC1768 MCU
- Cortex™-M3
- 96MHz, 32KB RAM, 512KB FLASH
- 10/100 Ethernet,
- USB Host
- USB Device
- SPI (2)
- I2C (2)
- UART(4)
- CAN 2.0
- PWM (6)
- ADC (6, 10 bit)
- DAC (1, 10 bit)
- GPIO (68)
- Prototyping form-factor
- 40-pin 0.1" pitch DIP package, 54x26mm
- Drops into existing designs and applications
- mbed HDK & SDK enabled
- Drag-n-drop programming
- USB Serial Port
- CMSIS-DAP
- Online development tools
- Easy to use C/C++ SDK
- Lots of published libraries and projects
- Status
- Alpha | Beta | Prodcution | Phasing out(link to replacement) | End of Life
Where to buy


![]()
![]()
![]()
![]()
![]()
![]()
![]()
![]()
![]()
![]()
![]()
![]()
![]()
![]()
![]()
![]()
![]()

![]()
![]()
![]()
![]()
![]()
![]()

![]()
![]()
Getting Started with mbed
1. Connect your microcontroller to a PC
Use the USB lead to connect your mbed to a PC. The status light will come on, indicating it has power. After a few seconds of activity, the PC will recognise the mbed Microcontroller as a standard USB drive.
 |  |
| Windows XP example | Mac OS X example |
2. Click the MBED.HTM link to get logged in
Go to the new USB Drive, and click MBED.HTM to open it in a web browser.
If you do not have an mbed account, choose "Signup", and create your mbed Account. Otherwise, log in with your normal username and password.
This will give you access to the website, tools, libraries and documentation.
Downloading A program
1. Save a program binary (.bin) to the mbed Microcontroller
Download the appropriate "Hello World!" binary:
- mbed NXP LPC1768: HelloWorld_LPC1768.bin
Note: the source code for this program will be seen in the next section.
Save the program binary file to your mbed Microcontroller Disk, just like you would with a normal USB disk. The Status LED will flash as the PC writes the file to the Microcontroller disk.

2. Press the Reset Button
When the Reset Button in pressed, the newest program on the mbed Microcontroller Disk will be loaded in to the Microcontroller FLASH memory. The Status LED will flash as this happens.
When the program is has been loaded onto the microcontroller, it will then start it running.
3. Hello World!
The Microcontroller is now running the program; flashing LED1 forever! If you reset the Microcontroller, or disconnect and reconnect the power, the program will simply restart.
4. To download a different program
It is the newest program on the mbed Microcontroller that is run after reset. We can therefore download a new program or overwrite an existing one to update the program that will run.
Hello World!
Import programmbed_blinky
The example program for mbed pin-compatible platforms
Last commit 08 Apr 2019 by  Mbed
Mbed
Where Next
Follow the guide to creating your own programs using the online compiler
Technical Reference
Power
- USB powered or 4.5v - 9v on Vin pin
- Current (active): < 250mA
- Current (sleep): < 20mA
- 3.3v regulated output on VOUT to power peripherals
- 5.0v from USB available on VU (only available when USB is connected!)
- Current limited to 500mA
- Digital IO pins are 3.3v, 4mA each, 400mA max total
Schematics
Data Sheets
Interface Firmware
Troubleshooting
Troubleshooting
Make sure you save the file to the mbed Microcontroller!
- You can use your computer's file explorer to to check what is on the Microcontroller, as you would for a normal USB Disk
- If the Status LED did not flash when saving to the Microcontroller, or after resetting the first time, you probably saved it elsewhere!
- Some browsers default to saving files to your "Desktop", so this should be changed; see Choose-where-to-save-files-FAQ
- Some Linux or old Mac PCs don't write data until you "Eject" the drive; see Mounting-with-sync
Don't try and "Open" or "Run" the program files. Always "Save" them to the Microcontroller.
- Some applications (e.g. VLC Media Player) recognise the .bin extension; ignore them!
Make sure you set it running!
- Remember to reset the Microcontroller to start it running after you download a new program
- If the binary downloads to the micro, but nothing happens, make sure you chose the correct board binary
When you unplug the Microcontroller, you may get a "Device Removal" error message; don't worry!
- You can ignore this, but you can also use "Eject" (Mac) or "Safely Remove Hardware" (Windows) to avoid this if you want
If you have any problems, or think this tutorial could be improved, please tell us in the Forum!
You need to log in to post a discussion