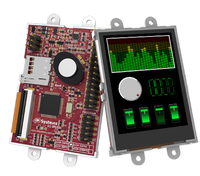
4D Systems 2.4" Resistive Touchscreen with Serial Interface
Touchscreen by 4D Systems with the Picaso graphics processor.
Hello World
Import programuLCD_4D_24PTU Drawing Program
Very basic test program for Picaso Serial library.
Library
Import libraryuLCD_4D_Picaso
Driver for 4D Systems LCD screen with Picaso processor. Ported from 4D Systems Picaso Serial Linux Library
Datasheet
http://www.4dsystems.com.au/productpages/uLCD-24PTU/downloads/uLCD-24PTU_datasheet_R_1_7.pdfNotes
This component page introduces the mbed driver for the uLCD-24PTU resistive touchscreen display module from 4D Systems. The μLCD-24PTU can be used for many applications that require a front end smart graphics interface. The PICASO Graphics processor is embedded inside the display and is driven by Extensible Virtual Engine (EVE). The μLCD-24PTU has a 2.4”, 240x320 LCD Screen, audio amplifier and speaker, micro-SD card connector, and lithium polymer (LiPo) battery support, along with a group of general purpose input/output pins (GPIO's), including I2C and serial communications. The TFT screen has Integrated 4-Wire Resistive Touch Panel. More on resistive touchscreen.
The communication between the LCD screen and the mbed is established through a serial interface.
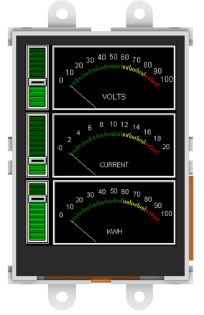
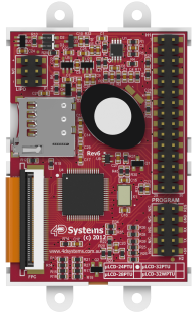
Front and back of μLCD-24PTU display. The data sheet for uLCD-24PTU can be found here.
Example Setup (schematic)
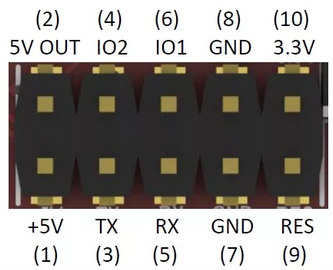
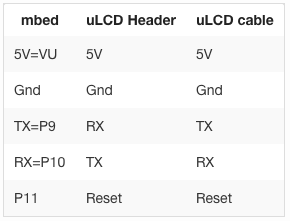
The hookup procedures of uLCD-24PTU is the same as uLCD-144-G2. The following is the pin map for wire up between the screen and mbed. More information can be found at uLCD-144-G2.
Interactive Touch Screen Demo
Using a set of Touch Screen Commands we can set detection region, read the mode of touch motion, and read the x & y coordinates of a user touch. Developers could add desired functionality using those return values from the commands. The following program demos a simplified touch screen drawing application. The application enables a user to graph with a single color using any resistive material (finger nail, plastic stick etc.). A button in the top-left corner toggles between pencil and eraser modes. A clear-screen button is in the top-right corner of display. To improve the graphing granularity, developer can modify the baud rate setting using setbaudWait() command. Higher baud rate improves granularity, but at the same time introduces higher probabilities of errors.
To use other devices with this library, delete the existing MODSERIAL library and replace it with Erik Olieman's MODSERIAL library.
#include "mbed.h"
#include "uLCD_4D_Picaso.h"

/**
* Demo program for uLCD_4D_Picaso resistance touchscreen
* Simple Graphing Application on resistive touchscreen display
* @version 1.0
* @author Andrew McRae, Tianhao Li
*/
// three pins are: TX   RX  RESET
uLCD_4D_Picaso lcd(p28, p27, p30);
//FRDM-KL25Z
//uLCD_4D_Picaso lcd(PTA2,PTA1,PTD4);
//
int main() {
    wait(1);
    // change the baudrate to improve or decrease the latency and plotting quality
    lcd.setbaudWait(Picaso::BAUD_57600);
    lcd.touch_Set(0);
    lcd.txt_Opacity(Picaso::OPAQUE);
    lcd.gfx_RectangleFilled(200, 0, 230, 30, Picaso::WHITE);
    lcd.gfx_RectangleFilled(0, 0, 30, 30, Picaso::WHITE);
    lcd.txt_MoveCursor(1, 1);
    lcd.putCH('E');
    int status = 0;
    int x = 0;
    int y = 0;
    int eraserActive = 0;
    int prevX, prevY;
    while(1) {
        status = lcd.touch_Get(0);
        if (status)
        {
            x = lcd.touch_Get(1);
            y = lcd.touch_Get(2);
            if (status == 1 && x >= 200 && y <= 30) {
                // Clear screen
                // Redraw eraser and clear screen button.
                lcd.gfx_Cls();
                lcd.gfx_RectangleFilled(200, 0, 230, 30, Picaso::WHITE);
                lcd.gfx_RectangleFilled(0, 0, 30, 30, Picaso::WHITE);
                lcd.txt_MoveCursor(0, 0);
                lcd.putCH('E');
            } else if (status == 1 && x <= 40 && y <= 30) {
                  eraserActive = !eraserActive;
            } else {
                if (eraserActive) {
                    lcd.gfx_RectangleFilled(x - 10, y - 10, x + 10, y + 10, Picaso::BLACK);
                } else {
                    if (status == 1) {
                        prevX = x;
                        prevY = y;
                    }

                    // Moving, draw a continuous line until release event happen
                    lcd.gfx_Line(prevX, prevY, x, y, Picaso::WHITE);
                }
            }

            prevX = x;
            prevY = y;

        }
    }
}
Here is a video demo of the graphing application.

