Si4735 Digital AM/FM Radio Receiver
General Description
The Silicon Labs Si4735 is an IC that handles complete tuner functionality from antenna input to audio output. There are many programmable options available to the programmer, such as frequency, volume, and audio output method. The Si4735 is interfaced over one of three serial connections, 2-wire, 3-wire, and SPI.
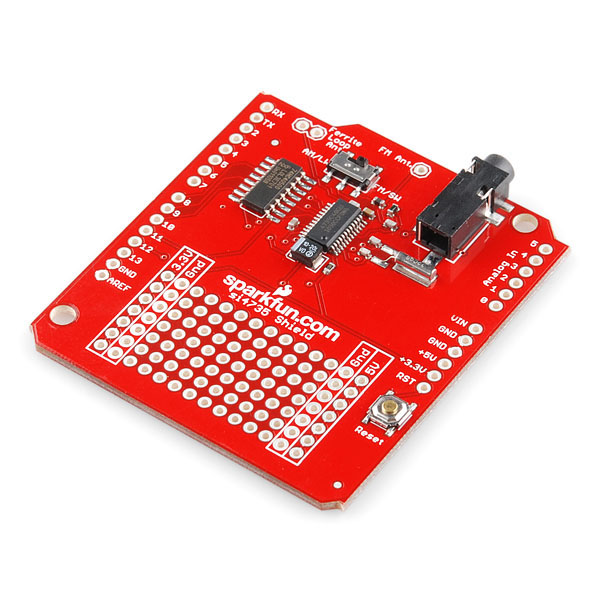
The Si4735 is newly available from sparkfun.com as an Arduino shield, but can be adapted for use in a standard breadboard.

Interfacing with mbed
The default interface for the Si4735 is over the 2-wire serial bus, which is I2C compliant. This interface was chosen because it is the default and simplifies the power-up sequence. The interface is described in detail in the programming guide.
Problem with Arduino Buffer
Be forewarned. This shield was designed for the Arduino, which runs it's IO pins at 5V logic. The Si4735 radio IC runs at 3.3V logic, so there is a level shifter buffer (74hc4050) on the data/input lines of the shield. This buffer is mostly unidirectional, and forces the shield to be used in SPI mode, which has a difficult start-up sequence. A majority of response signals from the radio IC over the I2C bus are not transmitted to the shield pins. With this buffer, no acknowledge signal was ever observed by the mbed, and no data was ever transmitted in response to read requests. However, the radio was able to send status responses back through the buffer following every write command. This oddity incorrectly led us to believe that responses to read requests were possible.
Solution for mbed
In order to fully communicate with the radio over I2C, the buffer must be removed from the shield, and the pins for the buffer's inputs and outputs must be shorted together (i.e. short the SDIO input to the SDIO output). This buffer is unnecessary for the mbed, because the mbed already runs at 3.3V logic. Refer to the Sparkfun schematic for more information about the way this buffer is connected.

Wiring Connections
The necessary wiring connections between the mbed and the Si4735 shield are listed in the table below. Remember that pull-up resistors are required for the I2C (sda, scl) lines.
| mbed Pin Label | mbed Pin | Si4735 Pin | Si4735 Pin Label |
|---|---|---|---|
| 3.3V Regulated Out | VOUT | +3.3V, 8, 12 | +3.3V, RAD_PWR, GPO1 |
| Ground | GND | 10, 2, GND (3), AREF | SEN, GPO2, Ground, AREF |
| sda | p28 | 11 | SDIO |
| scl | p27 | 13 | SCLK |
| Reset | p16 | 9 | RAD_RES |
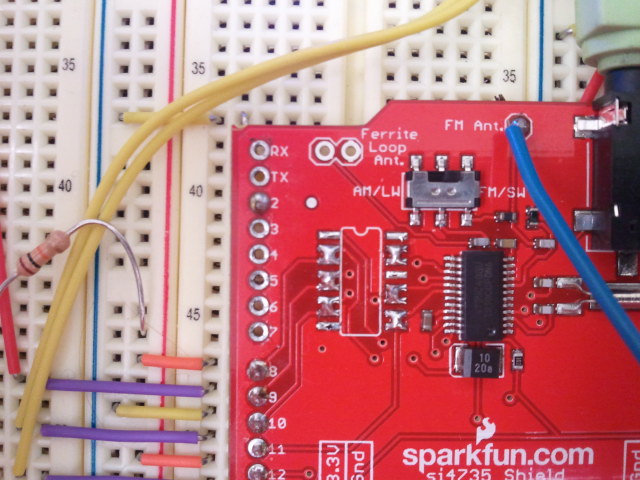
When soldering header pins to the Si4735 shield for a breadboard, it is recommended that only the pins on the bottom left (pins 8-13, GND, and AREF) be soldered. The pin holes on the shield are custom fitted for the Arduino, and the shield will not fit into a breadboard if all of the pins are soldered. Instead, you can solder flexible jumper wires to the 4 remaining required pins (2, +3.3V, GND (2)). If an FM antenna is not available, a single wire can be soldered to the FM antenna input. The radio will get good reception from strong radio stations in this configuration.
Sample Program
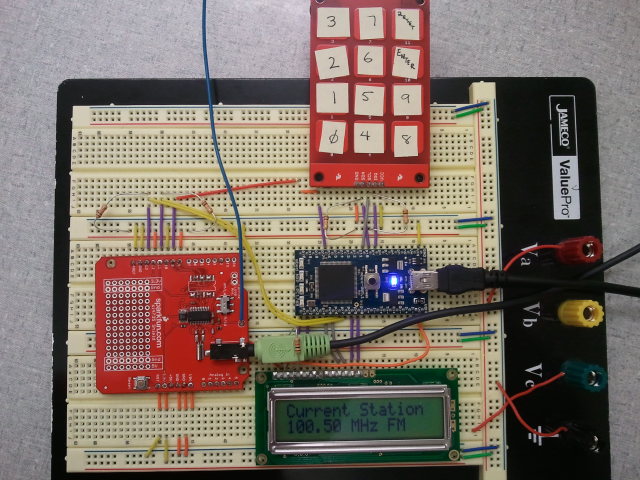
The following demo sets up the Si4735 as described above with the MPR121 Capacitive Touch keypad and 16x2 character LCD display. The keypad is used to dial in the station frequency in 10s of KHz (e.g. 9-9-7 for 99.70 MHz FM), and then sent to the radio by pressing 10. The LCD display displays the current station and any frequency entry over/underflows. Here are the connections necessary for the keypad and LCD.
| mbed Pin | Keypad Pin | mbed Pin | LCD Pin |
|---|---|---|---|
| 3.3V Out | VCC | 5V Out | VCC |
| GND | GND | GND | GND, RW |
| p8 | IRQ | GND via 1K-ohm | VO |
| p9 | SDA | p21 | RS |
| p10 | SCL | p22 | E |
| p25,26,29,30 | D4:D7 |

Video Demo
Code
Here is the library for the Si4735 radio interface.
Import programSi4735
Si4735 Radio Library
Below is the code for the sample program.
main.cpp
// Georgia Tech ECE 4180
// Design Project for mbed
// Brett Berry and Brett Wilson

#include "mbed.h"
#include "mpr121.h"
#include "TextLCD.h"
#include "Si4735.h"

// Create the interrupt receiver object on pin 8
InterruptIn interrupt(p8);
// Setup the i2c bus on pins 9 and 10
I2C i2c(p9, p10);
// Setup the Mpr121:
// constructor(i2c object, i2c address of the mpr121)
Mpr121 mpr121(&i2c, Mpr121::ADD_VSS);

// constructor for the TextLCD display
TextLCD lcd(p21, p22, p25, p26, p29, p30); // rs, e, d4-d7

// constructor for the Si4735 AM/FM radio
// Si4735(PinName sda, PinName scl, PinName RST_)
Si4735 radio(p28, p27, p16);

DigitalOut led(LED1);
DigitalOut led2(LED2);

// Initiallize USB serial connection for debugging
Serial pc(USBTX, USBRX); // tx, rx

// Initialize variables
int station = 0; // stores the calculation for the stn freq being entered
int next_stn = 0; // buffer for the station freq to be sent to the radio
bool stn_ready = false; // flag raised to send frequency to radio
bool rst_lcd = false; // flag to reset the LCD display and station entry variables
bool test_flag = false; // test flag for other functions not used in main function
int count = 0; // counter for the number of keys pressed to prevent overflow
float temp = 997; // temporary float for printing frequency to LCD display
int response; // store the response from the getFrequency method

// Key hit/release interrupt routine
// Warning: Keep code in interrupt to a minimum to prevent crash
void fallInterrupt() {
  int key_code=0;
  int i=0;
  int value = mpr121.read(0x00);
  value += mpr121.read(0x01)<<8;
  // LED demo mod
  // puts key number out to LEDs for demo
  // scans mpr121 register bits in order to determine which key was pressed
  for (i=0; i<12; i++) {
    if (((value>>i)&0x01)==1) {
        key_code = i + 1; // Add one to key_code to offset key release signal (0)
    }
  }
  if ((key_code < 11) && (key_code>0)) { // add number to station frequency
    station = 10*station + key_code - 1;
    count++;
  }
  else if ((key_code == 11) && (count > 2)) { // enter station and send to radio
    // raise station ready flag and copy station into temporary variable
    next_stn = 10 * station;
    stn_ready = true;
    station = 0;
  }
  else if (key_code == 12){ // reset the lcd display and station calculation
    // raise reset LCD flag
    led2 = !led2;
    rst_lcd = true;
    test_flag = true;
  }
}

int main() {
    // define the interupt routine for the keypad
    interrupt.fall(&fallInterrupt);
    interrupt.mode(PullUp);

    led = 1;
    led2 = 0;

    // Display the frequency info for the default frequency
    // 99.70 MHz chosen as default since it's the strongest local frequency
    lcd.cls();
    lcd.printf("Current Station\n99.70 MHz FM\n");

    // Power up the radio and initialize to default frequency
    radio.begin(FM);

    while(1) {

        if (stn_ready) { // Next station ready to be sent to radio
            if ((next_stn >= 8750) && (next_stn <= 10790)) { // Screen for valid FM frequencies
                radio.tuneFrequency(next_stn); // Send station to radio
                // tuneFrequency command sends frequency in 10s of KHz
                temp = float(next_stn)/100.0; // Calculate freq float in MHz
                lcd.cls(); // clear LCD screen
                // display new station frequency information on LCD
                lcd.printf("Current Station\n%3.2f MHz FM\n", temp);
                stn_ready = false; // reset stn_ready flag
                count = 0; // reset key press count
            }
            else if (next_stn < 8750) { // Frequency lower than minimum frequency detected
                lcd.cls();
                lcd.printf("Station entry\nunderflow->reset"); // display error message
                count = 0;
                station = 0;
                stn_ready = false;
            }
            else { // Frequency higher than maximum frequency detected
                lcd.cls();
                lcd.printf("Station entry\noverflow->reset\n"); // display error message
                count = 0;
                station = 0;
                stn_ready = false;
            }
        }
        if (count > 4) { // too many keys pressed on the keypad
            lcd.cls();
            lcd.printf("Station entry\noverflow->reset\n"); // display error message
            count = 0;
            station = 0;
        }
        if (rst_lcd) { // flag for resetting LCD
            lcd.cls();
            // Display last valid station entry
            lcd.printf("Current Station\n%3.2f MHz FM\n", temp);
            count = 0;
            station = 0;
            rst_lcd = false;
        }
        if (test_flag) { // flag for testing other methods
            response = radio.getFrequency();
            pc.printf("Current Frequency: %d\n\r", response);
            //radio.seekUp();
            //radio.seekDown();
            //radio.mute();
            //radio.unmute();
            test_flag = false;
        }
        led = !led;
        wait(.2);
    }
}
2 comments on Si4735 Digital AM/FM Radio Receiver:
Please log in to post comments.

Hi Brett,
I have a quick question. I've noticed most cell phones with built-in FM radios require you to plug in headphones, which acts as an antenna. Do you how this can be done using the Si4735? Connect the antenna directly to GND (can you quickly experiment with this please? It can't hurt)? Maybe isolate the headphone's ground wire from the ground somehow?
Thanks -Frank