Mbed Connect Cloud
Overview
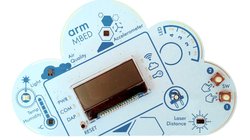
The Mbed Connect Cloud platform is designed for use with Arm Mbed and is a complete starter kit featuring the u-blox ODIN-W262 MCU and multiple sensors that allows quick prototyping of a variety of applications for Internet of Things. The support for dual‑band Wi‑Fi enables easy connectivity for a wide range of applications. The platform boasts 5 different environmental sensors on board and multiple user controlled GPIOs which are all supported and available using Arm Mbed.
Windows Serial Driver
The Mbed serial driver must be installed on windows PCs before the USB debug serial port from the Mbed Connect Cloud can be used.
Features
MCU
- ODIN‑W262 with onboard antenna Wi-Fi
- Integrated MCU, STM STM32F439ZIY6
- Arm Cortex-M4 with FPU
- 168 MHz
- 2 MB flash
- 256 kB RAM
Peripherals
- C12832A1Z - 128 x 32 LCD
- RGB LED
- User configurable LED x 7
- User configurable switch x 2
- CCS811 - Indoor air quality sensor
- TSL2561 - Ambient light sensor
- SHT31-DIS-B - Temperature and humidity sensor
- MMA7660FC - 3-Axis accelerometer sensor
- VL53L0X - Time of flight laser distance sensor
- MX25R3235FM1IH0 - SPI flash
Pin Map


Example programs
Import programmbed-cloud-connect-sensor-temp-hum
Sets up LCD and prints sensor data value of SHT31-D temperature/humidity sensor to LCD
Last commit 11 Jan 2018 by  Andrea Corrado
Import programmbed-cloud-connect-sensor-air-quality
Sets up LCD and prints sensor data value of CCS811 Indoor Air Quality sensor to LCD
Last commit 11 Jan 2018 by Andrea Corrado
Import programmbed-cloud-connect-sensor-light
Sets up LCD and prints sensor data value of TSL2561 light sensor to LCD
Last commit 11 Jan 2018 by Andrea Corrado
Import programmbed-cloud-connect-sensor-accelerometer
Sets up LCD and prints sensor data value of MMA7660 accelerometer sensor to LCD
Last commit 11 Jan 2018 by Andrea Corrado
Import programmbed-cloud-connect-sensor-laser-distance
Sets up LCD and prints sensor data value of VL53L0X laser distance sensor to LCD
Last commit 11 Jan 2018 by Andrea Corrado
Getting Started with Mbed
1. Connect your microcontroller to a PC
Use the USB lead to connect your Mbed to a PC. The status light will come on, indicating it has power. After a few seconds of activity, the PC will recognize the Mbed Microcontroller as a standard USB drive.
 |  |
| Windows XP example | Mac OS X example |
2. Click the MBED.HTM link to get logged in
Go to the new USB Drive, and click MBED.HTM to open it in a web browser.
If you do not have an Mbed account, choose "Signup", and create your Mbed Account. Otherwise, log in with your normal username and password.
This will give you access to the website, tools, libraries and documentation.
PC Configuration
Your Mbed Microcontroller can appear on your computer as a serial port. On Mac and Linux, this will happen by default. For Windows, you need to install a driver:
Windows
See Windows-serial-configuration for full details about setting up Windows for serial communication with your Mbed Microcontroller
From a host PC to communicate with Mbed you will need a terminal application. This allows the Mbed Microcontroller to print to your PC screen, and for you to send characters back to your Mbed.
- Terminals - Using Terminal applications to communicate between the Host PC and the Mbed Micrcontroller
Some terminal programs (e.g. TeraTerm) list the available serial ports by name. However, if you do need to know the identity of the serial port so that you can attach a terminal or an application to it:
| Windows | Mac | Linux | ||||
| Find the identity of the COM port by opening ''Device Manager''. To do this navigate ''Start -> Control Panel -> System -> Hardware -> Device Manager''. | To find the device name under Mac OS X, use the command ''ls /dev/tty.usbmodem*'' | To find the device name under Linux, use the command ''ls /dev/ttyACM*'' | ||||
 |  |  |
On both Mac and Linux PCs, the port with the higher number will be the USB serial debug port. For example, if you have Linux and get ports /dev/ttyACM0 and /dev/ttyACM1, ttyACM1 will be the debug port and ttyACM0 the AT command/secondary port.
Downloading A program
1. Save a program binary to the Platform
Download the appropriate "Blinky" binary:
- Mbed Connect Cloud Blinky: Download
Save the program binary file to your Mbed Microcontroller Disk, just like you would with a normal USB disk. The PWR LED will flash as the PC writes the file to the Microcontroller disk. The file is now consumed.
2. Press the Reset Button
When the Reset Button in pressed, the microcontroller will be reset and the last programmed application will begin to run.
3. Blinky!
The Microcontroller is now running the program; flashing LED_GREEN forever! If you reset the Microcontroller, or disconnect and reconnect the power, the program will simply restart.
DAPLink Interface Firmware Upgrade
The Mbed board includes the DAPLink interface. Firmware for the board will be included in DAPLink releases. To update the interface firmware on your board, follow these steps:
- Hold 'RESET' button down
- Plug the Mbed into PC via micro USB
- Observe drive "CRP 'DISABLD'
- Open the drive, and delete the file called "firmware.bin"
- Download the required firmware
- Copy the .bin file onto the "CRP DISABLD" drive.
- On Windows, replace firmware.bin with the above firmware
- On Linux/Mac, use command: dd if={new_firmware.bin} of={firmware.bin} conv=notrunc
- Unplug your board, and plug it back in
- It should now appear as a disk drive called DAPLINK
You can re-program your Mbed Board at any time by plugging it in with the button held down. This will cause it to appear as the "CRP DISABLD" drive, at which point you can follow the steps above.
Technical Resources
| ODIN-W2 Series Data Sheet | Technical Data Sheet |
| Board Schematic | Mbed Connect Cloud Schematic |
| Hardware Production files | Eagle Files and GERBERS for production. |
You need to log in to post a discussion
Discussion topics
| Topic | Replies | Last post |
|---|---|---|
| mbed, OS how to upgrade or downgrade Mbed OS with mbed compiler and as well as CLI | 0 |
29 Jan 2018
by
 javedmiya deshmukh
|
Questions
To compile a program for this board using Mbed CLI, use mbed_connect_odin as the target name.
Board Partner
Arm
Arm Holdings is the world's leading semiconductor intellectual property (IP) supplier and as such is at the heart of the development of digital electronic products. Headquartered in Cambridge, UK, Arm has offices around the world, including design centers in Taiwan, France, India, Sweden, and the US.
Mbed OS support
- Mbed OS 5.15
Example programs