mbed + Pololu 3pi = fun (part 2)

As the mbed project is all about "Rapid Prototyping", we tend to give ourselves crazy deadlines for any demos we do. This is just to make sure we practice what we preach! I posted about our experiments with an mbed, RN42 Bluetooth module and Pololu 3pi robot, so with that working it was all about turning it in to an event for ARM Tech Con; "mbed Robot Racing!" Here is what we did next to have it ready for the show....
The first step was to design a PCB for the m3pi and a RN42 breakout, and get that sent out for manufacture quickly. With only a couple of weeks to do all this, knowing your critical paths is important! We then sourced the parts, and when the boards were back assembled the PCBs by hand.
Meanwhile, we built some libraries to make the m3pi easy to use, and put together an Android App that could control the m3pi using those libraries over bluetooth. We also put together a custom website to automatically capture lap times, and all the graphics, booth plans and logistics needed to hold the event. Everything was in development in parallel, which made things rather interesting!
First up is the really great work that Ioannis Kedros has done on the hardware and assembly. We've gone from the initial experiments undertake on the m3pi Development page, so a working example of that design. My personal favorite is the NiMH charging circuit which means our m3pis are fitted with NiMH batteries which never have to be removed, and are safely charged from a low cost DC wall adaptor. Just for ease of use in development this has been a great feature. (Big thanks to Ioannis for hand soldering all the tiny SMD charge controller IC's!)
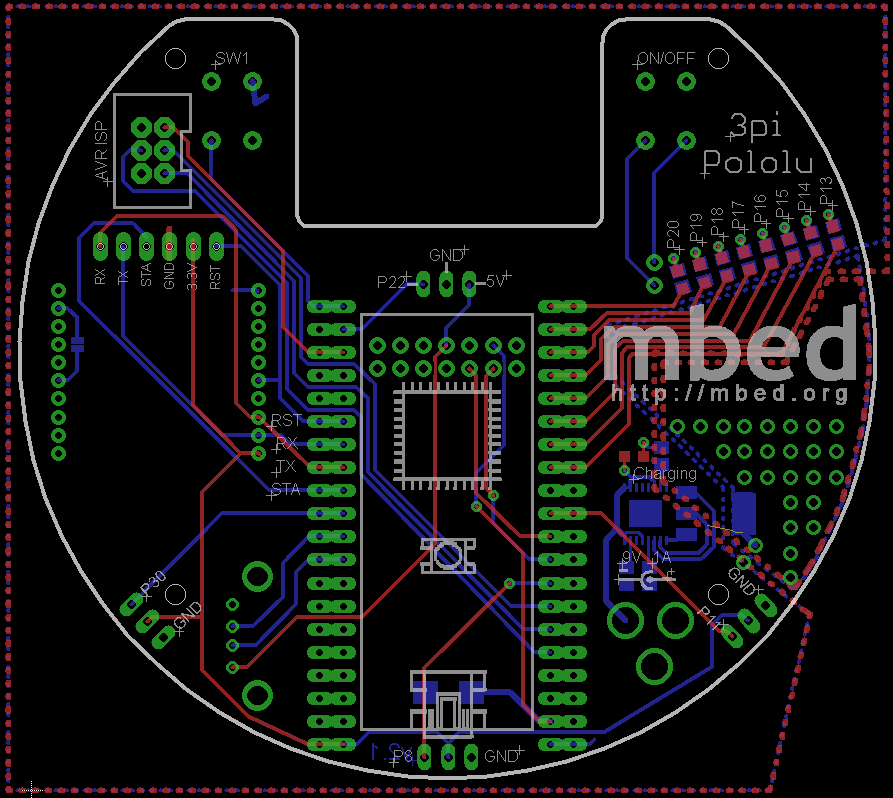
If you want to look at the m3pi schematics or download the m3pi Eagle project, they are all available on the m3pi page, along with the schematics and Eagle project for the RN42 breakout.
Here is the finished "m3pi" hardware:

The next up was the firmware, and the m3pi library class was born. With such minimal hardware connection, the interface was straight forward, just a serial port and a reset line. With the hardware being fixed by the PCB design, it could be argued that no configuration is needed at all, and that might be the next logical step. For the class itself, the idea of basic motor control was expended with other methods for forward, backward, left and right - hand shortcuts. When the 3pi is in slave mode, its LCD is accessible, so the m3pi class was derived from Stream, meaning that an implementation of putc for the LCD would give us printf for free. With a growing number of methods, and Michael Walkers introduction of RPC the m3pi class quickly became a great interface to the Pololu 3pi.
You can see the published library for full details of the class.
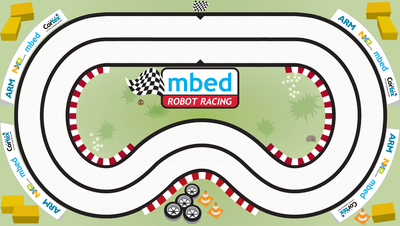
Meanwhile, we put together a track design. Remember that behind all this hardware and software effort was the idea to run a racing event! We named it mbed Robot Racing and decided it need a logo:
![]()
Here is the resulting track; it is actually 8'x4' (2.4m x 1.2m)!
So we now have a robot and a lovely track to drive the m3pi around, but there are still bits missing. The idea of the event is to race a time trial, the fastest laps wins. You can drive interactively by an Android Tablet, program a fixed path with LOGO style commands, or program a line following algorithm; so we needed the Android App and examples of LOGO style commands and a line follower.
The android app was put together by Phil Day. Initially, there were problems with the Bluetooth connection dropping on the test mobile phone we were using, but when we switched to using an Archos Internet Tablet, all Bluetooth problems went away. The final aspect with this one was to get it to feel right, and after just two days locked in a darkened room, Phil emerged with a nicely working app. It even had the logo in the background. Thanks Phil!
The last hurdle was the time trial. This needed some way of timing. We decided that beam breaking was the way to go as we had a fancy Balluff sensor to hand, but how to keep and display the time?
This is where the combined imagination of Simon and Dan really took over, and this is the scheme that emerged. The beam breaker hooks up to the mbed, which is also running some USB HID code to make it look like a USB keyboard when plugged into a PC. Meanwhile, a web browser is open on the PC, and is running some JavaScript that is listening for the characters send by the "USB keyboard" to know when to start/stop/reset a rather nice timer display running in the browser. Simple huh? Well, thats not the end of the story. At the end of the lap, a flash object which has access to the webcam is able to take a picture. The Javascript now has the time of the lap and photo courtesy of the webcam. Add the name of the contestant by good old fashioned "typing it in" and the contestants name, lap time and photo is now in the database, and in the leader board in the appropriate position. Simple!
With all that in place, now it is time to get on a plane to ARM Techcon and get it setup!
Over the coming weeks, we'll be making sure that all the resources needed to build the different bits of mbed Robot Racing are available in the cookbook, so if anyone wants run their own please be sure to let us know!
And here is the little video we put together for when we announce the event...
If you are going to be at ARM Techcon, make sure you drop by!
You need to log in to post a comment